Встановлення часу
Use the time setting knob located on the back of the clock to adjust the hour and minute hands. Rotate the knob clockwise or counter-clockwise until the correct time is displayed.
Model: B09JKWDFTT | Brand: ROTH
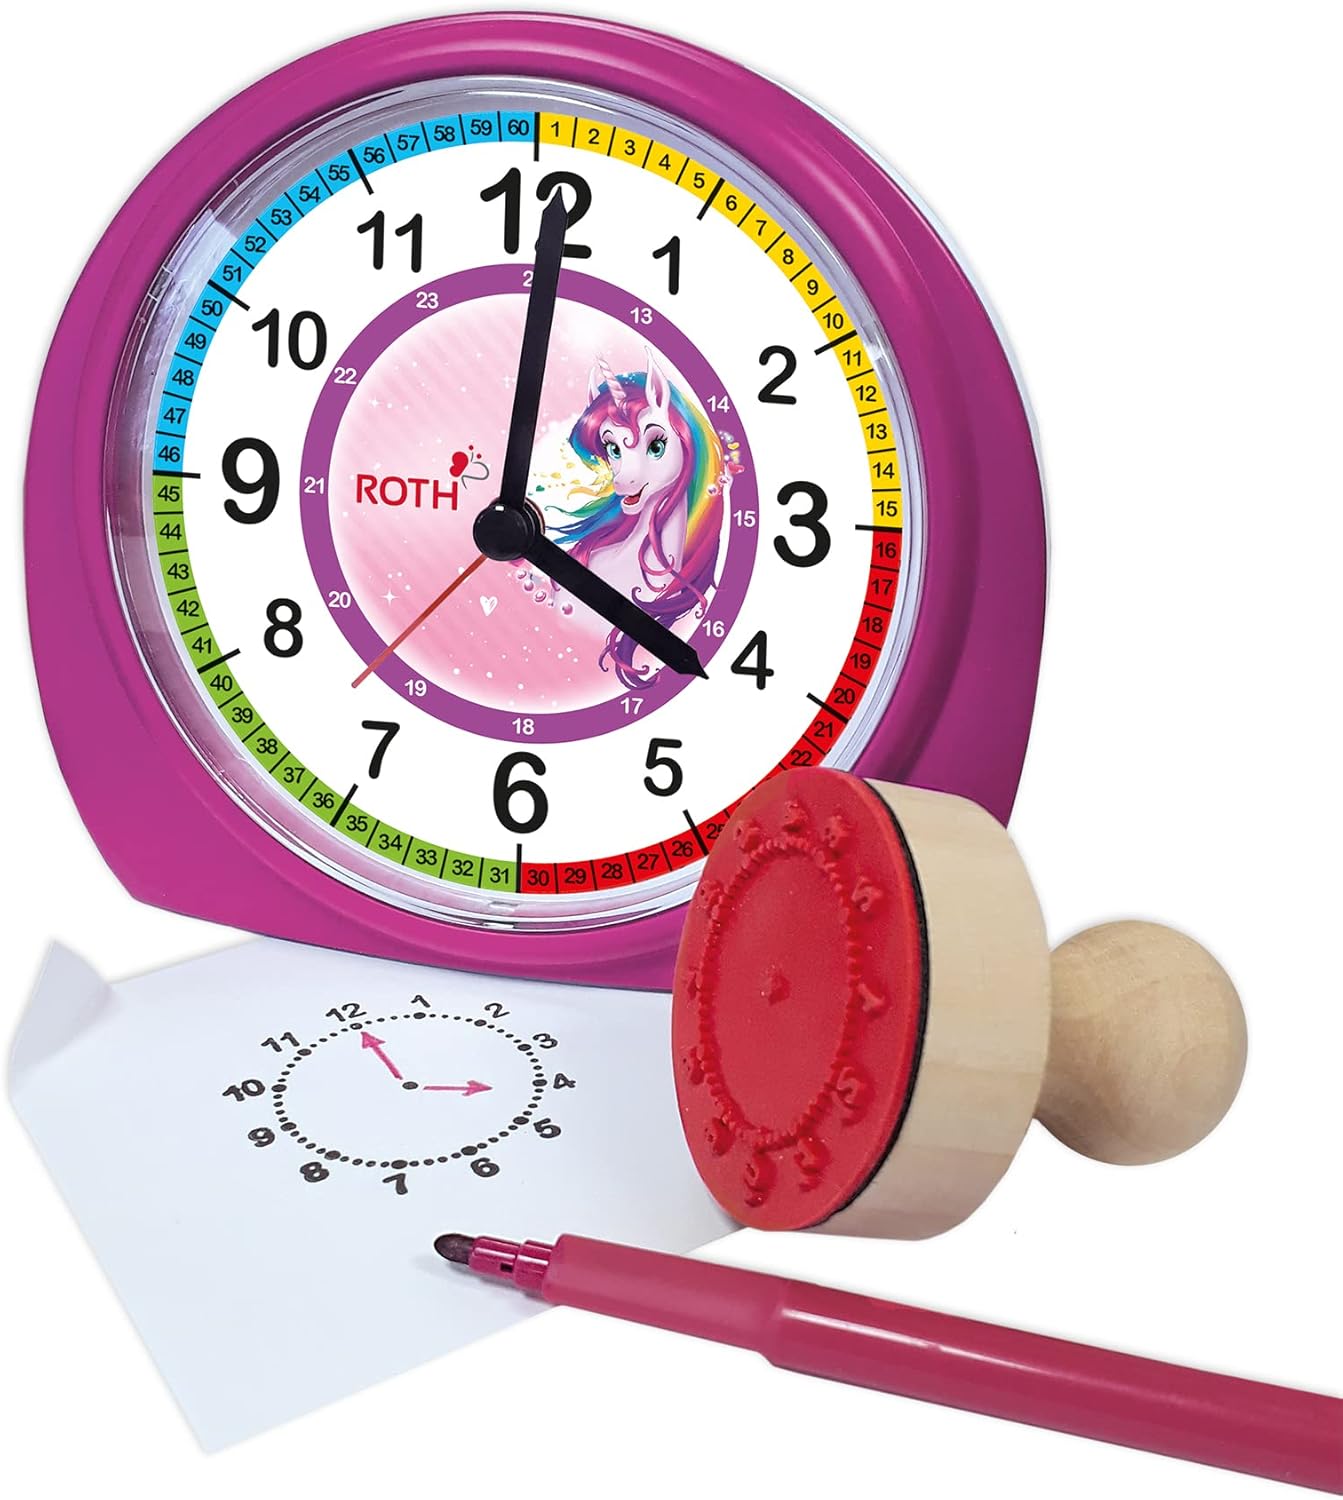
This manual provides comprehensive instructions for the ROTH Educational Alarm Clock and Stamp Set. Designed to assist children in learning to tell time, this set includes an alarm clock with various features and a complementary stamp set for practice. Please read this manual thoroughly before use to ensure proper operation and safety.

ПОПЕРЕДЖЕННЯ: НЕБЕЗПЕКА ЗАДУХИ – Дрібні деталі. Не підходить для дітей віком до 3 років.
Будь ласка, перевірте упаковку, щоб переконатися в наявності всіх елементів:

The alarm clock requires 1x AA battery (not included).

Use the time setting knob located on the back of the clock to adjust the hour and minute hands. Rotate the knob clockwise or counter-clockwise until the correct time is displayed.
Use the alarm setting knob, also on the back, to set the desired alarm time. The alarm will sound a beep when the set time is reached. To activate or deactivate the alarm, use the ON/OFF switch located on the side of the clock.

When the alarm sounds, press the large button on the top of the clock to activate the snooze function. The alarm will temporarily stop and sound again after a short interval.
The clock features a backlight for visibility in low-light conditions. Press the backlight button, typically located on the top or side, to illuminate the clock face.
The included wooden stamp and ink pad are designed to help children practice telling time. The stamp creates a clock face outline on paper, allowing children to draw in the hands for various times.

| проблема | Можлива причина | Рішення |
|---|---|---|
| Годинник не працює | Батарейка розряджена або неправильно вставлена. | Replace battery (1x AA) or check polarity. |
| Сигналізація не звучить | Сигналізація не активована або налаштована неправильно. | Ensure alarm ON/OFF switch is in the 'ON' position and alarm time is set correctly. |
| Не працює підсвічування | Battery low or backlight button not pressed. | Replace battery or press the backlight button firmly. |
| Stamp not making clear impression | Ink pad is dry or stamp not evenly inked. | Ensure ink pad is moist; re-ink stamp evenly. Replace ink pad if necessary. |
| Особливість | Деталь |
|---|---|
| Розміри продукту (ДxШxВ) | 20 х 21.1 х 7.3 см |
| Вага товару | 350 грамів |
| Особливості | Snooze, Alarm, Backlight |
| Бренд | ROTH |
| Віковий діапазон (опис) | діти |
| матеріал | Wood (Stamp), Plastic (Clock) |
| Колір | Рожевий |
| Джерело живлення | Працює від батареї |
| Тип батареї | 1x AA (не входить в комплект) |
This product comes with a standard manufacturer's warranty. For specific warranty details, including duration and coverage, please refer to the product packaging or contact ROTH customer support directly. If you encounter any issues or have questions not covered in this manual, please reach out to the retailer or manufacturer for assistance.
For further support, please visit the official ROTH webсайту або зв’яжіться зі своїм відділом обслуговування клієнтів.
 |
Короткий посібник з встановлення та налаштування клапанного модуля Roth Touchline SL Concise guide for installing and setting up the Roth Touchline SL Valve module for heating systems, featuring 'Heat on demand' mode. Includes connection details and interface setup. |
 |
Керівництво з встановлення термостата Roth Touchline® SL Вичерпний посібник з встановлення кімнатного термостата та системи теплої підлоги Roth Touchline® SL. Дізнайтеся, як підключити, зареєструвати та налаштувати термостат до датчиків температури підлоги та контролерів. |
 |
Керівництво з встановлення термостата Roth Touchline SL Вичерпний посібник з встановлення та налаштування термостатів Roth Touchline SL та SL Plus. Охоплює настінний монтаж, підключення проводки, підключення датчиків, сполучення з контролерами, налаштування датчика температури підлоги та розширені функції. |
 |
Керівництво з монтажу трубопровідної системи Roth MultiPex® PEX Цей посібник з монтажу містить детальні інструкції щодо трубопровідних систем Roth MultiPex® PEX. Він охоплює такі важливі кроки, як різання, згинання та кріплення труб, а також попередження щодо використання розчинників. Документ також містить вичерпні технічні дані та список сумісних аксесуарів, представлених англійською мовою для ясності. Підходить для систем питного водопостачання та центрального опалення. |
 |
Керівництво з монтажу Roth MultiPex®: Труби та фітинги Вичерпний посібник з монтажу трубних систем Roth MultiPex®, що охоплює різання, гнуття, кріплення, складання, технічні характеристики та аксесуари. Дізнайтеся, як безпечно та ефективно встановлювати сантехнічні рішення Roth. |
 |
Керівництво з встановлення та експлуатації кімнатного термостата Roth Touchline® PL Цей посібник містить вичерпні інструкції щодо встановлення та експлуатації бездротового кімнатного термостата Roth Touchline® PL. Він охоплює налаштування, сполучення з контролером, а також детальні пояснення функцій і налаштувань термостата. |