DrayTek Router Basic Setup

Технічні характеристики
- модель: Маршрутизатор Vigor
- Інтерфейс: LAN, ISDN, Wireless LAN
- Протоколи: IEEE 802.11b, IEEE 802.11g
- Безпека: WEP, WPA/PSK, 802.1x
Інструкція з використання продукту
Changing the Administrator Password:
To enhance security, follow these steps:
- Enter the current administrator password or leave blank if setting for the first time.
- Enter and confirm the new administrator password.
- Натисніть OK, щоб зберегти зміни.
Network Address Translation (NAT) and IP Routing Configuration:
Configure private and public IP addresses along with subnet masks as needed.
RIP Protocol Control:
Enable or disable RIP packet exchange on the LAN interface and set subnets accordingly.
Налаштування сервера DHCP:
Set up Dynamic Host Configuration Protocol to automatically assign IP settings to DHCP clients.
Configuring ISDN Interface (VigorX/i and VigorW/Gi):
For users of compatible models, configure ISDN interface settings.
Configuring Wireless LAN Interface (VigorG):
For wireless connectivity:
- Set Frequency Domain and MAC address.
- Configure General Settings, including SSID, wireless channel, and encryption mode.
- Select operation mode (Mixed, 11g-only, or 11b-only).
- Choose encryption type for security – Disable, WEP Only, WEP/802.1x Only, or WEP or WPA/PSK.
вступ
In the Basic Setup group, you can change the administrator password, IP configuration of the LAN interface, and also local DHCP server, ISDN, and Wireless LAN configuration.

Конфігурація
Зміна пароля адміністратора
For security reasons, we strongly recommend that you set an administrator password for the router. On first setup, the router requires no password. If you don’t set a password, the router is open, and it could be logged into, and settings could be changed by any user from the local network or the Internet.
Click Administrator Password Setup, and the following screen will open.
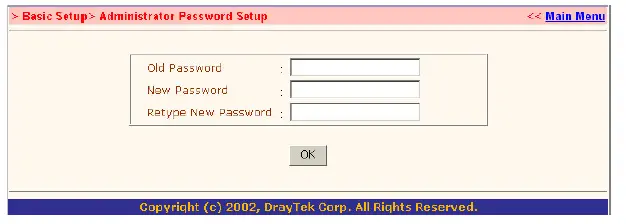
Старий пароль: Enter a current administrator password. If this is the first time setting a password, leave this field blank.
Новий пароль: Enter a new administrator password.
Retype New Password: Type the new password again for confirmation.
Натисніть OK.
Configuring LAN IP Address
There are two sets of IP address settings for the LAN interface. The 1st IP address/netmask is for private users or NAT users, and the 2nd IP address/netmask is for public users. To allow public users requires you to have subscribed to a globally reachable subnet from your ISP.
наприкладample, for some DSL accounts, the ISP will assign a few public IP addresses for your local network usage. You could use one IP address for your router, and the 2nd IP address/netmask should be configured with the public IP address. Other local PCs should set the router IP address as the default gateway. When the DSL connection to the ISP has been established, each local PC will be directly routed to the Internet. Also, you could use the 1st IP address/netmask to connect to other private users (PCs). These IP addresses of the users will be translated to the 2nd IP address by the router and sent out via the DSL connection.
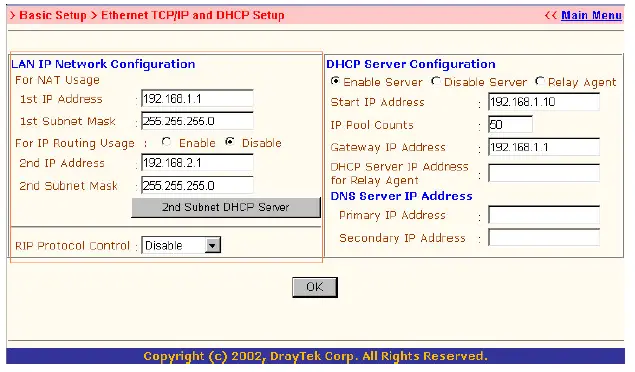
- For NAT Usage: (Default: Always Enable)
- 1st IP Address: Private IP address for connecting to a local private network (Default: 192.168.1.1).
- 1st Subnet Mask: Netmask for the local private network (Default: 255.255.255.0/24). For IP Routing Usage: (Default: Disable)
- Enable: Enables the 2nd IP address settings.
- Disable: Disables the 2nd IP address settings.
- 2nd IP Address: Sets a public IP address.
- 2nd Subnet Mask: Sets a netmask for the public IP address.
- RIP Protocol Control:
- Disable: Disables RIP packet exchange on the LAN interface.
- 1st Subnet: Sets the 1st subnet to exchange RIP packets with neighbor routers connected to the LAN interface.
- 2nd Subnet: Sets the 2nd subnet to exchange RIP packets with neighbor routers connected to the LAN interface.
- 2nd Subnet DHCP Server: This is for the 2nd subnet of the Vigor Router.

- Start IP Address: Sets the start IP address of the IP address pool.
- IP Pool Counts: Sets the number of IPs in the IP address pool.
- MAC Address: To type the specific MAC Address that could be added to, removed from, or edited in the access list above.
- ADD: To add a MAC address to the list.
- Remove: To remove the selected MAC address from the list.
- Edit: To edit the selected MAC address on the list.
- Cancel: To cancel the MAC address access control setup.
- Close: To close this window.
- Clear All: To clean all of the configured MAC addresses on the list.
- OK: To save the access control list.
Налаштування сервера DHCP
DHCP stands for Dynamic Host Configuration Protocol. It can automatically dispatch related IP settings to any local user configured as a DHCP client.

- Enable Server: Assign IP to LAN PC automatically.
- Disable Server: Assign the IP of the LAN PC manually.
- Relay Agent: Allow PCs on LAN to request IP from other DHCP server.
- Start IP Address: Sets the start IP address of the IP address pool.
- IP Pool Counts: Sets the number of IPs in the IP address pool.
- Gateway IP Address: Sets the gateway IP address for the DHCP server. Usually, it should be the same as the 1st IP address when the router works as a default gateway.
- DNS Server IP Address: (Default: None).
DNS stands for Domain Name System. Every Internet host must have a unique IP address; they also may have a human-friendly, easy-to-remember name, such as www.yahoo.com. The DNS server converts the user-friendly name into its equivalent IP address. - Primary IP Address: Sets the IP address of the primary DNS server.
- Secondary IP Address: Sets the IP address of the secondary DNS server.
Примітка: If both the Primary IP and Secondary IP Address fields are left blank, the router will assign its own IP address to local users as a DNS proxy server and maintain a DNS cache. If the IP address of a domain name is already in the DNS cache, the router will resolve the domain name immediately. Otherwise, the router forwards the DNS query packet to the external DNS server by establishing a WAN (e.g., DSL/Cable) connection.
Configuring the ISDN Interface (VigorX/i and VigorW/Gi only)
This setup page is present in the VigorX/i and VigorW/Gi.

- ISDN Port: Click Enable to turn on the ISDN port, Disable to turn off.
- Country Code: For proper operation on your local ISDN network, you should set the correct country code.
- Own Number: Sets your ISDN number. If the field has been configured, every outgoing call will carry the number to the called user.
- MSN Numbers for the Router: MSN Numbers mean that the router is able to accept number-matched incoming calls. In addition, the MSN service should be supported by a local ISDN network provider. The router provides three MSN number fields. Note that MSN services must be subscribed to from your local telecom.
- By default, the MSN function is disabled. Leave the MSN number fields blank, under which all incoming calls will be accepted without number-matching.
Configuring the Wireless LAN Interface (VigorG)
The VigorG are equipped with a wireless LAN interface compliant with the 11Mbps IEEE 802.11b and 54 Mbps IEEE 802.11 g protocols. The features of wireless LAN capability enable high mobility of several simultaneous users accessing all LAN facilities, just like on a wired LAN, as well as Internet and WAN access.

The Frequency Domain is set as Europe, and the MAC address will show as above. Click General Settings, and you can configure the SSID and wireless channel.

режим: In Mixed(11b+11g) mode, the radio can support both IEEE802.11b and IEEE802.11g protocols simultaneously. In 11g-only mode, the radio only supports the IEEE802.11g protocol. In 11b-only mode, the radio only supports the IEEE802.11b protocol.
- Scheduler: You can set a wireless device to work at some time interval only. There are 4 internals you can choose: schedule1, schedule2, schedule3, and schedule4. The default setting is always working. You can set the schedule under Advanced Setup >> Call Schedule Setup.
- SSID (Service Set Identification): You should set the SSID to the same as your notebookwireless card to allow the client PCs to access the network via the wireless LAN interface. The default SSID is “default”.
- Channel: To select a wireless channel for VigorG. The default channel is 6.
- Hide SSID: To chidethe SSID when the wireless clients are sniffing the radio.
Configuring the Security of Wireless LAN Interface (VigorG)
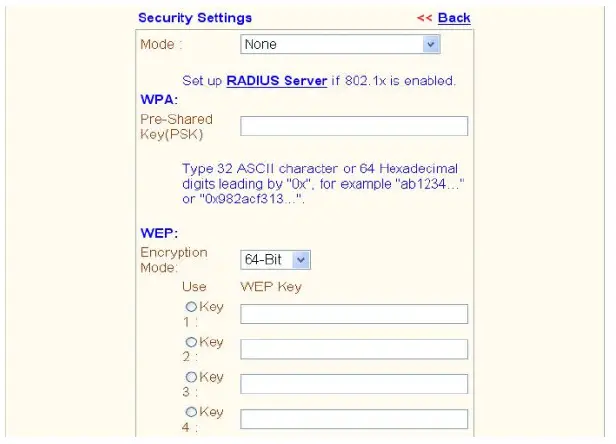
режим:
To improve the security and privacy of your wireless data packets, one of the following encryption features can be used.
- Disable: Turn off the encryption mechanism.
- WEP Only: Accepts only WEP clients, and the encryption key should be entered in WEP Key.
- WEP/802.1x Only: Accepts only WEP clients, and the encryption key is got dynamically through 802.1x.
- WEP or WPA/PSK: Accepts WEP and WPA clients simultaneously, and the encryption key should be entered in WEP Key and PSK, respectively.
- WEP/802.1x or WPA/802.1x: Accepts WEP and WPA clients simultaneously, and the encryption key is got dynamically through 802.1x.
- WPA/PSK Only: Accepts only WPA clients, and the encryption key should be entered in PSK.
- WPA/802.1x Only: Accepts only WPA clients, and the encryption key is got dynamically through 802.1x.
Примітка: You should also set the RADIUS Server if WEP/802.1x Only, WEP/802.1x, or WPA/ 802.1x or WPA/802.1x Only mode is selected.
WPA Encryption:
The WPA encrypts each frame transmitted from the radio using the pre-shared key (PSK) entered from this panel or a key obtained dynamically through 802.1x.
Pre-Shared Key (PSK): Either 32 ASCII characters or 64 Hexadecimal digits, leading 0 can be entered. For example “0123456789ABCD….” or “0x321253abcde…..”.
Шифрування WEP:
The WEP encrypts each frame transmitted from the radio using one of the keys entered from this panel. WEP encryption can be enabled by selecting 64 bits or 128 bits from pull down menu. There are 4 key sets that can be entered, and only one key can be selected. The key can be entereinby ASCII or Hexadecimal.
- Disable: Turns off the WEP encryption mechanism.
- WEP 64 Bit: For 664-bitWEP key, either 5 ASCII characters or 10 hexadecimal digit precededdg by 0,x can be entered. For example, ABCDE or 0x4142434445.
- WEP 128 Bit: For 128bits 13 ASCII characters or 26 hexadecimal digits, leading by 0x can be entered. For example, ABCDEFGHIJKLM or 0x4142434445464748494A4B4C4D.
Configuring the Access Control of Wireless LAN Interface (VigorG)
For additional security of wireless access, the Access Control allows you to restrict the network access rights by the wireless LAN MAC address of the client. Only the valid MAC address that has been configured can allow access to the wireless LAN interface.

- Enable Access Control: To check the Enable Access Control to enable the MAC Address access control feature.
- MAC Address: To type the specific MAC Address that could be added to, removed from, or edited in the access list above.
- ADD: To add a MAC address to the list.
- Remove: To remove the selected MAC address from the list.
- Edit: To edit the selected MAC address on the list.
- Cancel: To cancel the MAC address access control setup.
- Clear All: To clean all of the configured MAC addresses on the list.
- OK: To save the access control list.
Часті запитання
Why is it important to set an administrator password for the router?
Setting an administrator password enhances security by preventing unauthorized access to router settings and configurations.
How does DHCP benefit users on the local network?
DHCP automatically assigns IP settings to devices on the network, simplifying network configuration for users.
Документи / Ресурси
 |
DrayTek Router Basic Setup [pdfПосібник користувача Router Basic Setup, Basic Setup |