1. Важливі інструкції з техніки безпеки
Please read all instructions before using this sewing machine. This machine is intended for household use only.
DANGER - To reduce the risk of electric shock:
- Увімкнений прилад ніколи не можна залишати без нагляду.
- Завжди відключайте цей прилад від електричної розетки одразу після використання та перед чищенням.
- Завжди вимикайте вилку з розетки перед повторним завантаженнямampінж. Замініть лампу на лампу такого ж типу з потужністю 15 Вт (зона 110-120 В) або 15 Вт (зона 220-240 В).
WARNING - To reduce the risk of burns, fire, electric shock, or injury to persons:
- Не дозволяйте використовувати як іграшку. Необхідна пильна увага, коли цей прилад використовується дітьми або поблизу них.
- Використовуйте цей прилад лише за призначенням, як описано в цьому посібнику. Використовуйте лише насадки, рекомендовані виробником, як зазначено в цьому посібнику.
- Ніколи не використовуйте цей прилад, якщо він має пошкоджений шнур або вилку, якщо він не працює належним чином, якщо його впустили, пошкодили або впустили у воду. Поверніть прилад до найближчого авторизованого дилера або сервісного центру для перевірки, ремонту, електричного або механічного налаштування.
- Ніколи не використовуйте прилад із заблокованими вентиляційними отворами. Тримайте вентиляційні отвори швейної машини та педалі вільними від накопичення ворсинок, пилу та тканини.
- Тримайте пальці подалі від усіх рухомих частин. Потрібна особлива обережність навколо голки швейної машини.
- Завжди використовуйте правильну голкову пластину. Неправильна пластина може спричинити поломку голки.
- Не використовуйте зігнуті голки.
- Не тягніть і не штовхайте тканину під час шиття. Це може відхилити голку, спричинивши її злам.
- Always unplug sewing machine off ("O") when making any adjustments in the needle area, such as threading needle, changing needle, threading bobbin, or changing presser foot, and the like.
- Завжди від'єднуйте швейну машину від електричної розетки, коли знімаєте кришки, змащуєте або виконуєте будь-які інші коригувальні роботи з обслуговування, згадані в інструкції з експлуатації.
- Ніколи не кидайте та не вставляйте предмети в будь-які отвори.
- Не використовуйте на вулиці.
- Не працюйте там, де використовуються аерозольні розпилювачі або там, де вводять кисень.
- Щоб відключити, поверніть усі елементи керування у положення «вимкнено» («O»), а потім вийміть вилку з розетки.
- Не від’єднуйте вилку, тягнучи за шнур. Щоб відключити, візьміться за вилку, а не за шнур.
- Рівень звукового тиску за нормальних умов експлуатації становить 75 дБ(A).
- Always turn off the machine or unplug when the machine is not operating properly.
- Ніколи нічого не кладіть на педаль керування.
- If the supply cord to the foot controller is damaged, it must be replaced by the manufacturer or its service agent or a similar qualified person in order to avoid a hazard.
- Цей прилад не призначений для використання особами (включаючи дітей) з обмеженими фізичними, сенсорними чи розумовими здібностями, або з браком досвіду та знань, якщо вони не перебувають під наглядом або не отримали інструкції щодо використання приладу особою, відповідальною за їх безпеку.
- Слідкуйте за дітьми, щоб переконатися, що вони не граються з пристроєм.
ЗБЕРЕЖІТЬ ЦІ ІНСТРУКЦІЇ
Image: Important Safety Instructions page from the Singer 2250 manual, detailing electrical and general safety warnings.
2. Налаштування
2.1 Аксесуари
The Singer 2250 sewing machine comes with a set of standard accessories and supports various optional accessories for different sewing tasks.
- Стандартні аксесуари: All purpose foot, Button sewing foot, Zipper foot, Screwdriver, Seam ripper/brush, Pack of needles, Bobbin (3), Darning plate, Spool holder.
- Optional Accessories (not supplied with machine, available from SINGER® retailers): Edge/quilting guide, Zipper foot, Straight stitch foot, Overcasting foot, Hemmer foot, Blind hem foot, Satin stitch foot, Cording/embroidery foot, Second spool pin, Spool pin felt.
2.2 Намотування шпульки
- Place thread and corresponding spool holder onto the spool pin.
- Snap the thread into the thread guide.
- Wind the thread counterclockwise around the bobbin winder tension disc.
- Thread the bobbin as illustrated and place it on the spindle.
- Push the bobbin spindle to the right.
- Hold the thread end.
- Step on the foot control pedal to begin winding.
- Cut the thread once the bobbin is full.
- Push the bobbin spindle to the left and remove the wound bobbin.
Зверніть увагу: When the bobbin winder spindle is in the "bobbin winding" position, the machine will not sew and the hand wheel will not turn. To start sewing, push the bobbin winder spindle to the left (sewing position).

Image: Manual page illustrating standard and optional accessories, and a step-by-step guide for winding the bobbin.
2.3 Підключення до джерела живлення
Ensure the machine's power switch is in the "O" (off) position. Insert the machine plug into the electrical outlet. Always use a grounded outlet.
2.4 Raising the Presser Foot Lifter
The presser foot lifter is located at the back of the needle bar area. Lift it to raise the presser foot for placing fabric, and lower it to hold the fabric in place for sewing.
3. Операція
3.1 Choosing Your Pattern
The Singer 2250 features a Pattern Selector Dial to choose various stitch patterns.
- Stitches indicated in black on the diagram correspond to the Pattern Selector Dial.
- For patterns indicated with the "S" color, turn the Pattern Selector Dial to "S", then use the Stitch Length Dial to adjust the desired stitch length.
- The Pattern Selector Dial can be turned in either direction.
3.2 Stitch Length Dial
The Stitch Length Dial controls the length of straight stitches and the density of zig-zag stitches.
- For Straight Stitching: Turn the Pattern Selector Dial to the straight stitch symbol. The stitch length increases as the dial approaches "4". Use longer stitches for heavier fabrics and thicker needles, shorter stitches for lighter fabrics and finer needles.
- For Zig-Zag Stitching: Turn the Pattern Selector Dial to "~~~ ". The density of zig-zag stitches increases as the setting of the stitch length dial approaches "0". Dense zig-zag stitches are known as satin stitches.

Image: Manual page detailing how to choose stitch patterns and adjust stitch length for various sewing applications.
3.3 Заправка нитки в машину
Proper threading is crucial for smooth sewing. Follow these general steps:
- Помістіть котушку з нитками на штифт для котушки.
- Проведіть нитку через верхні напрямні для ниток.
- Пропустіть нитку через диски натягу.
- Протягніть нитку вгору через важіль тягачів.
- Guide the thread down through the needle bar thread guide.
- Проведіть нитку в голку спереду назад.
- Raise the bobbin thread by turning the handwheel towards you, catching the bobbin thread with the needle thread.
- Pull both threads under the presser foot and towards the back.
3.4 Sewing on Buttons
To sew buttons using your Singer 2250:
- Встановіть шторку.
- Change the all-purpose foot to the button sewing tool.
- Position the fabric and button under the foot.
- Lower the button to the desired position and lower the foot.
- Set the Pattern Selector Dial on "---" and sew a few securing stitches.
- Select one of the two narrow zig-zag patterns (between 0.5 and 1.5) and sew through both holes of the button. Turn the handwheel to check needle clearance.
- Slowly sew the button with about 10 stitches.
- Select pattern "---" again and sew a few securing stitches.
- If a shank is required, place a darning needle on top of the button and sew.
- For buttons with 4 holes, sew through the front two holes first, then sew backwards and then sew through the back two holes.
3.5 Installing the Removable Extension Table
The removable extension table provides a larger work surface and also serves as an accessory box.
- Щоб встановити: Hold the removable extension table horizontally and push it in the direction of the arrow until it clicks into place.
- Щоб видалити: Pull the extension table towards the left.
- The inside of the removable extension table can be used as an accessory box. To open, flip the cover down.
4. Технічне обслуговування
4.1 Darning Plate
The darning plate is used for specific tasks like darning or free-hand embroidery.
- Установка: Install the darning plate as illustrated in the manual.
- Видалення: Для нормального шиття зніміть пластину штопання.
- For free-motion sewing, a darning/embroidery foot (optional accessory) is recommended.
4.2 Inserting & Changing Needles
Regularly change your needle, especially if sewing problems occur. Use SINGER® Brand Needles for best results.
- Turn the power switch to off ("O").
- Послабте голку клamp гвинт.
- Insert the new needle with the flat side of the shaft facing the back, pushing it up as far as it will go.
- Затягніть голку клamp гвинт.
Увага: Needles must be in perfect condition. Problems can occur with bent needles, damaged points, or blunt needles.
4.3 Changing the Bulb
To change the light bulb, ensure the machine is unplugged. Replace the bulb with the same type rated 15 watts (110-120V area) or 15 watts (220-240V area).
4.4 Очищення
Regularly clean the lint and dust from the bobbin case area and feed dogs using the provided brush. Ensure the machine is unplugged before cleaning.
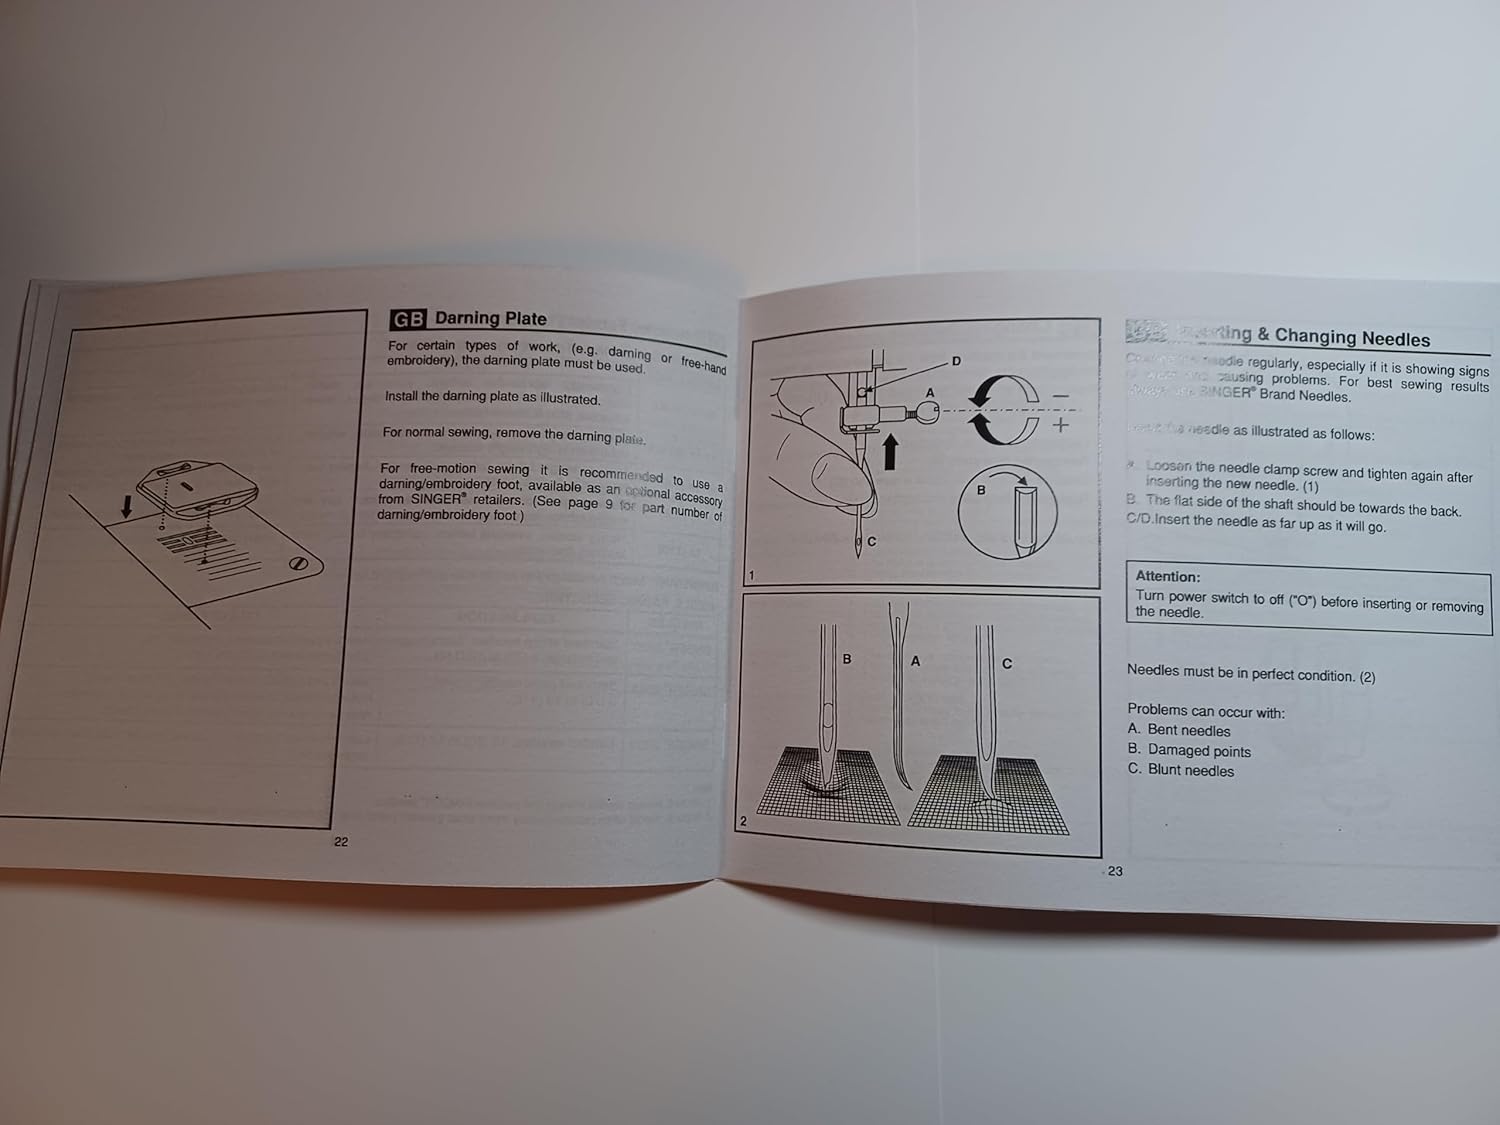
Image: Manual page illustrating procedures for sewing on buttons, installing the extension table, using the darning plate, and changing needles.
5. Вирішення проблем
If you encounter issues with your Singer 2250, refer to the following common problems and solutions:
- Пропущені шви: Ensure the needle is inserted correctly, not bent, and is the appropriate size for the fabric and thread. Re-thread the machine.
- Розрив нитки: Check for correct threading, proper tension, a bent or blunt needle, or burrs on the needle plate or bobbin case.
- Зморщування тканини: Adjust tension settings, use the correct needle size, or ensure the presser foot pressure is appropriate for the fabric.
- Machine Not Feeding Fabric: Check if the feed dogs are raised. Ensure the presser foot is lowered.
- Шумна робота: Clean and lubricate the machine as per maintenance instructions. Check for loose parts or a bent needle.
For persistent problems, contact an authorized Singer service center.
6. Технічні характеристики
| Розміри продукту | 8.5 x 5.5 x 0.1 дюймів |
| Вага товару | 3 унції |
| Номер моделі | SINGER 2250 Manual |
| Виробник | TabSynth Design (for reproduction manual) |
| ASIN | B0G19M5M63 |
7. Гарантія та підтримка
This instruction manual is a reproduction for the Singer 2250 Sewing Machine. For warranty information regarding your Singer 2250 sewing machine, please refer to the original documentation provided with your machine or contact Singer customer support directly.
For support related to the operation or maintenance of your Singer 2250, please consult this manual. If further assistance is needed, contact an authorized Singer service center or your local Singer dealer.