вступ
This manual provides detailed instructions for the installation, operation, and maintenance of your Vetroo M06 Micro-ATX/Mini-ITX Gaming PC Case. Please read this manual thoroughly before beginning assembly to ensure proper setup and optimal performance.

Image: The Vetroo M06 Micro-ATX/Mini-ITX Gaming PC Case in black, showcasing its mesh front panel and side window, viewпід кутом.
Ключові характеристики
- Компактний дизайн: Micro-ATX / Mini-ITX form factor with a high-airflow mesh front panel, designed for space-efficient builds.
- Оптимізоване охолодження: Supports up to five 120mm fans and a 240mm top-mounted liquid radiator for efficient thermal management.
- Сумісність з графічним процесором: Підходить для відеокарт довжиною до 355 мм.
- Flexible PSU Mounting: Features an adjustable power supply installation area with a maximum length of 160mm.
- Сучасне підключення: Front panel includes USB Type-C and USB 3.0 ports for convenient peripheral access.
Вміст упаковки
Будь ласка, перевірте наявність усіх компонентів, перш ніж продовжити встановлення:
- Vetroo M06 PC Case
- Коробка з аксесуарами (гвинти, стійки, кабельні стяжки)
- SFX PSU Bracket (1x)
- Посібник користувача (цей документ)
Технічні характеристики
| Особливість | Деталь |
|---|---|
| Назва моделі | M06 |
| Тип корпусу | Міні-вежа |
| Сумісність материнської плати | Micro ATX, Mini ITX |
| Розміри продукту (Д x Ш x В) | 395 мм x 200 мм x 332 мм (15.55 дюйма x 7.87 дюйма x 13.07 дюйма) |
| Вага товару | 13.37 фунта (6.06 кг) |
| матеріал | Acrylonitrile Butadiene Styrene (ABS), SPCC (0.8mm metal plate) |
| Максимальна довжина GPU | 355 мм |
| Максимальна висота процесорного кулера | 165 мм |
| Максимальна довжина блоку живлення | 160mm (Adjustable mounting) |
| Підтримка фанів | До 5 х 120 мм вентиляторів |
| Опора радіатора | 1 x 240mm (Top) |
| Передні порти вводу-виводу | 1 x USB Type-C, 1 x USB 3.0, HD Audio, Power Button, Reset Button |

Image: Diagram illustrating the compact dimensions of the Vetroo M06 PC case, measuring 15.5 inches in depth, 7.8 inches in width, and 13.0 inches in height.

Image: A detailed diagram outlining the compatibility specifications for the Vetroo M06 PC case, including maximum CPU cooler height (165mm), GPU length (355mm), PSU length (160mm), and supported motherboard form factors (M-ATX/ITX).
Налаштування та встановлення
Before starting, ensure you have a clean, static-free workspace. Refer to your component manuals for specific installation details.
1. Встановлення материнської плати
- Remove the side panel(s) of the case.
- Install the necessary motherboard standoffs into the case tray according to your motherboard's form factor (Micro-ATX or Mini-ITX).
- Обережно встановіть материнську плату на опори, суміщаючи отвори для гвинтів.
- Закріпіть материнську плату гвинтами.
2. Встановлення графічного процесора
- Remove the appropriate PCIe slot covers from the rear of the case.
- Вставте відеокарту в основний слот PCIe на материнській платі.
- Закріпіть відеокарту до корпусу гвинтами.
- Connect any required PCIe power cables from your power supply to the GPU.
3. Установка блоку живлення
- Determine the desired mounting position for your power supply. The Vetroo M06 supports adjustable PSU mounting.
- If using an SFX power supply, attach the included SFX bracket to the PSU.
- Slide the power supply into its designated bay and secure it with screws from the rear of the case.
- Route the necessary power cables to your components.

Зображення: Внутрішній view of the Vetroo M06 PC case highlighting the three adjustable mounting positions for ATX/SFX power supplies, along with an illustration of the included SFX bracket.
4. Storage Installation (HDD/SSD)
- Locate the designated mounting points for 3.5" HDDs and 2.5" SSDs.
- Secure your storage drives using the provided screws.
- Підключіть кабелі передачі даних та живлення SATA до кожного диска.
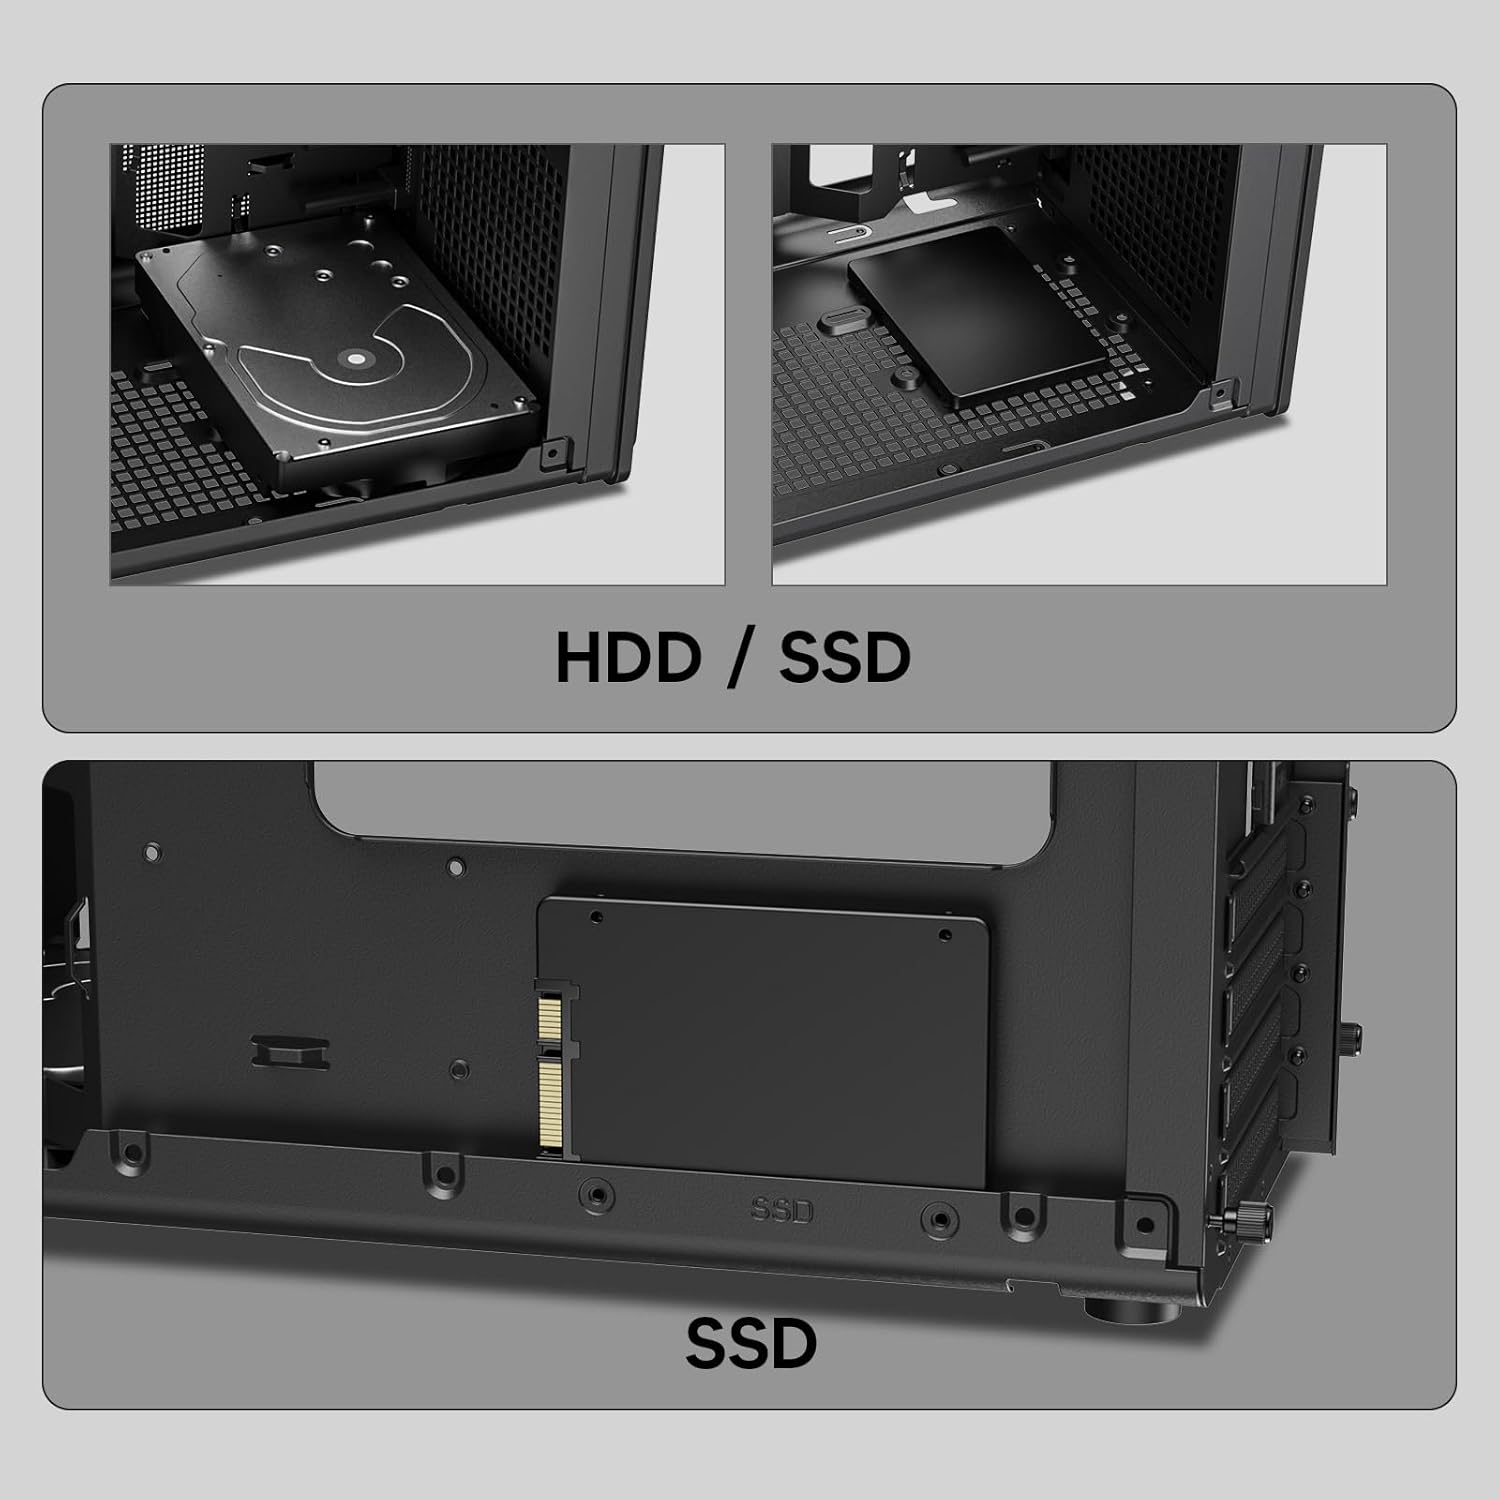
Зображення: Крупний план views of the Vetroo M06 PC case interior, demonstrating the mounting options for both 3.5-inch Hard Disk Drives (HDDs) and 2.5-inch Solid State Drives (SSDs).
5. Cooling System Installation (Fans/Radiator)
- Identify the fan mounting locations (up to five 120mm fans).
- Mount fans using appropriate screws, ensuring correct airflow direction.
- For liquid cooling, install a 240mm radiator at the top mounting position, securing it with screws.
- Connect fan and pump cables to your motherboard or fan controller.
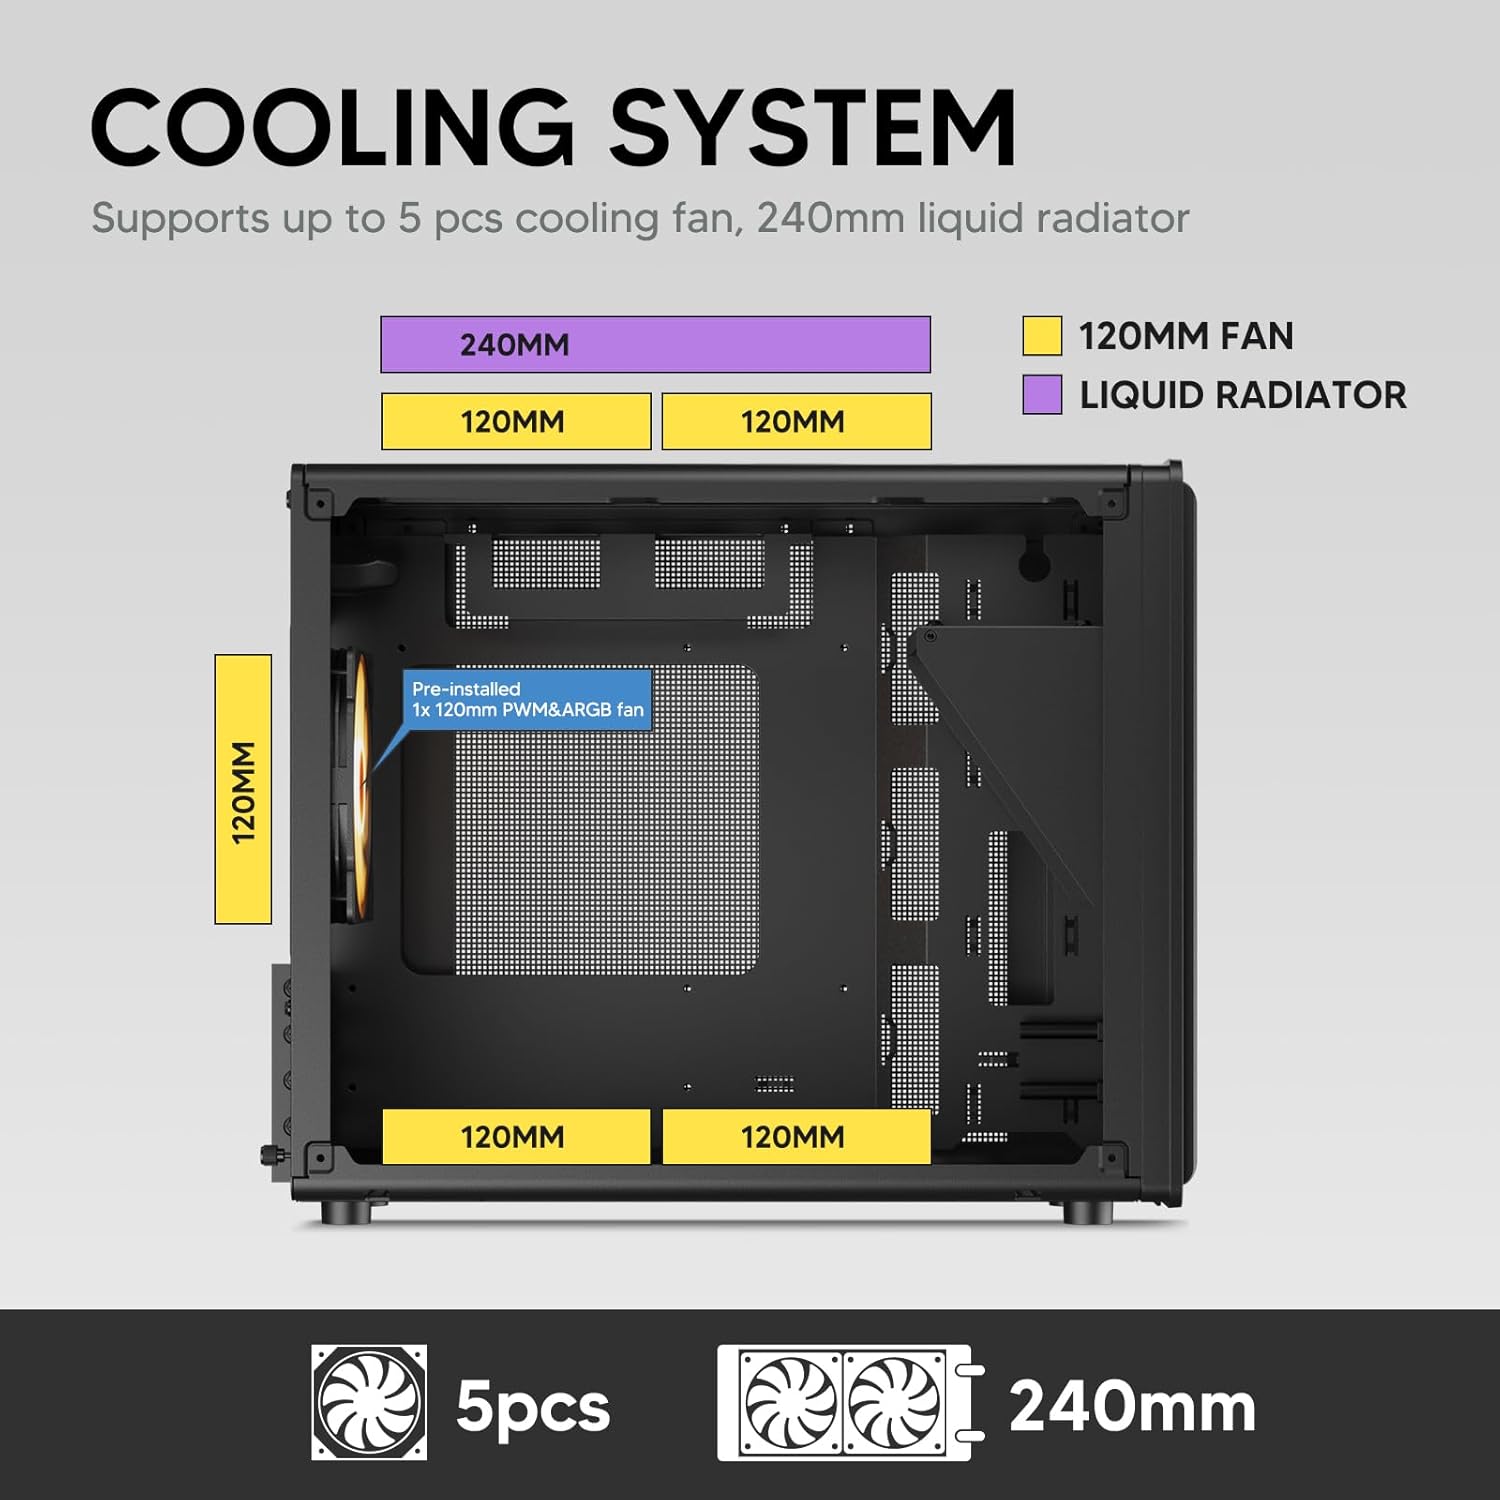
Image: A diagram illustrating the cooling system layout within the Vetroo M06 PC case, detailing the positions for up to five 120mm fans and a 240mm liquid radiator at the top.
6. Підключення панелі вводу/виводу
- Connect the front panel cables (Power, Reset, USB 3.0, USB Type-C, HD Audio) to the corresponding headers on your motherboard. Refer to your motherboard manual for header locations.

Image: A close-up of the Vetroo M06 PC case's front I/O panel, clearly labeling the Power button, Reset button, USB 3.0 port, HD Audio jack, and USB Type-C port.
Інструкція з експлуатації
Once all components are installed and cables are connected, replace the side panels. Connect your peripherals (monitor, keyboard, mouse) and power cable to the PSU. Press the power button on the front panel to start your system.
Керування повітряним потоком
The Vetroo M06 case features an excellent airflow design with mesh panels to facilitate optimal cooling. Ensure fans are installed to create a balanced airflow, typically with intake fans at the front/bottom and exhaust fans at the rear/top.

Image: An exploded diagram of the Vetroo M06 PC case, illustrating the intended airflow patterns with blue arrows indicating cool air intake and red arrows showing warm air exhaust through its mesh panels.
Технічне обслуговування
Regular maintenance helps prolong the life of your PC components and ensures optimal performance.
- Очищення від пилу: Періодично очищуйте пилові фільтри та внутрішні компоненти за допомогою стисненого повітря. Перед очищенням переконайтеся, що система вимкнена та відключена від мережі.
- Управління кабелем: Verify that internal cables are neatly routed and do not obstruct airflow.
- Перевірки компонентів: Ensure all screws are tight and components are securely seated.

Image: A close-up shot of the Vetroo M06 PC case, featuring a digital caliper measuring the thickness of the metal plate, which is specified as 0.8mm, highlighting the case's robust construction.
Усунення несправностей
Якщо у вас виникли проблеми, зверніться до наступних поширених кроків усунення несправностей:
- Система не вмикається:
- Check all power connections, including the PSU to wall outlet, PSU to motherboard (24-pin and CPU 8-pin), and front panel power switch cable to motherboard.
- Переконайтеся, що перемикач блоку живлення знаходиться в положенні «УВІМК.».
- Немає виводу на дисплей:
- Verify that your monitor is connected to the graphics card (not the motherboard's integrated graphics ports, unless you are using integrated graphics).
- Перевстановіть відеокарту та модулі оперативної пам'яті.
- Проблеми з перегрівом:
- Ensure all case fans are spinning and oriented correctly for optimal airflow.
- Check CPU cooler installation and thermal paste application.
- Очистіть вентилятори та фільтри від накопичення пилу.
- USB-порти не працюють:
- Verify that the front panel USB 3.0 and USB Type-C cables are correctly connected to the motherboard headers.
Гарантія та підтримка
Vetroo products are designed for quality and reliability. For warranty information and technical support, please visit the official Vetroo webсайт або зверніться до служби підтримки клієнтів. Зберігайте чек про покупку для гарантійних випадків.
Vetroo Official Webсайт: Vetroo Store on Amazon
For further assistance, please refer to the contact information provided with your product packaging or on the official Vetroo support channels.


