1. Вступ
The ATTACK SHARK X1 is an ultralight wireless gaming mouse designed for high-performance use. It features a magnetic RGB charging dock, a PixArt PAW3395 Pro sensor, and offers tri-mode connectivity (Wired, 2.4GHz Wireless, Bluetooth). This manual provides detailed instructions for setting up, operating, and maintaining your X1 gaming mouse.

Image 1.1: ATTACK SHARK X1 Gaming Mouse with its Magnetic RGB Charging Dock.
2. Вміст упаковки
Перевірте наявність усіх предметів у вашій упаковці:
- ATTACK SHARK X1 Ultralight Wireless Gaming Mouse
- Magnetic RGB Charging Dock
- Зарядний кабель USB Type-C
- 2.4-ГГц USB-приймач
- Протиковзаюча стрічка
- Посібник користувача (цей документ)
3. Продукт закінчивсяview
Familiarize yourself with the components of your ATTACK SHARK X1 mouse and charging dock.
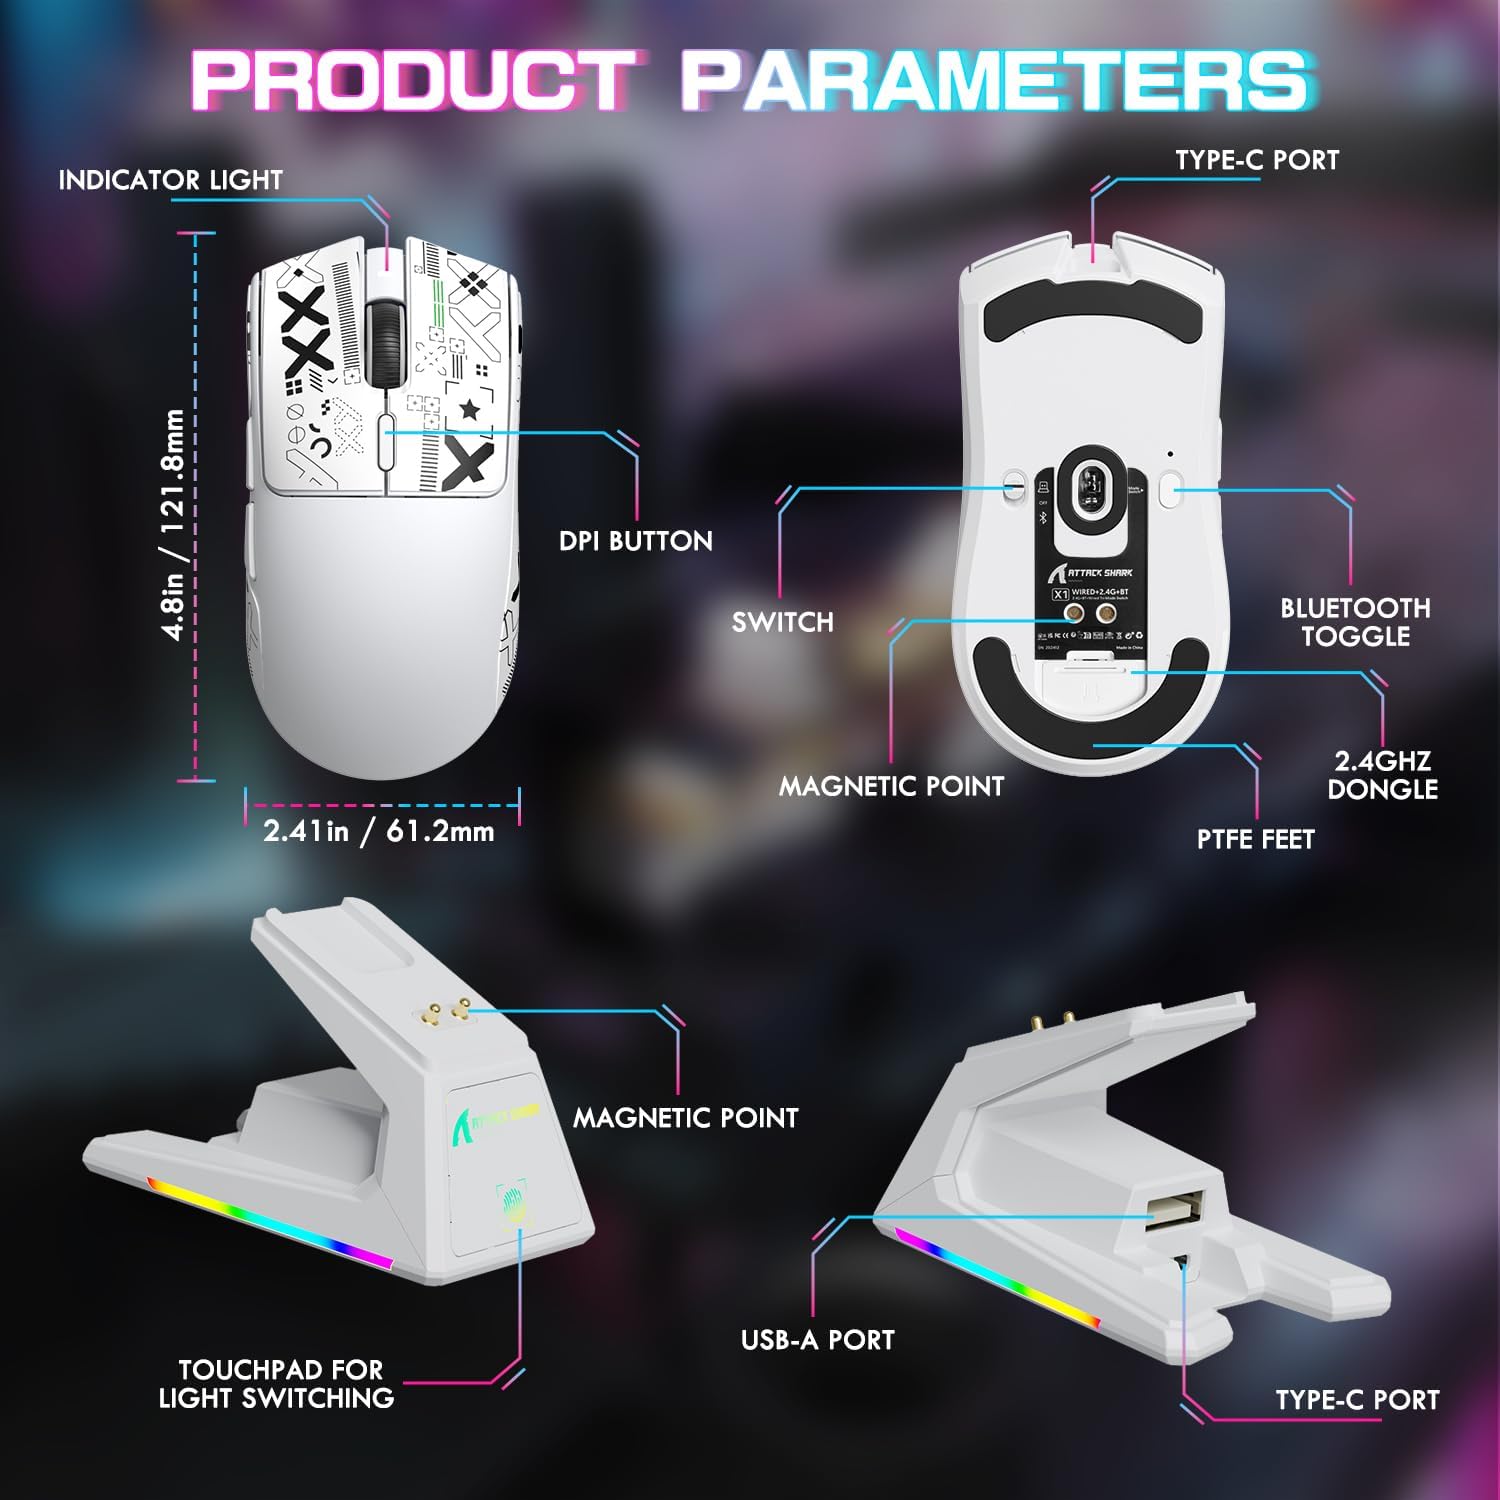
Image 3.1: Detailed diagram of the mouse and charging dock components.
Компоненти миші:
- Світловий індикатор: Відображає стан батареї та режим підключення.
- Кнопка DPI: Перемикає попередньо встановлені рівні DPI.
- Перемикач: Power and connection mode selector (OFF, 2.4G, BT).
- Магнітна точка: For secure attachment to the charging dock.
- PTFE ніжки: Low-friction glides for smooth movement.
- Порт типу C: Для дротового підключення та заряджання.
- Перемикач Bluetooth: Activates Bluetooth pairing.
- 2.4GHz Dongle Storage: Compartment for the USB receiver.
Charging Dock Components:
- Магнітна точка: Connects with the mouse for charging.
- Порт USB-A: For connecting the 2.4GHz USB receiver.
- Порт типу C: For connecting the dock to a power source.
- Touchpad for Light Switching: Controls the RGB lighting effects on the dock.
4. Налаштування
4.1 Заряджання миші
Before first use, it is recommended to fully charge the mouse. The mouse can be charged via the magnetic charging dock or directly via the Type-C cable.
- Connect the magnetic RGB charging dock to a power source using the provided Type-C cable.
- Place the mouse onto the charging dock. The magnetic points will align, and the mouse will begin charging. The dock's RGB lighting will indicate charging status.
- Alternatively, connect the Type-C cable directly to the mouse's Type-C port and a power source.
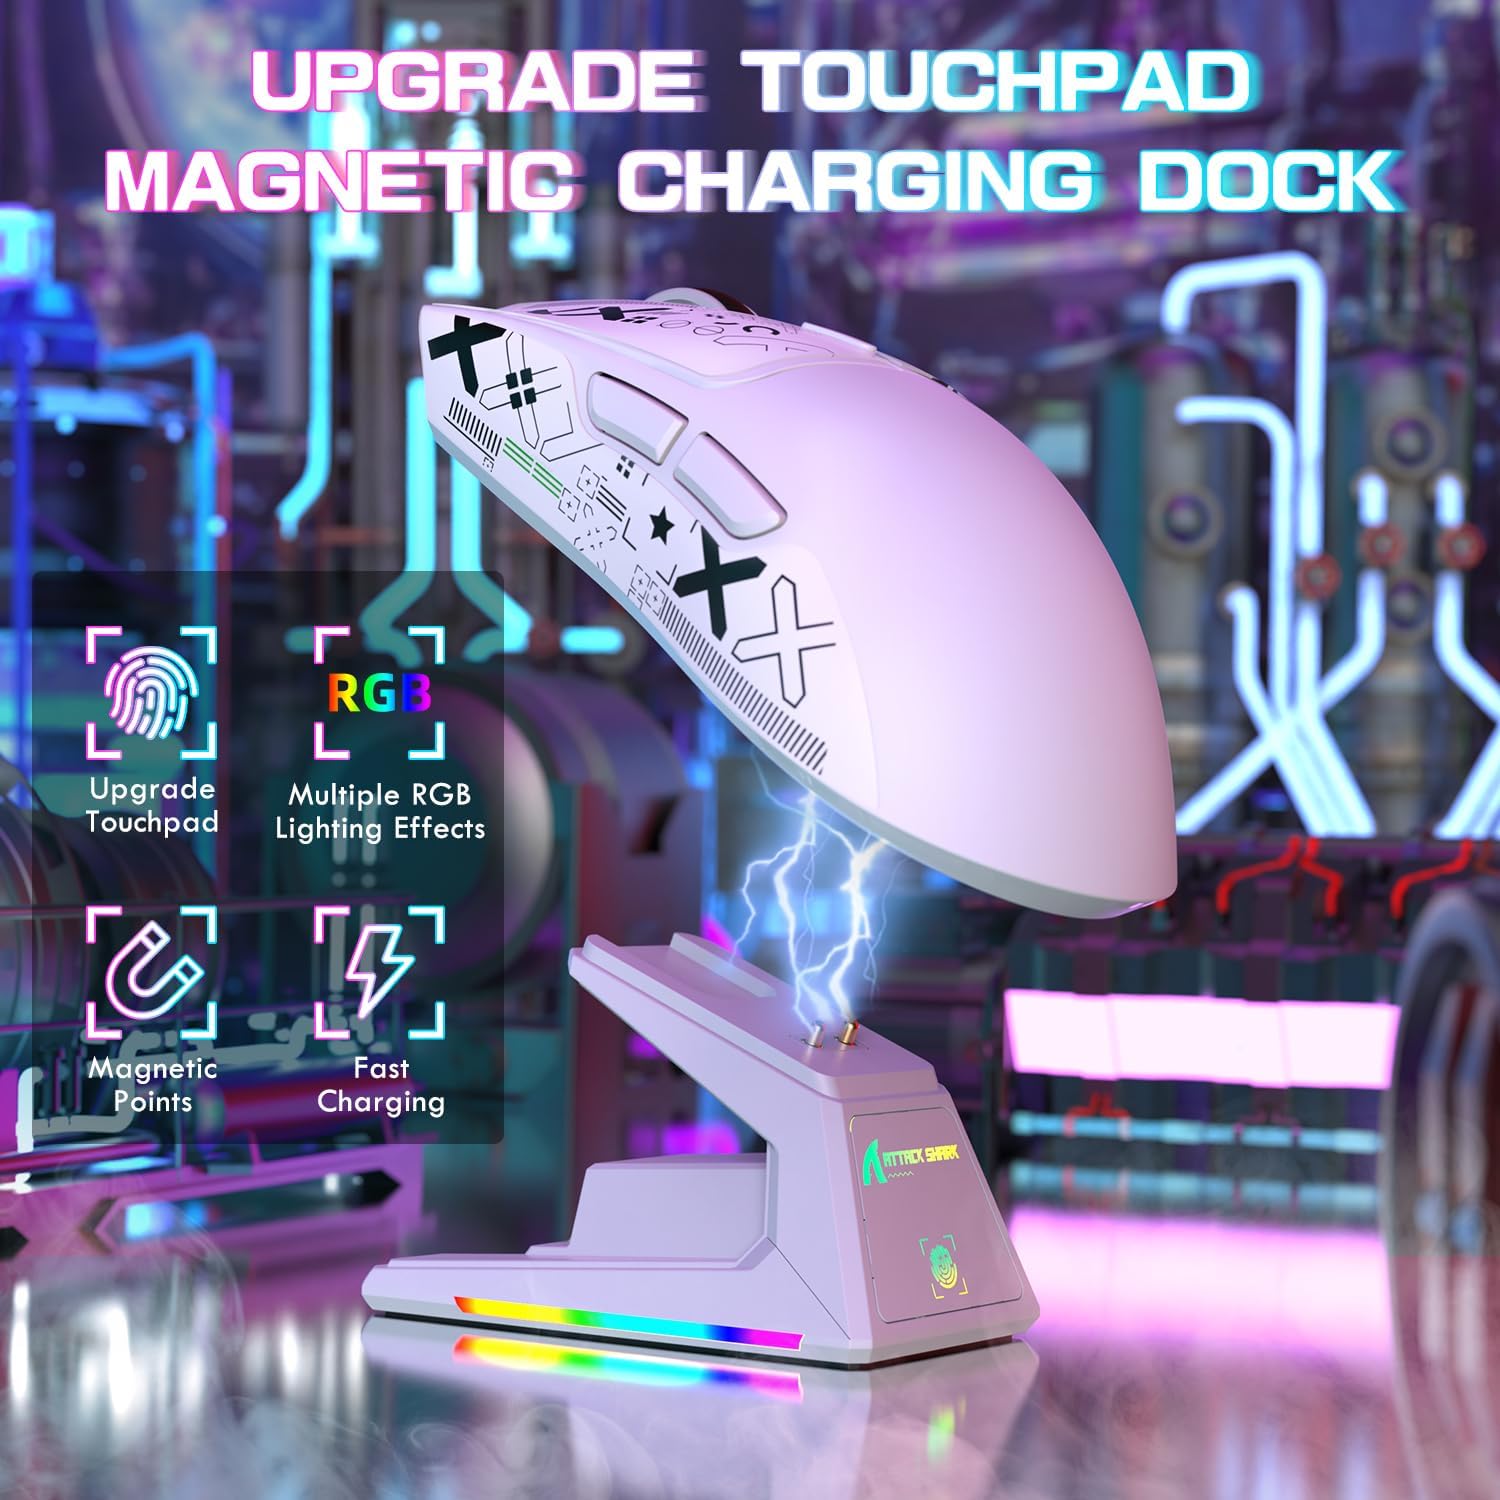
Image 4.1: Charging the X1 mouse using the magnetic dock.
4.2 Applying Anti-Slip Grip Tape
The included anti-slip grip tape can be applied to the mouse for enhanced grip and comfort. Carefully peel the backing and adhere the tape to the desired areas on the mouse body.
4.3 Підключення миші
The ATTACK SHARK X1 supports three connection modes: Wired, 2.4GHz Wireless, and Bluetooth.
Зображення 4.2: закінченоview of the tri-mode connectivity options.
Дротове підключення:
- Ensure the mouse power switch (located on the bottom) is set to the 'OFF' position.
- Connect the Type-C cable directly from the mouse to your computer's USB port. The mouse will function immediately and charge simultaneously.
Бездротове підключення 2.4 ГГц:
- Remove the 2.4GHz USB receiver from its storage compartment on the bottom of the mouse.
- Plug the USB receiver into an available USB-A port on your computer or into the USB-A port on the charging dock.
- Set the mouse power switch to the '2.4G' position. The mouse will automatically connect to the receiver.
Підключення Bluetooth:
- Set the mouse power switch to the 'BT' position.
- Press and hold the Bluetooth toggle button (located on the bottom of the mouse) for 3 seconds until the indicator light flashes rapidly, indicating pairing mode.
- На комп’ютері або пристрої перейдіть до налаштувань Bluetooth і знайдіть нові пристрої.
- Select 'ATTACK SHARK X1' from the list of available devices to pair. The indicator light will become solid once connected.
- The mouse can connect to up to three Bluetooth devices (BT1, BT2, BT3). Switch between them by briefly pressing the Bluetooth toggle button.
5. Інструкція з експлуатації
5.1 Налаштування DPI
The mouse features a dedicated DPI button on its top surface. Press this button to cycle through preset DPI levels. For fine-tuning and custom DPI settings (50-unit increments up to 40000 DPI), use the programmable web програмне забезпечення драйвера.
5.2 Керування RGB-підсвічуванням
The magnetic charging dock features dynamic RGB lighting effects. These can be adjusted by tapping the touchpad control located on the front of the dock.
5.3 Web Програмне забезпечення драйвера
The ATTACK SHARK X1 gaming mouse supports full customization through its web-based driver software. This software allows you to:
- Create and assign macros.
- Re-assign mouse keys.
- Точне налаштування параметрів DPI.
- Adjust polling rate (up to 1000Hz).
- Configure other performance parameters.
Доступ до web driver software at: bit.ly/4mqcdwo
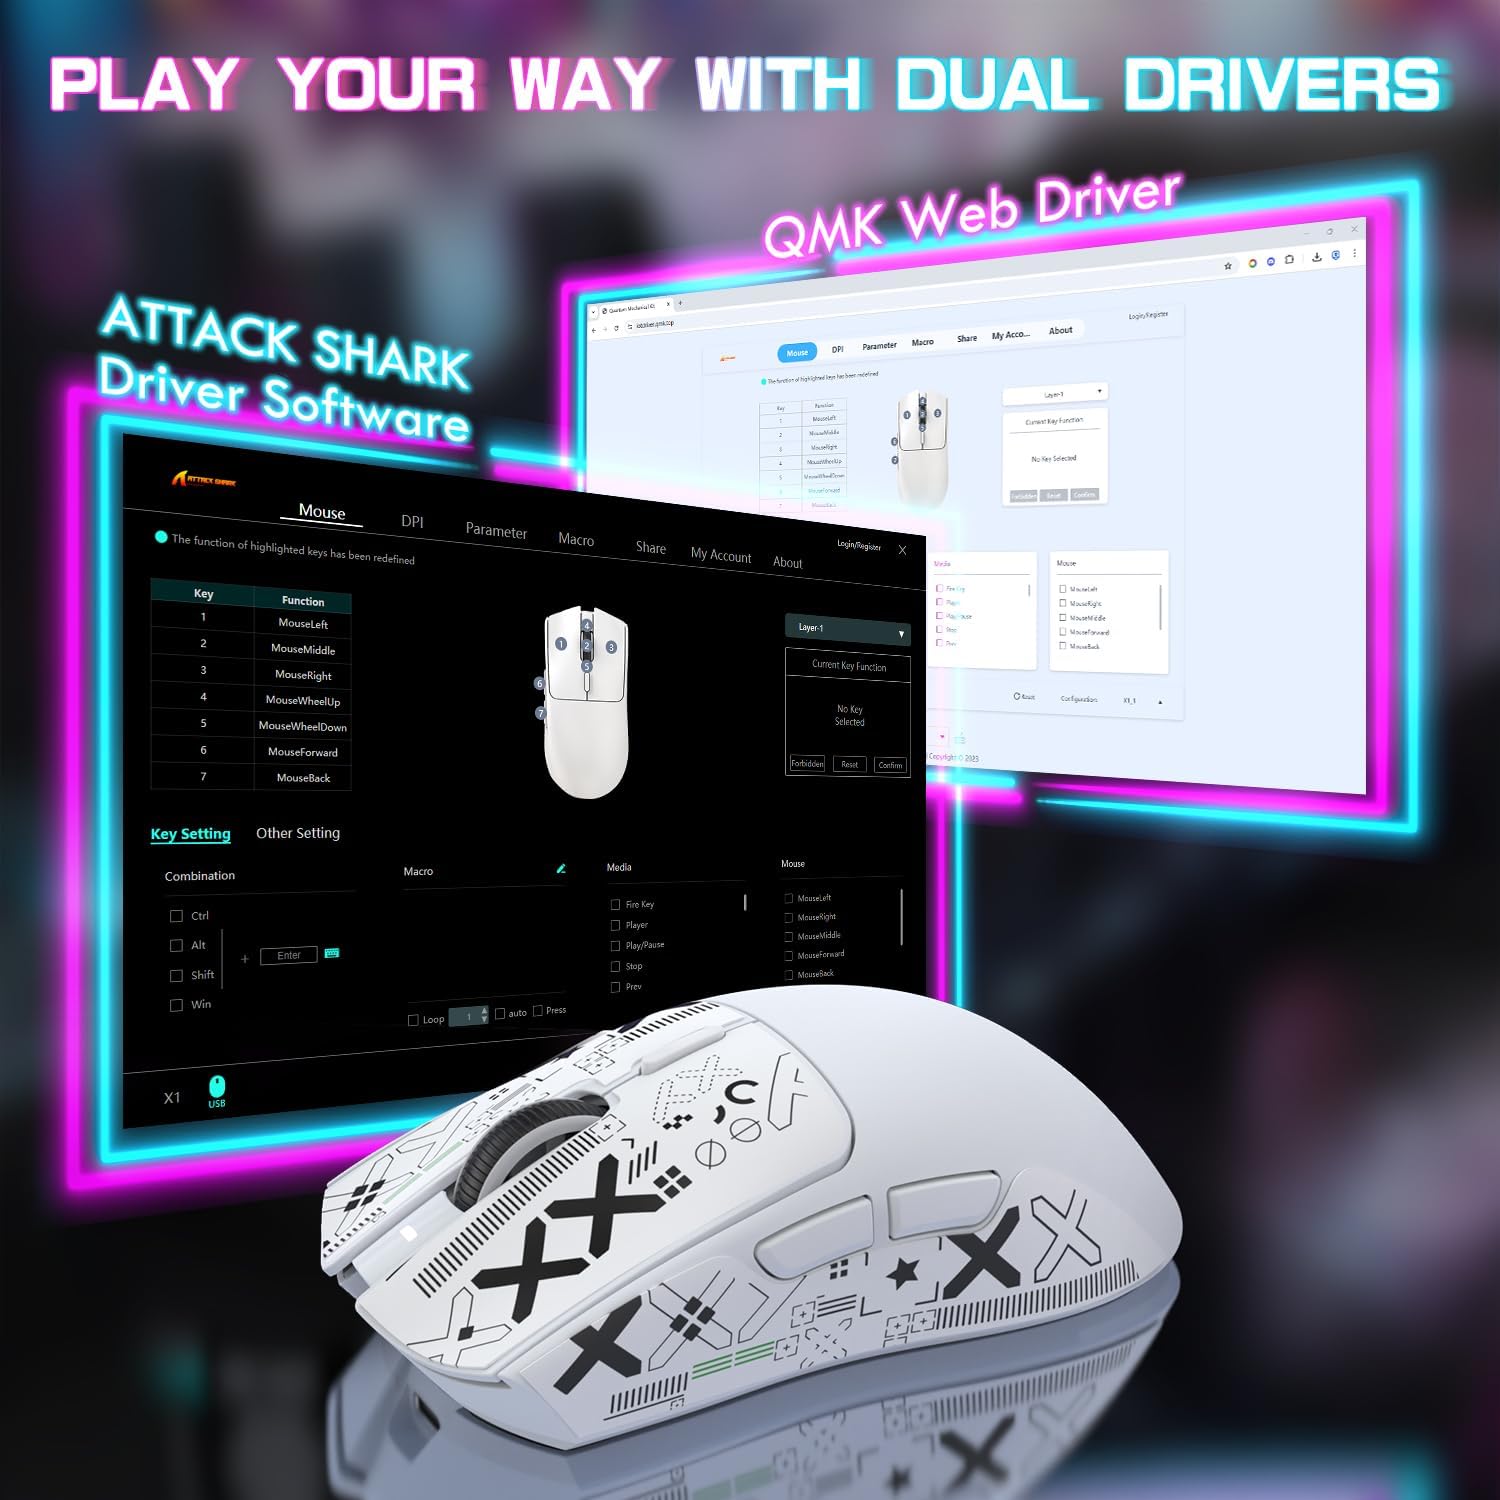
Image 5.1: The ATTACK SHARK X1 web driver software interface.
5.4 Перемикання режимів підключення
To switch between wired, 2.4GHz wireless, and Bluetooth modes, use the physical switch located on the bottom of the mouse. For Bluetooth, briefly press the Bluetooth toggle button to cycle between paired devices (BT1, BT2, BT3).
6. Технічне обслуговування
6.1 Очищення
Regularly clean your mouse to ensure optimal performance and longevity.
- Use a soft, dry cloth to wipe the surface of the mouse and charging dock.
- Для стійкого бруду злегкаampПротріть тканину водою або м’яким миючим розчином. Уникайте агресивних хімікатів.
- Використовуйте м’яку щітку або стиснене повітря, щоб очистити пил зі щілин, кнопок та оптичного датчика.
6.2 Догляд за акумулятором
Щоб максимізувати термін служби акумулятора:
- Уникайте частого повного розряджання акумулятора.
- Зберігайте мишу в прохолодному, сухому місці, якщо вона не використовується протягом тривалого часу.
- The mouse features a smart sleep mode to conserve power during inactivity.
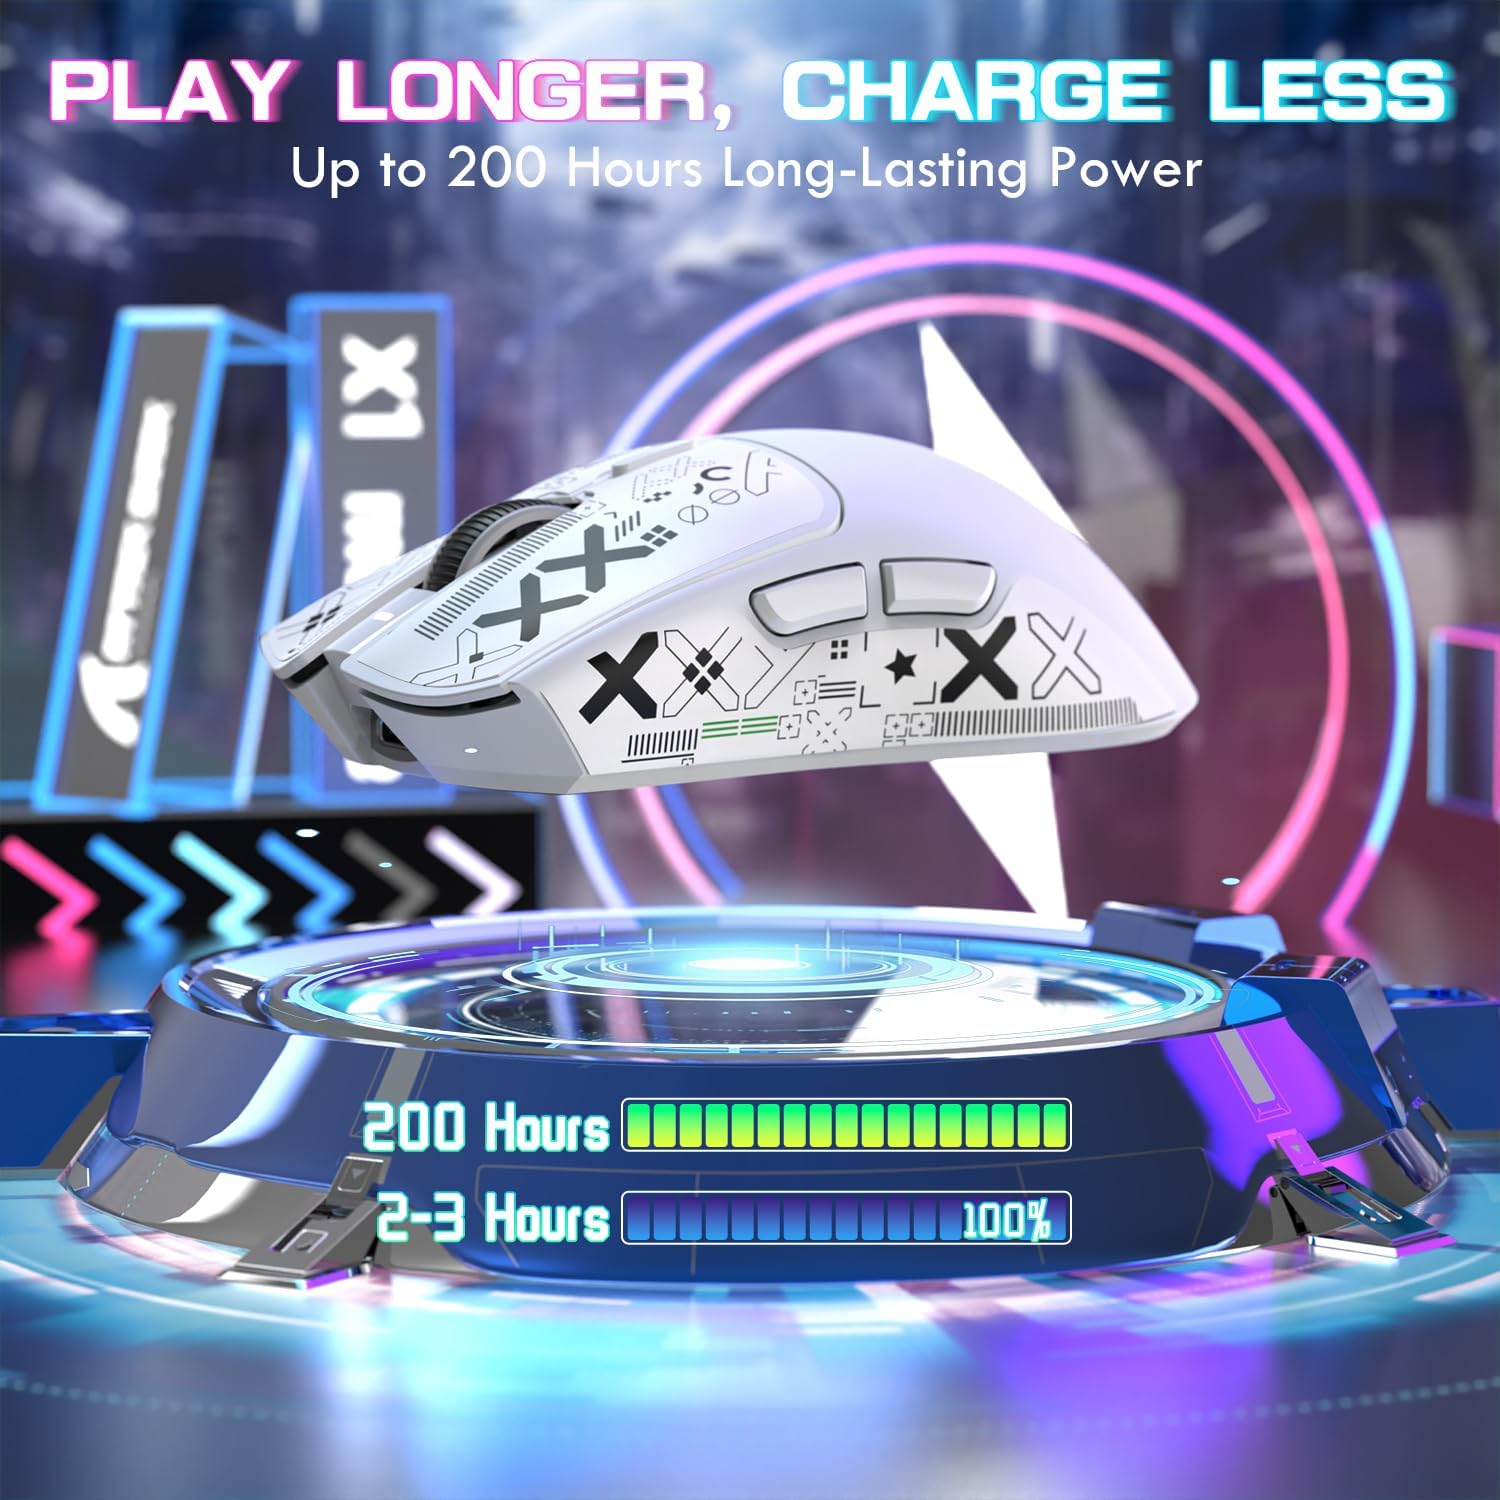
Image 6.1: The X1 mouse offers extended battery life and efficient charging.
7. Вирішення проблем
If you encounter issues with your ATTACK SHARK X1 mouse, refer to the following common problems and solutions:
| проблема | Можлива причина | Рішення |
|---|---|---|
| Миша не реагує (бездротова) | Low battery; Incorrect connection mode; USB receiver not connected; Driver issue. | Charge the mouse; Ensure switch is on '2.4G' or 'BT'; Plug in USB receiver; Reinstall/update drivers via web програмне забезпечення. |
| Миша не заряджається | Cable not connected properly; Dock not powered; Magnetic points misaligned. | Check Type-C cable connection to dock/mouse and power source; Ensure mouse is correctly seated on the magnetic dock. |
| RGB lighting not working on dock | Dock not powered; Lighting turned off. | Ensure dock is connected to power; Tap the touchpad on the dock to cycle through lighting modes. |
| DPI не змінюється | Несправність кнопки DPI; Конфлікт програмного забезпечення. | Ensure DPI button is pressed firmly; Check web driver software for custom profiles or conflicts. |
| Lag or disconnections | Перешкоди; Відстань від приймача; Низький заряд батареї. | Reduce distance to receiver; Remove sources of interference; Charge the mouse. |
8. Технічні характеристики
Key technical specifications for the ATTACK SHARK X1 Ultralight Wireless Gaming Mouse:
| Особливість | Деталь |
|---|---|
| Модель | X1 |
| датчик | PixArt PAW3395 Pro Optical Sensor |
| Діапазон DPI | 50 - 40,000 DPI (adjustable in 50-unit increments via web водій) |
| Швидкість опитування | До 1000 Гц |
| Прискорення | 50г |
| Швидкість відстеження | IPS 650 |
| Перемикачі | OMRON Optical Micro Switches (100 million click lifespan) |
| Кодувальник | F-Switch Encoder |
| Підключення | Tri-Mode: USB Type-C Wired, 2.4GHz Wireless, Bluetooth (BT1/BT2/BT3) |
| вага | 53 г (приблизно) |
| Зарядка | Magnetic RGB Charging Dock or USB Type-C |
| Термін служби батареї | До 200 годин (залежно від використання) |
| Розміри | Approximately 121.8mm (L) x 61.2mm (W) |

Image 8.1: The PixArt PAW3395 Pro Sensor provides high-performance tracking.
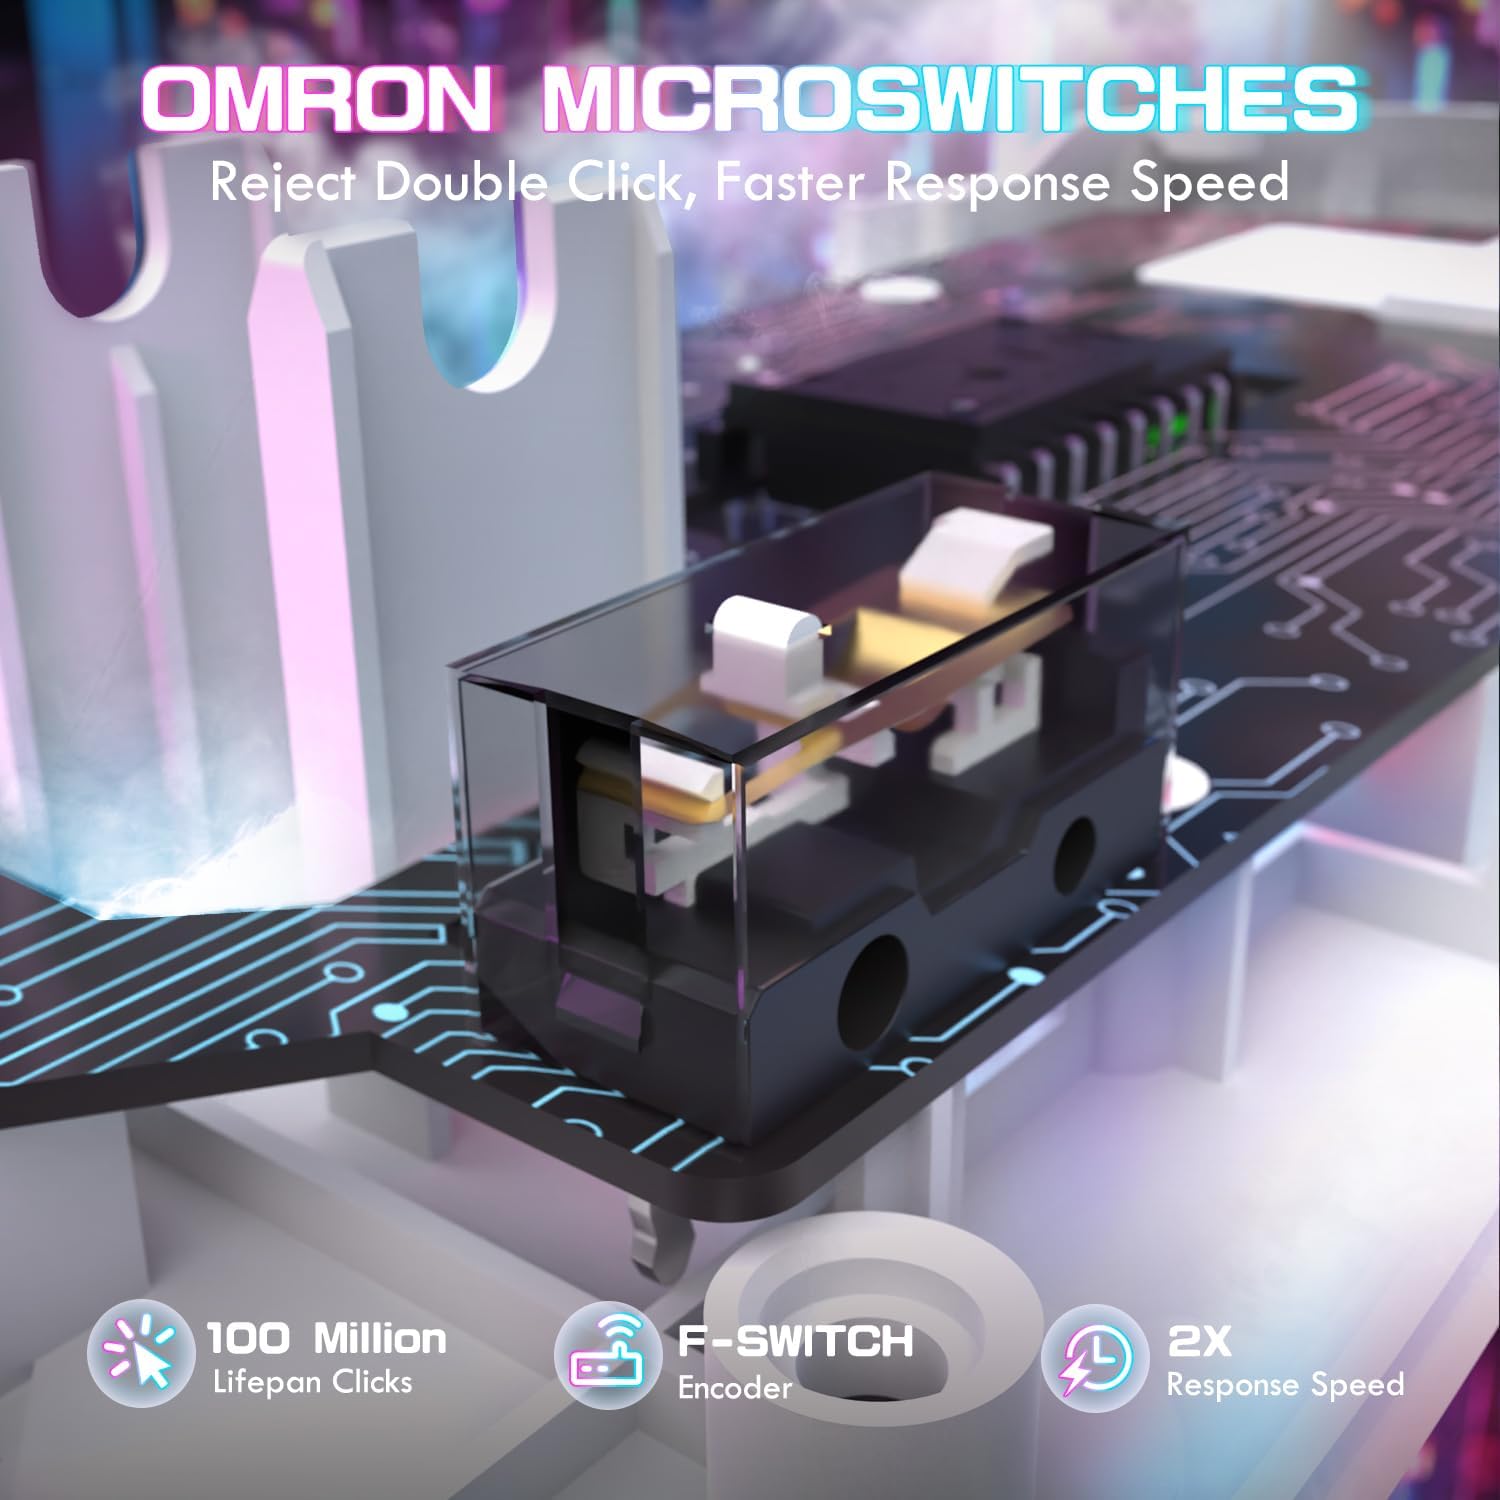
Image 8.2: OMRON optical micro switches ensure durability and responsive clicks.
9. Гарантія та підтримка
ATTACK SHARK products are manufactured to high quality standards. For warranty information and technical support, please refer to the official ATTACK SHARK webсайт або зверніться до продавця. Зберігайте чек про покупку для гарантійних випадків.
10. Відео про продукт
Watch the official product video for a visual guide on the ATTACK SHARK X1 mouse features and usage.
Video 10.1: ATTACK SHARK X1 Tri Mode Ultra Light Gaming Mouse overview. This video demonstrates the magnetic charging dock, connectivity options, and key features of the mouse.