1. Вступ
The Mastech MS8233B is a compact, handheld digital multimeter designed for measuring AC/DC voltage, DC current, resistance, diode, continuity, and temperature. It features a 2000-count display, data hold function, and low battery indication, making it suitable for various electrical testing applications in domestic and electronics environments.
2. Інформація про безпеку
To ensure safe operation and service of the meter, please read this manual thoroughly before use. Failure to observe safety warnings can result in severe injury or death.
- Always ensure the meter is in good working condition before use.
- Не застосовуйте більше номінального об’ємуtage, which is 600V CAT III.
- Будьте обережні при роботі з обtagвище 30 В змінного струму (RMS), 42 В пікового значення або 60 В постійного струму, оскільки це створює небезпеку ураження електричним струмом.
- Завжди від'єднуйте вимірювальні дроти від кола перед зміною функцій.
- Негайно замініть батарею, коли з’явиться індикатор низького заряду батареї.
- Do not operate the meter if the battery cover is not properly closed.
- Дотримуйтеся місцевих і національних правил безпеки.
3. Продукт закінчивсяview
The Mastech MS8233B Digital Multimeter features a clear display, a rotary function switch, and dedicated input jacks for various measurements.

малюнок 3.1: Фронт view of the Mastech MS8233B Digital Multimeter. This image displays the LCD screen, rotary function switch, input jacks, and control buttons.
3.1 Компоненти
- РК-дисплей: Відображає показники вимірювань, одиниці вимірювання та індикатори функцій.
- Функція поворотного перемикача: Used to select the desired measurement function (e.g., V~, V-, A-, Ω, Diode, Continuity, Temp).
- Кнопка HOLD: Заморожує поточне значення на дисплеї.
- Кнопка підсвічування: Активує підсвічування дисплея для покращення видимості в умовах слабкого освітлення.
- Вхідний роз'єм VΩmA: Позитивний вхід для об'ємуtagвимірювання опору, діодів, перевірки цілісності кола та струму до 200 мА.
- Гніздо входу COM: Загальний (негативний) вхід для всіх вимірювань.
- Вхідний роз'єм 10A: Positive input for high current measurements (up to 10A).
4. Налаштування
4.1 Встановлення батареї
The MS8233B requires 2 LR44 batteries for operation. Ensure the batteries are installed correctly before first use or when replacing them.
- Вимкніть мультиметр і від'єднайте всі вимірювальні дроти.
- Знайдіть відсік для батарейок на задній панелі глюкометра.
- За допомогою викрутки відкрийте кришку батарейного відсіку.
- Insert the 2 LR44 batteries, observing the correct polarity (+ and -).
- Встановіть на місце кришку батарейного відсіку та закріпіть її гвинтом.
5. Інструкція з експлуатації
Before taking any measurements, ensure the test leads are properly connected to the meter and the circuit under test.
5.1 Загальні операції
- Turn the rotary switch from the "OFF" position to the desired measurement function.
- Connect the test leads to the appropriate input jacks and the circuit.
- Зчитайте значення вимірювання на РК-дисплеї.
- To turn off the meter, rotate the switch back to the "OFF" position.
5.2 DC VoltagВимірювання (V-)
- Встановіть поворотний перемикач на потрібний рівень гучності постійного струмуtagдіапазон (наприклад, 200 мВ, 2 В, 20 В, 200 В, 600 В).
- Під’єднайте червоний тестовий провід до гнізда VΩmA, а чорний — до гнізда COM.
- Підключіть вимірювальні щупи до компонента або кола, що підлягає вимірюванню.
5.3 Перем. СтрумtagВимірювання (В~)
- Встановіть поворотний перемикач на потрібний рівень гучності змінного струмуtage range (e.g., 200V, 600V).
- Під’єднайте червоний тестовий провід до гнізда VΩmA, а чорний — до гнізда COM.
- Підключіть вимірювальні дроти до клем змінного струму.tagе джерело.
5.4 Вимірювання постійного струму (А)
- Set the rotary switch to the desired DC Current range (e.g., 200µA, 2mA, 20mA, 200mA, 10A).
- For currents up to 200mA, connect the red test lead to the VΩmA jack. For currents up to 10A, connect the red test lead to the 10A jack. Always connect the black test lead to the COM jack.
- Connect the meter in series with the circuit to measure the current.
- Увага: Do not attempt to measure currents exceeding 200mA through the VΩmA jack or 10A through the 10A jack.
5.5 Вимірювання опору (Ом)
- Встановіть поворотний перемикач у потрібний діапазон опору (наприклад, 200 Ом, 2 кОм, 20 кОм, 200 кОм, 2 МОм).
- Під’єднайте червоний тестовий провід до гнізда VΩmA, а чорний — до гнізда COM.
- Connect the test leads across the resistor or component to be measured. Ensure the circuit is de-energized.
5.6 Діодне випробування
- Set the rotary switch to the Diode symbol.
- Під’єднайте червоний тестовий провід до гнізда VΩmA, а чорний — до гнізда COM.
- Підключіть червоний вимірювальний провід до анода, а чорний – до катода діода. На дисплеї відобразиться напруга в прямому напрямку.tage крапля.
- Reverse the leads. An open circuit (OL) reading indicates a good diode. A reading in both directions or no reading indicates a faulty diode.
5.7 Тест безперервності
- Set the rotary switch to the Continuity symbol.
- Під’єднайте червоний тестовий провід до гнізда VΩmA, а чорний — до гнізда COM.
- Connect the test leads across the circuit or component. If the resistance is less than approximately 60Ω, the buzzer will sound, indicating continuity.
5.8 Вимірювання температури
While the product title mentions temperature, the MS8233B model's detailed specifications do not explicitly list a temperature function. If your specific unit includes this feature, typically you would:
- Set the rotary switch to the Temperature function (usually marked with °C or °F).
- Connect a K-type thermocouple (if included) to the VΩmA and COM jacks, observing polarity.
- Place the thermocouple probe at the point where temperature needs to be measured.
5.9 Функція утримання даних
- Press the "HOLD" button to freeze the current reading on the display.
- Press the "HOLD" button again to release the reading and resume live measurements.
5.10 Функція підсвічування
- Press the backlight button (often marked with a sun symbol) to turn on the display backlight.
- Press the button again to turn off the backlight.
6. Технічне обслуговування
6.1 Заміна батареї
When the low battery indicator appears on the display, replace the batteries as described in Section 4.1. Always use 2 new LR44 batteries.
6.2 Очищення
Протріть корпус рекламоюamp тканиною та м’яким миючим засобом. Не використовуйте абразивні засоби або розчинники. Перед використанням переконайтеся, що глюкометр повністю сухий.
7. Вирішення проблем
- Немає дисплея/Тьмяний дисплей: Перевірте встановлення батарей та зарядіть їх. За потреби замініть батареї.
- "OL" або "1" на дисплеї: Indicates an over-range condition or open circuit. Select a higher range or check connections.
- Неправильні показання: Ensure correct function selection, proper lead connection, and that the circuit is de-energized for resistance/diode tests.
- No Continuity Buzzer: Check if the resistance is above 60Ω or if the function is correctly selected.
8. Технічні характеристики
The following table outlines the technical specifications for the Mastech MS8233B Digital Multimeter.
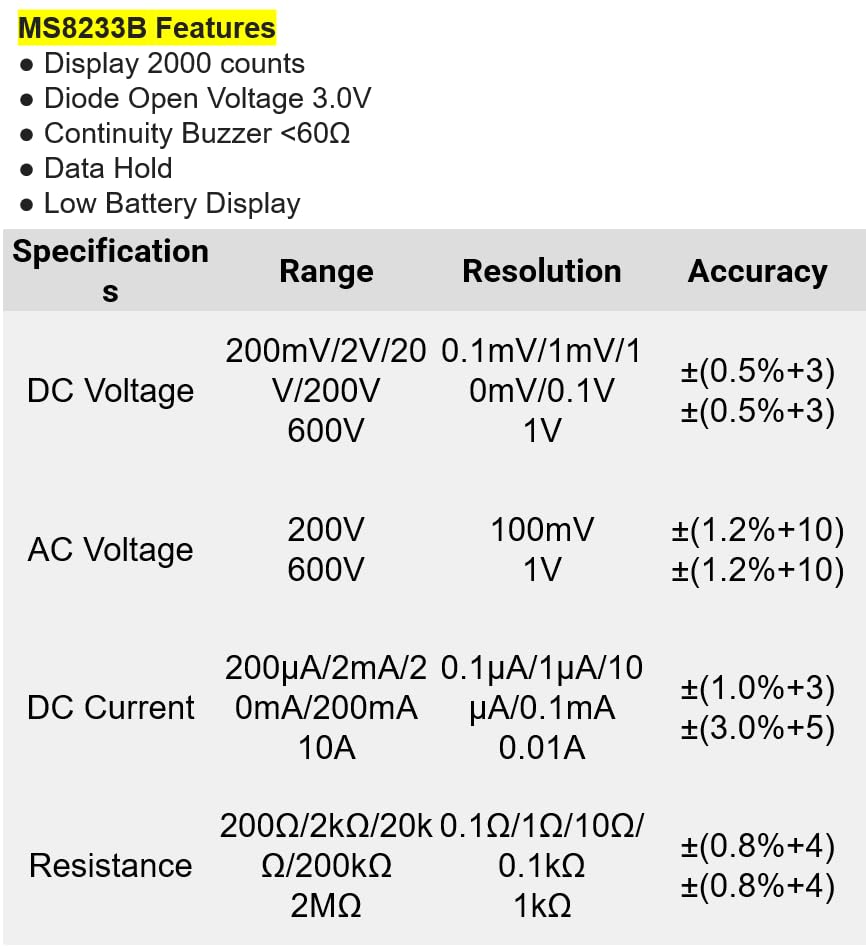
малюнок 8.1: Detailed specifications for the Mastech MS8233B, including ranges, resolutions, and accuracies for various measurements.
| Специфікація | Значення |
|---|---|
| Дисплей | 2000 графів |
| Діод відкритого об'ємуtage | 3.0 В |
| Звінок безперервності | <60Ω |
| Утримання даних | так |
| Дисплей з низьким рівнем заряду акумулятора | так |
| DC Voltage Дальність | 200 мВ, 2 В, 20 В, 200 В, 600 В |
| AC Voltage Дальність | 200В, 600В |
| Діапазон струму постійного струму | 200 мкА, 2 мА, 20 мА, 200 мА, 10 А |
| Діапазон опору | 200 Ом, 2 кОм, 20 кОм, 200 кОм, 2 МОм |
| Рейтинг безпеки | CAT III 600В |
| Джерело живлення | 2 x LR44 Batteries (included) |
| Розміри продукту | 20 х 15 х 25 см |
| Вага товару | 1 кілограм |
| Виробник | МАСТЕК |
| Номер моделі товару | YQ-MS8233B |
| Країна походження | Тайвань |

малюнок 8.2: A comparison table showing features across various Mastech digital multimeter models, including the MS8233B.
9. Гарантія та підтримка
For warranty information, technical support, or service inquiries, please refer to the documentation provided with your purchase or contact your retailer. Keep your purchase receipt as proof of purchase for any warranty claims.


