1. Вступ
Thank you for choosing the Geek Smart L7 Robot Vacuum and Mop. This device is designed to provide efficient and thorough cleaning for your home, combining powerful vacuuming with intelligent mopping capabilities. Featuring advanced LDS navigation, Wi-Fi connectivity, and smart app control, the L7 ensures a customized cleaning experience for various floor types, including carpets and hard floors.
This manual provides essential information for the safe operation, setup, maintenance, and troubleshooting of your robot vacuum. Please read it carefully before use and retain it for future reference.
2. Техніка безпеки
Щоб зменшити ризик травмування або пошкодження, прочитайте та дотримуйтесь усіх запобіжних заходів під час налаштування, використання та обслуговування робота-пилососа.
- Цим пристроєм можуть користуватися діти віком від 8 років і особи з обмеженими фізичними, сенсорними чи розумовими здібностями або з недостатнім досвідом і знаннями, якщо вони перебувають під наглядом або отримали інструкції щодо безпечного користування пристроєм і розуміють небезпеку, пов’язану з цим. .
- Слідкуйте за дітьми, щоб переконатися, що вони не граються з пристроєм.
- Чищення та технічне обслуговування не повинні виконуватися дітьми без нагляду.
- Використовуйте лише оригінальний адаптер живлення, наданий виробником.
- Не використовуйте робота в середовищах з відкритим вогнем або легкозаймистими матеріалами.
- Тримайте волосся, вільний одяг, пальці та всі частини тіла подалі від отворів і рухомих частин.
- Do not operate the robot in rooms where an infant or child is sleeping.
- Не використовуйте робота для збирання великого сміття, рідин або палаючих предметів.
- Ensure the robot is placed on a stable surface and cannot fall from high places.
- Turn off the robot and unplug the charging dock before cleaning or maintenance.
3. Вміст упаковки
Переконайтеся, що всі компоненти є в наявності та знаходяться у належному стані після розпакування.
- Geek Smart L7 Robot Vacuum and Mop
- Док-станція для зарядки
- Адаптер живлення
- Бічні щітки (2 пари)
- Основна кисть
- Dust Bin (680ML)
- 2-in-1 Water Tank & Dust Bin (350ML water tank & 260ML dust bin)
- Швабра (2)
- High-Efficiency Filter (pre-installed in dust bin)
- Інструмент для очищення
- Посібник користувача
4. Продукт закінчивсяview
Компоненти робота-вакуума

Image: The Geek Smart L7 Robot Vacuum, showcasing its top view with control buttons, LDS sensor, and accompanying accessories like the charging dock and replacement filters.
- LDS Navigation Sensor: Located on top, for precise mapping and navigation.
- Кнопки управління: Живлення/Очищення, Дім/Підзарядка.
- Передній бампер: Виявляє перешкоди.
- Бічні щітки: Змітайте сміття на головний шлях щітки.
- Основна щітка: Збирає бруд та сміття.
- Ведучі колеса: Дозволяють пересування по різних поверхнях.
- Контакти для зарядки: Підключіться до зарядної док-станції.
- Пилозбірник / Резервуар для води: Removable compartments for dust collection and water for mopping.
Док-станція для зарядки
The charging dock provides power to recharge the robot's battery. It should be placed in an open area with sufficient clearance.
5. Налаштування
5.1 Розміщення зарядної док-станції
- Розмістіть зарядну док-станцію біля стіни на відкритому просторі.
- Ensure there is at least 0.5 meters (1.6 feet) of clear space on both sides of the dock and 1.5 meters (4.9 feet) in front.
- Підключіть адаптер живлення до зарядної док-станції та вставте його в розетку.
- Переконайтеся, що індикатор живлення на зарядній док-станції світиться.
5.2 Початкове заряджання
- Помістіть робота на зарядну док-станцію, переконавшись, що зарядні контакти суміщені.
- The robot will automatically begin charging. Allow it to fully charge before its first use (approximately 4-5 hours).
5.3 Підключення та зіставлення програм

Image: The Geek Smart L7 Robot Vacuum actively scanning its environment using LDS navigation to create a detailed map, with digital map representations floating above it.
- Download the Geek Smart app from your mobile device's app store (available for iOS and Android).
- Зареєструйте обліковий запис і увійдіть.
- Follow the in-app instructions to add your L7 robot vacuum. This typically involves connecting to the robot's Wi-Fi hotspot and then connecting the robot to your home Wi-Fi network.
- Once connected, initiate a full cleaning cycle. The robot will use its LDS navigation to create an accurate map of your home. This map will be saved in the app for future use, allowing for features like selective room cleaning and setting no-go zones. The robot can save up to 5 different maps.
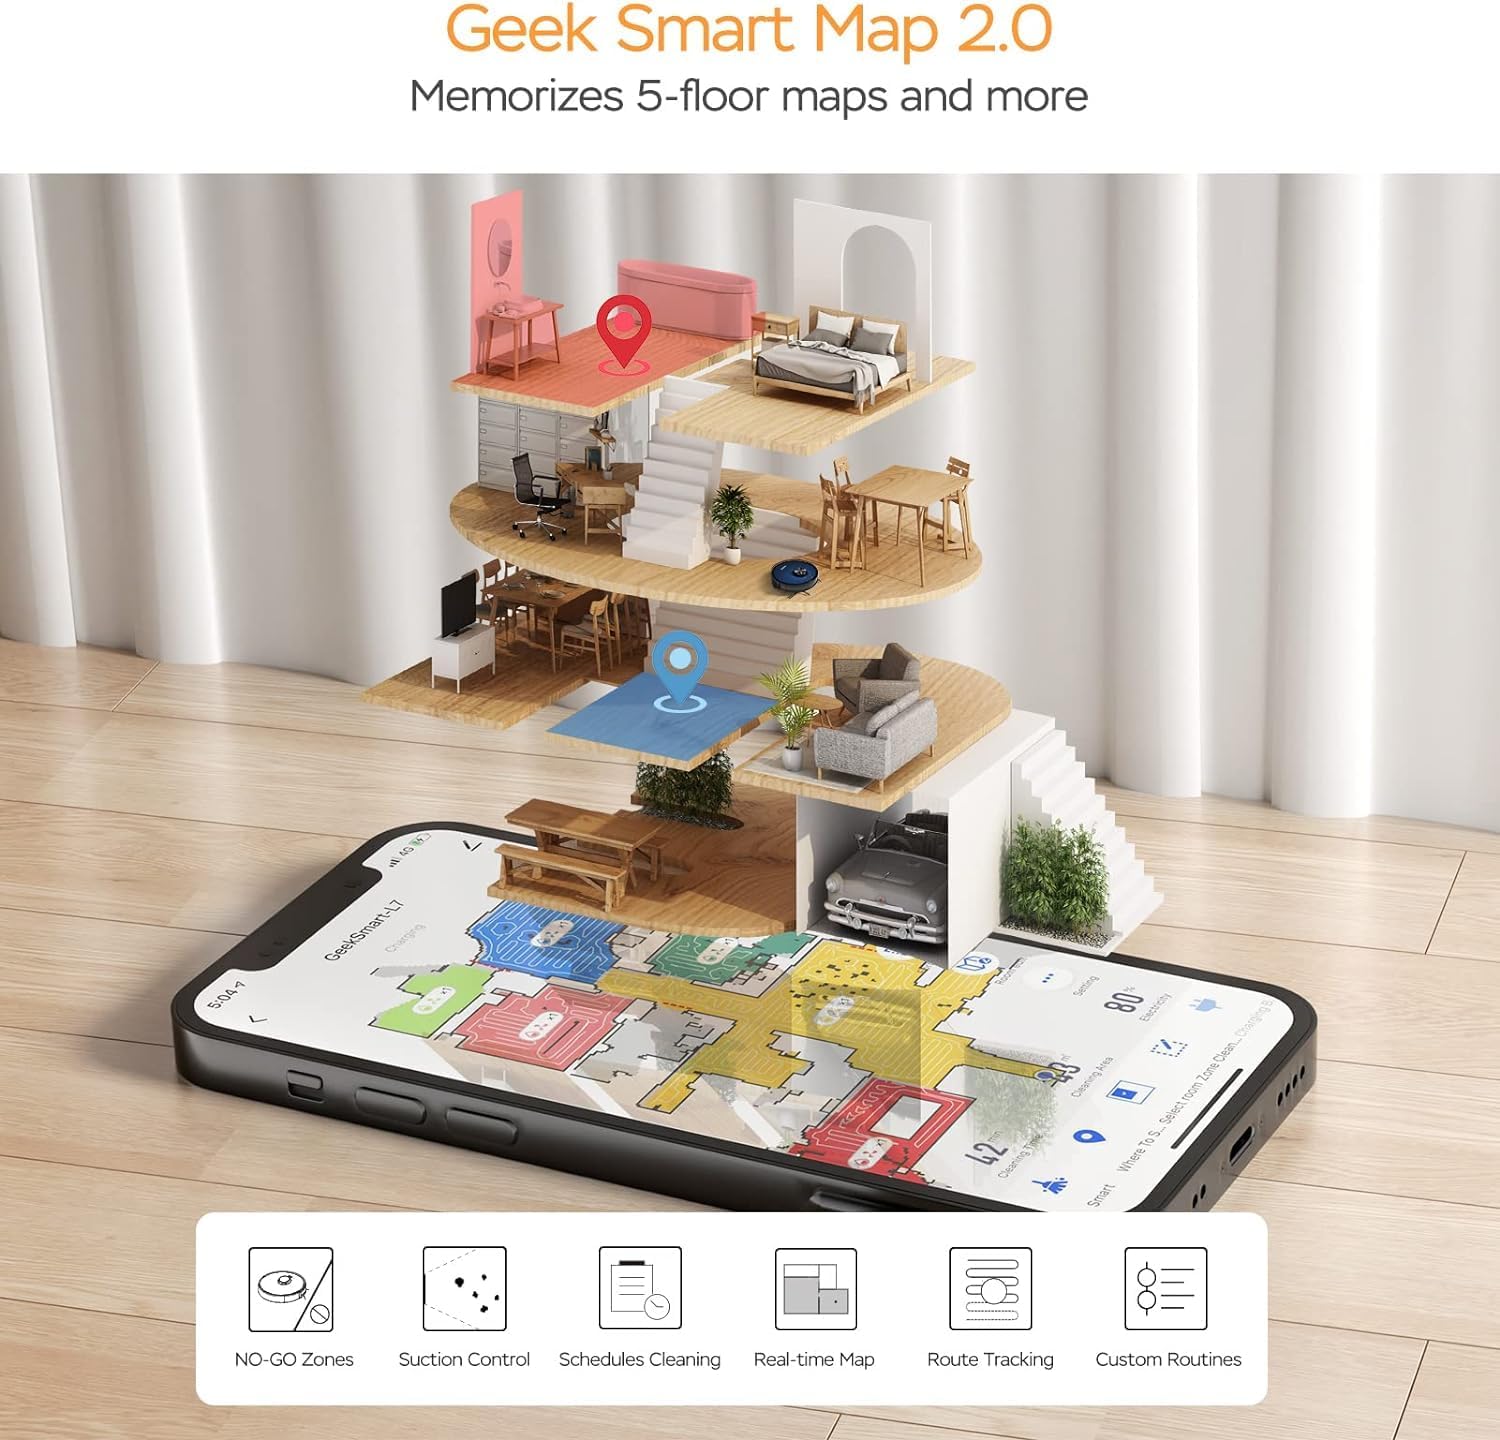
Image: A smartphone screen displaying the Geek Smart app interface, showing a color-coded floor plan map with various cleaning zones and controls.
6. Інструкція з експлуатації
6.1 Запуск та зупинка очищення
- Почати очищення: Press the Power/Clean button on the robot or tap "Start Cleaning" in the app. The robot will begin a full cleaning cycle.
- Призупинити прибирання: Press the Power/Clean button during operation or tap "Pause" in the app.
- Резюме прибирання: Press the Power/Clean button again or tap "Resume" in the app.
- Повернення до доку: Press the Home/Recharge button on the robot or tap "Recharge" in the app. The robot will return to its charging dock.
6.2 Режими очищення
The L7 offers various cleaning modes to suit different needs.

Image: The Geek Smart L7 Robot Vacuum demonstrating its 2-in-1 sweeping and mopping capabilities on a hard floor, with debris being swept and a damp mop trail visible.
- Автоматичне очищення: The robot intelligently plans its cleaning path using LDS navigation.
- Пилососити: Utilizes up to 2700Pa suction power to clean dirt and debris from various surfaces.
- Прибирання: Attach the mop cloth and fill the 2-in-1 water tank. The electronic water tank allows for adjustable water output.
- Vacuum & Mop (Simultaneous): The robot can vacuum and mop simultaneously when the 2-in-1 tank is installed.
- Режим посилення килимового покриття: The robot automatically increases suction power when it detects carpeted areas for deeper cleaning.

Image: The Geek Smart L7 Robot Vacuum actively cleaning a hard floor, with a visual representation of its powerful 2700Pa suction lifting debris.

Image: The Geek Smart L7 Robot Vacuum transitioning from a hard floor to a carpet, illustrating its Carpet Boost Mode with enhanced suction indicated by glowing lines.

Image: The Geek Smart L7 Robot Vacuum positioned on a floor split between marble and wood, illustrating its integrated mopping system and adjustable water output for different surfaces.
6.3 Функції керування програмами
The Geek Smart app unlocks advanced cleaning customization.
- Вибіркове прибирання кімнат: Choose specific rooms or areas on the map for cleaning.
- No-Go Zones / No-Mop Zones: Draw virtual boundaries on the map to prevent the robot from entering certain areas or mopping carpets.
- Invisible Walls: Create virtual walls to restrict the robot's movement.
- Планування: Set cleaning schedules for automatic operation at desired times.
- Регулювання потужності всмоктування: Manually adjust the suction level.
- Water Output Adjustment: Control the water flow for mopping.

Image: The Geek Smart L7 Robot Vacuum operating quietly (65dB) in a living room, demonstrating its low noise level suitable for homes with sleeping individuals or pets.
7. Технічне обслуговування
Регулярне технічне обслуговування забезпечує оптимальну продуктивність і подовжує термін служби вашого робота-пилососа. Завжди вимикайте робота та від’єднуйте зарядну док-станцію від мережі перед виконанням будь-якого технічного обслуговування.
7.1 Спорожнення пилозбірника
- Натисніть кнопку звільнення пилозбірника та витягніть його.
- Open the dust bin cover and empty the contents into a trash can.
- Clean the filter and dust bin with the provided cleaning tool or a soft brush.
- Знову встановіть контейнер для пилу.
7.2 Cleaning the 2-in-1 Water Tank & Dust Bin
- Remove the 2-in-1 tank from the robot.
- Empty any remaining water from the water tank compartment.
- Спорожніть відсік для пилу та очистіть фільтр.
- Rinse the water tank compartment with clean water. Do not immerse the entire tank in water, especially the electronic components.
- Allow all parts to air dry completely before reassembling and reinstalling.
7.3 Очищення головної щітки
- Flip the robot over and press the release tabs to remove the main brush cover.
- Вийміть основну щітку.
- Use the cleaning tool to remove hair and debris tangled around the brush and its bearings.
- Знову встановіть головну щітку та кришку.
7.4 Очищення бічних щіток
- Обережно потягніть бічні щітки вгору, щоб зняти їх.
- Remove any hair or debris. If brushes are bent, soak them in warm water for a few minutes to reshape.
- Притисніть щітки назад на місце до клацання.
7.5 Очищення датчиків та зарядних контактів
- Use a clean, dry cloth to wipe the cliff sensors (located on the bottom of the robot), wall sensors (on the side), and the charging contacts on both the robot and the charging dock.
- Ensure the LDS sensor on top is also clean and free of obstructions.
8. Вирішення проблем
Якщо у вас виникли проблеми з роботом-пилососом, зверніться до наступної таблиці, щоб знайти поширені проблеми та способи їх вирішення.
| проблема | Можлива причина | Рішення |
|---|---|---|
| Робот не включається | Низький рівень заряду батареї; живлення вимкнено | Помістіть робота на зарядну док-станцію; переконайтеся, що вимикач живлення увімкнено. |
| Робот не може заряджатися | Забруднені контакти зарядки; зарядна док-станція не живиться | Очистіть зарядні контакти на роботу та док-станції; переконайтеся, що док-станція підключена до мережі. |
| Робот часто застрягає | Перешкоди на підлозі; датчики перепаду висоти брудні | Clear cables and small objects; Clean cliff sensors. |
| Погана ефективність очищення | Пилосбірник повний; Щітки заплуталися; Фільтр засмічений | Empty dust bin; Clean main and side brushes; Clean or replace filter. |
| Функція миття підлоги не працює | Water tank empty; Mop cloth dry; Water outlet clogged | Fill water tank; Moisten mop cloth; Clean water outlet. |
| Проблеми з підключенням програми | Неправильний пароль Wi-Fi; Роутер занадто далеко; Робот офлайн | Verify Wi-Fi credentials; Move robot closer to router; Restart robot and router. |
9. Технічні характеристики
| Особливість | Специфікація |
|---|---|
| Бренд | Geek Smart |
| Назва моделі | L7 |
| Тип навігації | 360° ЛіДАР |
| Максимальна потужність всмоктування | 2700 Па |
| Ємність акумулятора | 2600 мАг |
| Максимальний час виконання | 130 хвилин |
| Ємність пилозбірника | 680 мл |
| Water Tank Capacity (2-in-1) | 350 мл |
| Рівень шуму | Sub-65 dB |
| Розміри продукту | 12.59 см (Д) x 12.59 см (Ш) x 3.74 см (В) |
| Вага товару | 13.39 фунта |
| Сумісні пристрої | Amazon Echo |
| UPC | 764773837187 |
10. Гарантія та підтримка
Geek Smart products are manufactured to the highest quality standards. For warranty information, technical support, or customer service inquiries, please refer to the contact information provided on the product packaging or visit the official Geek Smart webсайт.
Зберігайте підтвердження покупки для гарантійних претензій.


