1. Вступ
The Vivolink USB-C 4K KVM Extender (Model W126974534) is designed to extend USB-C signals, including 4K video, USB data (for keyboard, mouse, and other peripherals), and control signals, over long distances using HDBaseT 3.0 technology. This system consists of a Transmitter (TX) unit and a Receiver (RX) unit, connected by a single Cat6a/7 Ethernet cable. It enables users to operate a computer or other USB-C source device from a remote location with a display, keyboard, and mouse, maintaining high-quality 4K resolution.
2. Інформація про безпеку
- Перед використанням пристрою уважно прочитайте всі інструкції.
- Do not expose this unit to rain, moisture, or excessive humidity.
- Забезпечте належну вентиляцію, щоб запобігти перегріву. Не закривайте вентиляційні отвори.
- Використовуйте лише адаптери живлення, що постачаються з пристроєм.
- Не намагайтеся відкривати або модифікувати пристрій. Зверніться до кваліфікованого персоналу для проведення будь-яких технічних робіт.
- Тримайте пристрій подалі від сильних електромагнітних полів.
- Відключайте живлення під час грози або коли пристрій не використовується протягом тривалого часу.
3. Вміст упаковки
Будь ласка, уважно перевірте вміст упаковки. Якщо будь-які елементи відсутні або пошкоджені, негайно зверніться до свого дилера.
- 1x Vivolink USB-C 4K KVM Extender Transmitter (TX) Unit
- 1x Vivolink USB-C 4K KVM Extender Receiver (RX) Unit
- 2 адаптери живлення (12 В постійного струму)
- 1 кабель USB-C – USB-C
- 1x Посібник користувача
- Монтажні аксесуари (якщо входять до комплекту)
4. Продукт закінчивсяview
The Vivolink USB-C 4K KVM Extender leverages HDBaseT 3.0 technology to provide uncompressed 4K video, audio, USB 2.0, and control signals over a single Cat6a/7 cable up to 100 meters. This solution is ideal for applications requiring remote access to a USB-C enabled computer, such as control rooms, medical imaging, digital signage, and educational facilities.
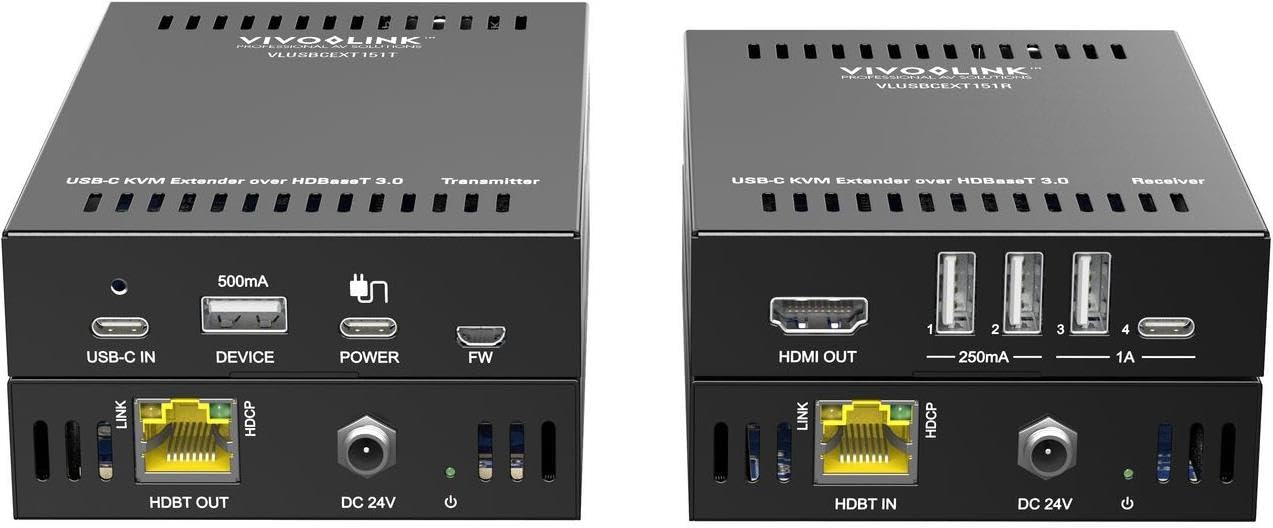
Зображення 1: Vivolink USB-C 4K KVM Extender units. This image displays the compact design of both the transmitter and receiver units, highlighting their various ports for connectivity.
The Transmitter unit connects to your USB-C source device (e.g., laptop, PC), while the Receiver unit connects to your display, keyboard, mouse, and other USB peripherals at the remote location. The HDBaseT 3.0 link ensures reliable and high-bandwidth transmission.
5. Інструкції з налаштування
Follow these steps to set up your Vivolink USB-C 4K KVM Extender:
- Пристрої для вимкнення живлення: Ensure all devices, including your source computer, display, and the KVM extender units, are powered off before making any connections.
- Connect Source to Transmitter: Connect your USB-C source device (e.g., PC, laptop) to the USB-C input port on the Transmitter (TX) unit using the provided USB-C cable.
- Connect Display to Receiver: Connect your display (monitor) to the HDMI output port on the Receiver (RX) unit using an HDMI cable.
- Connect Peripherals to Receiver: Connect your USB keyboard, mouse, and any other USB peripherals to the USB ports on the Receiver (RX) unit.
- Connect TX and RX Units: Connect the HDBaseT OUT port on the Transmitter (TX) unit to the HDBaseT IN port on the Receiver (RX) unit using a single, high-quality Cat6a or Cat7 Ethernet cable. Ensure the cable length does not exceed 100 meters for optimal performance.
- Застосувати живлення: Connect the provided 12V DC power adapters to both the Transmitter (TX) and Receiver (RX) units, then plug them into power outlets.
- Пристрої, що вмикаються: Power on your display, then your source computer. The extender units will typically power on automatically when connected to power.
- Перевірте підключення: Check for signal on your remote display and test the functionality of your keyboard and mouse.
6. Інструкція з експлуатації
Once the Vivolink USB-C 4K KVM Extender is set up correctly, operation is straightforward:
- Автоматичне виявлення сигналу: The extender units are designed to automatically detect and transmit the video, audio, and USB signals from your source device to the remote display and peripherals.
- роздільна здатність: The system supports resolutions up to 4K (3840x2160) at 60Hz, depending on the capabilities of your source and display devices.
- Функціональність USB: All connected USB devices (keyboard, mouse, USB drives, etc.) should function as if directly connected to the source computer.
- Силовий цикл: If you encounter any issues, try power cycling both the Transmitter and Receiver units, as well as your source computer and display.
7. Технічне обслуговування
To ensure the longevity and optimal performance of your Vivolink USB-C 4K KVM Extender, follow these maintenance guidelines:
- Прибирання: Використовуйте м’яку суху тканину для очищення зовнішніх поверхонь пристроїв. Не використовуйте рідкі або аерозольні засоби для чищення.
- Вентиляція: Ensure that the ventilation openings on both units are not obstructed to prevent overheating.
- Управління кабелем: Keep cables neatly organized and avoid sharp bends or excessive tension on connectors.
- Середовище: Store and operate the device in a cool, dry environment, away from direct sunlight, heat sources, and extreme temperatures.
8. Вирішення проблем
If you experience issues with your KVM extender, refer to the following troubleshooting steps:
| проблема | Можливе рішення |
|---|---|
| No video on remote display |
|
| Клавіатура/миша не реагує |
|
| Intermittent signal or flickering video |
|
9. Технічні характеристики
- Бренд: Vivolink
- модель: W126974534 (VLUSBCEXT150)
- Технологія: HDBaseT 3.0
- Роздільна здатність відео: До 4K (3840x2160) при 60 Гц
- введення: USB-C (on TX unit)
- Вихід: HDMI (on RX unit)
- USB: USB 2.0 (on RX unit for peripherals)
- Відстань розширення: Up to 100 meters (328 feet) over Cat6a/7 cable
- Джерело живлення: DC 12V (via included power adapters)
- Виробник: Vivolink
- ASIN: B0CPWLBPGF
10. Гарантія та підтримка
Vivolink products are designed for reliability and performance. For information regarding warranty coverage, technical support, or service, please refer to the warranty card included with your product or visit the official Vivolink website. Please have your product model number (W126974534) and purchase details ready when contacting support.
Інтернет-ресурси: For the latest drivers, firmware updates, and additional support documentation, please visit the Vivolink support page.


