1. Вступ
This manual provides instructions for the safe and effective use of your AquilaPro KL02060 Laser Measuring Tool. This compact device is designed for accurate distance measurements up to 197 feet (60 meters) with an accuracy of ±0.078 inches (2mm). It features multiple measurement modes, unit switching, and a USB rechargeable battery.
2. Інформація про безпеку
WARNING: Read all safety warnings and instructions before using this product.
- This device is a Class II laser product with a power output of less than 1mW.
- Не дивіться прямо на лазерний промінь.
- Не направляйте лазерний промінь на людей або тварин.
- Не розбирайте та не модифікуйте пристрій. Ремонт повинен виконуватися лише уповноваженим сервісним персоналом.
- Тримайте пристрій у недоступному для дітей місці.
- Use only the specified charging method (USB).
- Уникайте використання пристрою у вибухонебезпечних середовищах або поблизу легкозаймистих матеріалів.
3. Продукт закінчивсяview
Familiarize yourself with the components and controls of your AquilaPro KL02060 Laser Measuring Tool.

малюнок 3.1: Фронт view of the AquilaPro KL02060 Laser Measuring Tool with key components labeled. Labels include: screen, single measurement/unit switch button, addition/subtraction measurement button, function/front/rear reference button, history/preset value setting button, and power/backlight button.
- екран: Displays measurements, modes, battery status, and other information.
- Single Measurement / Unit Switch Button: Initiates a single measurement or cycles through measurement units (m/in/ft).
- Addition / Subtraction Measurement Button: Activates addition or subtraction functions for measurements.
- Function / Front/Rear Reference Button (FUNC): Cycles through measurement modes (e.g., length, area, volume, Pythagorean) and switches the measurement reference point (front or rear of the device).
- History / Preset Value Setting Button (PRESET): Accesses measurement history or sets preset values.
- Power / Backlight Button: Turns the device on/off and controls the screen backlight.
4. Налаштування
4.1 Заряджання батареї
The AquilaPro KL02060 is equipped with a rechargeable Lithium-ion battery. Before first use, fully charge the device.
- Знайдіть порт USB для зарядки на пристрої.
- Connect the device to a standard USB power source (e.g., computer, wall adapter) using the provided USB cable.
- Індикатор заряду батареї на екрані показуватиме стан заряджання.
- Після повної зарядки від’єднайте USB-кабель.
5. Інструкція з експлуатації
5.1 Увімкнення/вимкнення живлення
- Щоб увімкнути живлення: натисніть і утримуйте Power / Backlight Button () протягом приблизно 2 секунд.
- Щоб вимкнути живлення: натисніть і утримуйте Power / Backlight Button for approximately 3 seconds. The device will also automatically power off after a period of inactivity to conserve battery.
5.2 Перемикання блоків
The device supports measurements in meters (m), inches (in), and feet (ft).
- While the device is on, short press the Single Measurement / Unit Switch Button to cycle through the available units. The current unit will be displayed on the screen.
5.3 Benchmark Switching (Front/Rear Reference)
The measurement can be taken from the front edge or the rear edge of the device. The default setting is typically the rear edge.

малюнок 5.1: Illustration of switching between front and rear measurement reference points. The icon on the screen indicates the active reference point.
- Коротко натисніть кнопку Function / Front/Rear Reference Button (FUNC) to toggle between front and rear reference points.
- An icon on the display will indicate whether the measurement is taken from the front or rear of the device.
- Front Reference: Вимірювання починається з переднього краю пристрою.
- Rear Reference: Measurement starts from the rear edge of the device (includes the length of the device itself).
5.4 Режими вимірювання
The AquilaPro KL02060 offers various measurement functions. Press the Function / Front/Rear Reference Button (FUNC) repeatedly to cycle through the modes.

малюнок 5.2: Visual representation of the different measurement modes available on the device.
- Одиночне вимірювання: Натисніть Single Measurement / Unit Switch Button once to emit the laser, then press again to take a single distance measurement.
- Безперервне вимірювання (відстеження): In this mode, the device continuously measures and displays the distance as you move it. This is useful for finding minimum/maximum distances or for real-time positioning.
- Вимірювання площі:
- Select Area mode.
- Виміряйте довжину.
- Виміряйте ширину.
- Пристрій автоматично розрахує та відобразить площу.
- Вимірювання об'єму:
- Select Volume mode.
- Виміряйте довжину.
- Виміряйте ширину.
- Виміряйте висоту.
- Пристрій автоматично розрахує та відобразить об'єм.
- Піфагорове вимірювання (непряме вимірювання): Used to calculate inaccessible distances using the Pythagorean theorem.
- Select Pythagorean mode (e.g., two-point or three-point).
- Follow the on-screen prompts to measure the required sides (hypotenuse and one leg).
- The device will calculate the unknown leg or height.
5.5 Додавання та віднімання
You can add or subtract measurements directly on the device.
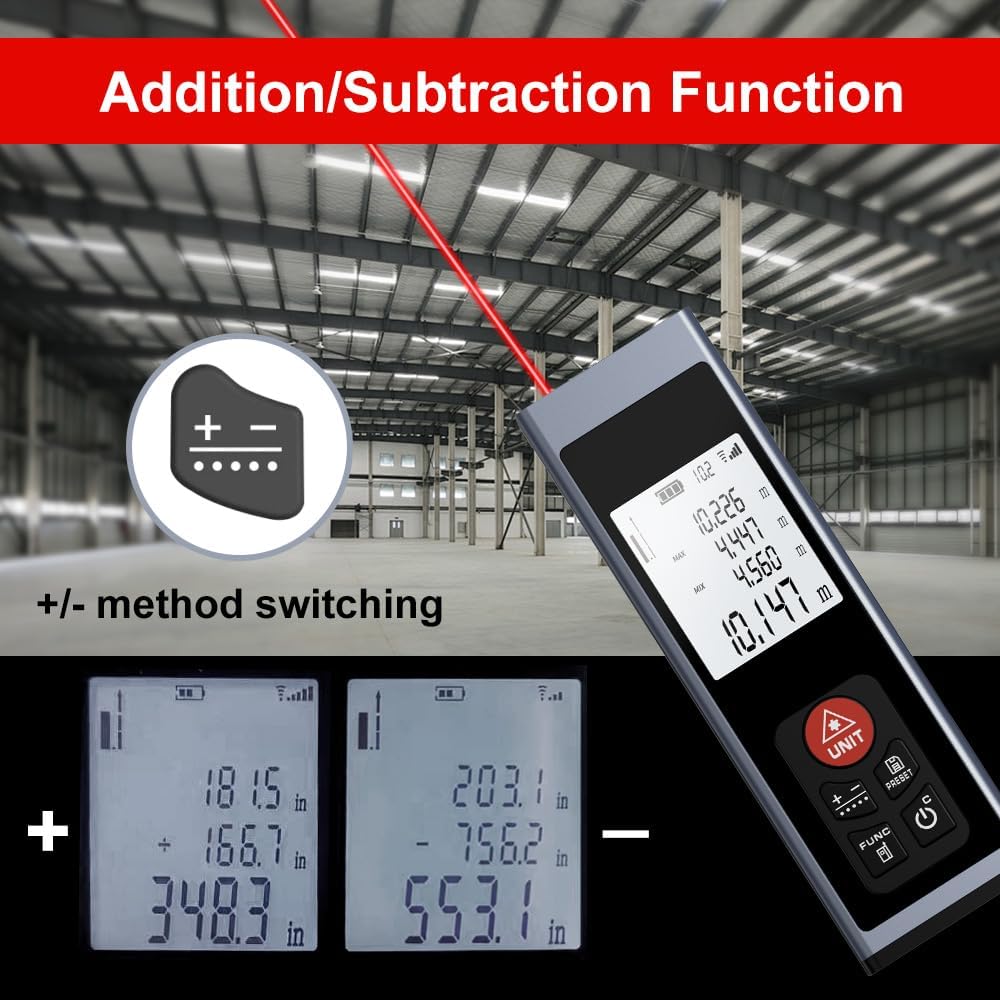
малюнок 5.3: Examples of addition and subtraction operations displayed on the device screen.
- Take your first measurement.
- Натисніть Addition / Subtraction Measurement Button () to select either addition (+) or subtraction (-).
- Take your second measurement.
- The device will display the calculated sum or difference.
5.6 Measurement History and Preset Values
- Натисніть History / Preset Value Setting Button (PRESET) повторноview previous measurements or to set specific preset values for quick recall. Refer to the on-screen prompts for detailed usage.
6. Технічне обслуговування
- Прибирання: Використовуйте м'який, damp cloth to clean the device. Do not use abrasive cleaners or solvents. Ensure the laser lens and display are kept clean for optimal performance.
- Зберігання: Store the device in a cool, dry place, away from direct sunlight and extreme temperatures. If storing for an extended period, ensure the battery is partially charged (around 50%) to prolong its lifespan.
- Догляд за акумулятором: Регулярно заряджайте акумулятор, навіть якщо пристрій не використовується часто, щоб підтримувати його справність.
7. Вирішення проблем
If you encounter issues with your AquilaPro KL02060, refer to the following common solutions:
| проблема | Можлива причина | Рішення |
|---|---|---|
| Пристрій не включається. | Низький або розряджений акумулятор. | Зарядіть пристрій за допомогою USB-кабелю. |
| Неточні вимірювання. | Dirty laser lens; incorrect reference point; unstable surface. | Clean the laser lens; verify the front/rear reference setting; ensure a stable measurement surface. |
| Лазерний промінь не видно. | Bright ambient light; device malfunction. | Use in lower light conditions; contact customer support if problem persists. |
| Дисплей порожній або завислий. | Помилка програмного забезпечення; низький заряд батареї. | Try restarting the device. Ensure battery is charged. |
If the problem persists after attempting these solutions, please contact AquilaPro customer support.
8. Технічні характеристики
| Особливість | Деталь |
|---|---|
| Номер моделі | KL02060 |
| Діапазон вимірювання | 197 футів (60 м) |
| Точність | ±0.078 inch (±2 mm) |
| Одиниці вимірювання | Meters (m), Inches (in), Feet (ft) |
| Лазерний клас | Клас II, <1 мВт |
| Тип батареї | Акумуляторна літій-іонна батарея (в комплекті) |
| Порт зарядки | USB |
| Розміри продукту | 2.79 x 1.52 x 8.64 cm (approx. 28L x 15W x 86H mm) |
| Вага товару | 50 г |
| матеріал | Алюміній |
| Рівень водонепроникності | Waterproof (IP54 International Protection Rating) |
| Включені компоненти | Шнурок |
9. Гарантія та підтримка
AquilaPro products are designed for reliability and performance. For warranty information or technical support, please refer to the contact details provided with your purchase or visit the official AquilaPro webсайт.