вступ
This manual provides detailed instructions for the assembly, operation, and maintenance of your Vetroo AL800 Mid Tower ATX PC Computer Case. Please read this manual thoroughly before beginning installation to ensure proper setup and optimal performance.

Figure 1: Vetroo AL800 Mid Tower ATX PC Computer Case (Black)
Інформація про безпеку
- Завжди від’єднуйте блок живлення від розетки перед встановленням або видаленням будь-яких компонентів.
- Handle components with care to avoid damage from electrostatic discharge. Consider using an anti-static wrist strap.
- Keep the case and components away from liquids and excessive humidity.
- Забезпечте належну вентиляцію, щоб запобігти перегріву.
- Не намагайтеся модифікувати корпус або його компоненти, оскільки це може анулювати гарантію та створити ризики для безпеки.
Вміст упаковки
Перевірте наявність усіх елементів в упаковці:
- Vetroo AL800 Mid Tower ATX PC Computer Case
- Коробка з аксесуарами (гвинти, стійки, кабельні стяжки)
- Pre-installed 1x 120mm PWM/ARGB Fan (rear)
- Посібник користувача (цей документ)
Ключові характеристики
- ARGB LED Strip: Integrated LED lighting and ARGB case fans can be synchronized with compatible motherboards via a 5V 3-pin interface.
- Door Opening Design: Features a 4mm thick tempered glass side panel with a convenient door-opening mechanism for easy access to internal components.
- High Performance Airflow: A mesh front panel and strategically placed dust filters ensure optimal airflow and system cooling.
- Широка сумісність: Supports ATX, M-ATX, and ITX motherboards. Accommodates GPUs up to 340mm in length and CPU coolers up to 165mm in height.
- Підтримка рідинного охолодження: Front panel supports up to a 360mm liquid cooling radiator.
- Підтримка вентиляторів: Підтримує до 8 x 120-мм вентиляторів.
- Просте управління кабелем: Includes two soft silicone cord grommets for organized cable routing.
- Powerful I/O Panel: Features 1x USB 3.2 Type-C port, 2x USB 3.0 ports, and a combined microphone/headphone jack.
Налаштування та встановлення
1. Загальна підготовка
- Поставте корпус на рівну, стійку поверхню.
- Open the tempered glass side panel by gently pulling it open. It is hinged for easy access.
- Remove the tempered glass panel if necessary for easier installation by lifting it off its hinges once open.

Figure 2: Tempered Glass Door Opening Design
2. Встановлення материнської плати
- Встановіть екран вводу/виводу (якщо є) у задній отвір корпусу.
- Align your ATX, M-ATX, or ITX motherboard with the pre-installed standoffs.
- Secure the motherboard using the provided screws from the accessory box.
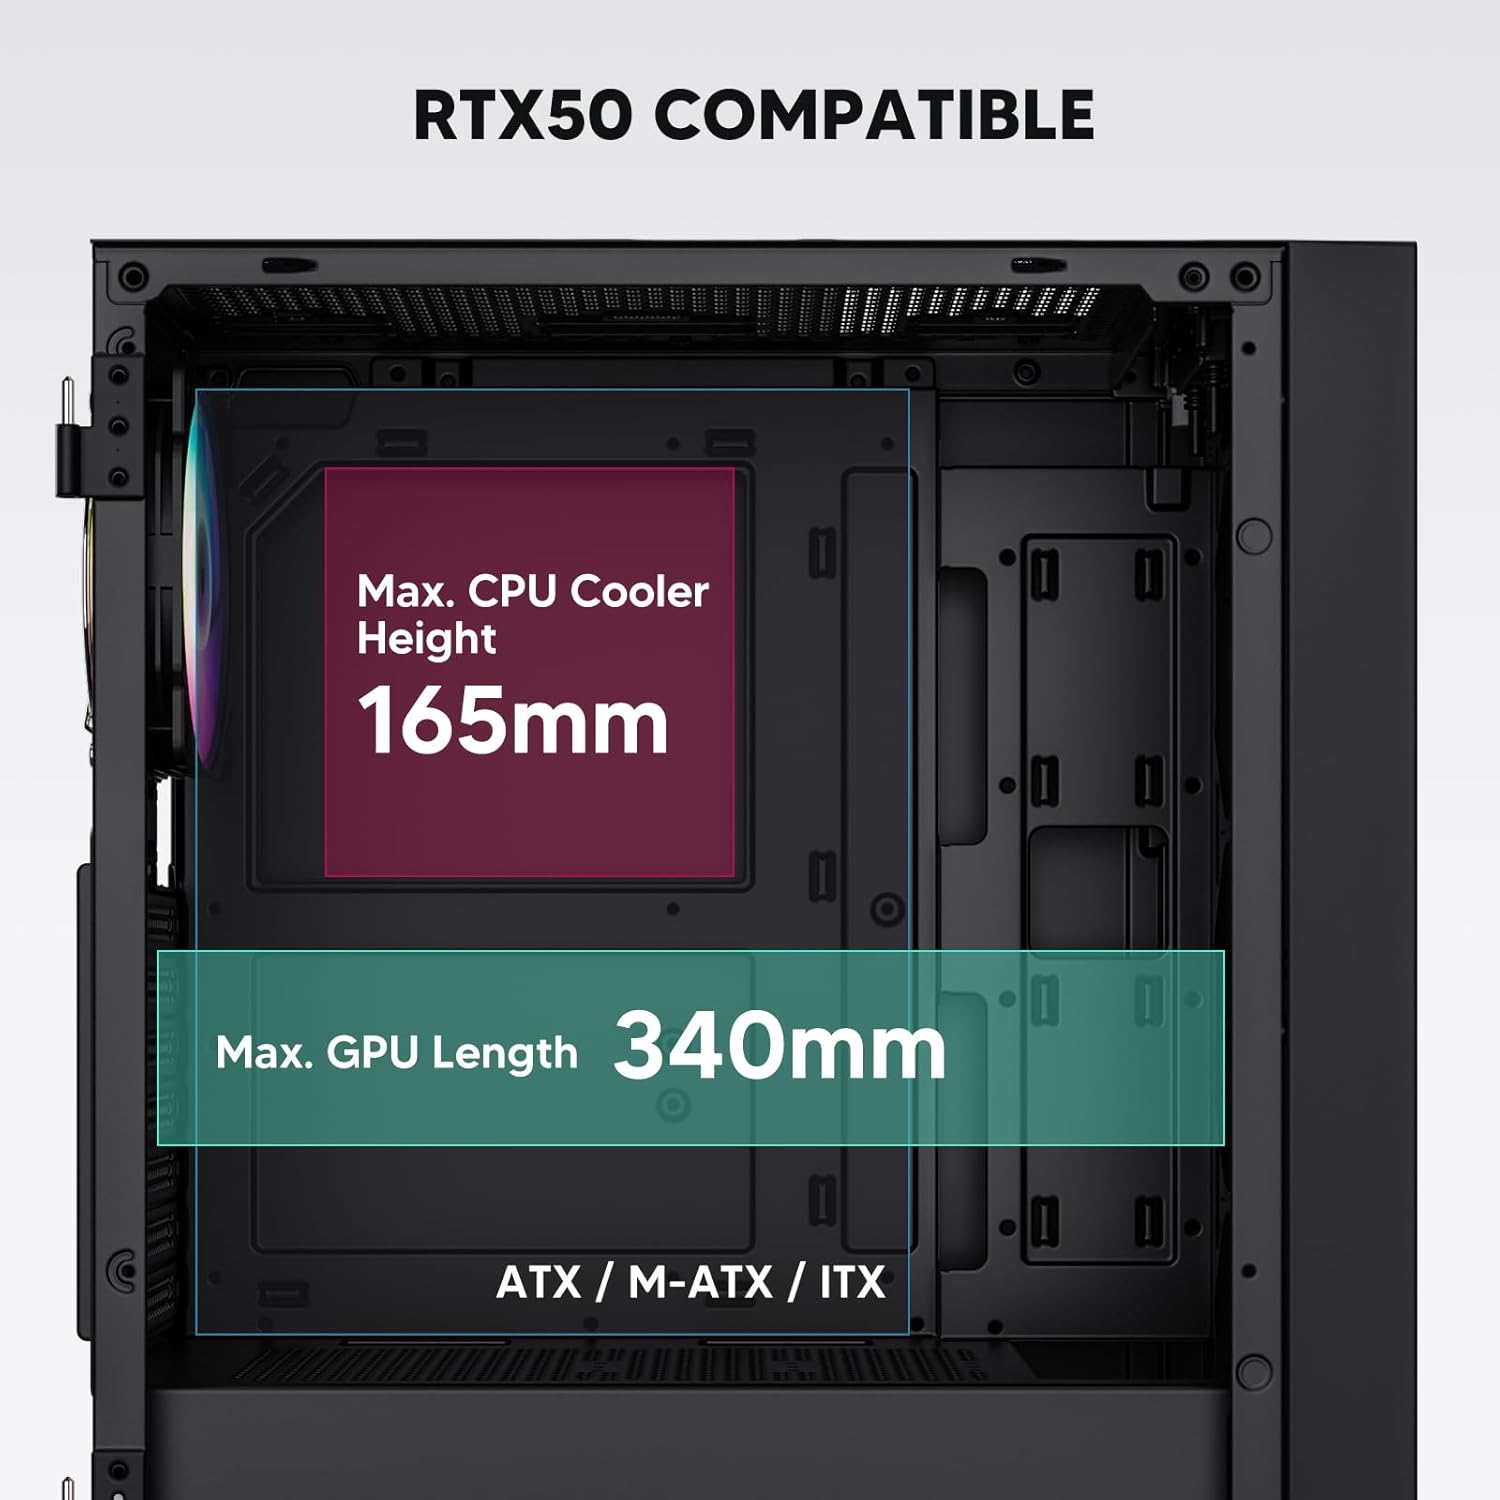
Figure 3: Motherboard and Component Clearance (Max CPU Cooler Height 165mm, Max GPU Length 340mm)
3. Storage Device Installation (HDD/SSD)
- Locate the dedicated mounting points for SSDs and HDDs.
- Install 2.5" SSDs onto the SSD trays or mounting brackets.
- Встановіть 3.5-дюймові жорсткі диски у відсік для дисків, розташований у нижній частині корпусу.
- Secure all drives with the appropriate screws.

Figure 4: Internal Layout with Drive Bay Locations (SSD, HDD, Power Supply)
4. Установка джерела живлення
- Mount your power supply unit (PSU) in the dedicated compartment at the bottom rear of the case.
- Ensure the PSU fan faces downwards (if the case has a bottom vent) or upwards, depending on your cooling preference.
- Secure the PSU with screws from the rear of the case. The case supports PSUs up to 200mm in length.
5. Встановлення плати розширення (графічного процесора)
- Зніміть необхідні кришки слотів PCI-E із задньої панелі корпусу.
- Вставте відеокарту або інші карти розширення в слоти PCI-E материнської плати.
- Закріпіть карти гвинтами. Корпус підтримує відеокарти довжиною до 340 мм.
6. Cooling System Installation (Fans/Radiators)
- The case comes with one pre-installed 120mm PWM/ARGB fan at the rear.
- Additional fans (120mm or 140mm) can be installed at the front, top, and bottom.
- Liquid cooling radiators up to 360mm can be installed at the front, and up to 240mm at the top.
- Refer to the diagram for supported fan and radiator configurations.

Figure 5: Fan and Liquid Radiator Support Diagram
7. Підключення передньої панелі
- Connect the front panel cables (Power, Reset, USB 3.0, USB Type-C, HD Audio) to the corresponding headers on your motherboard.
- Consult your motherboard manual for the exact pin layout of these headers.
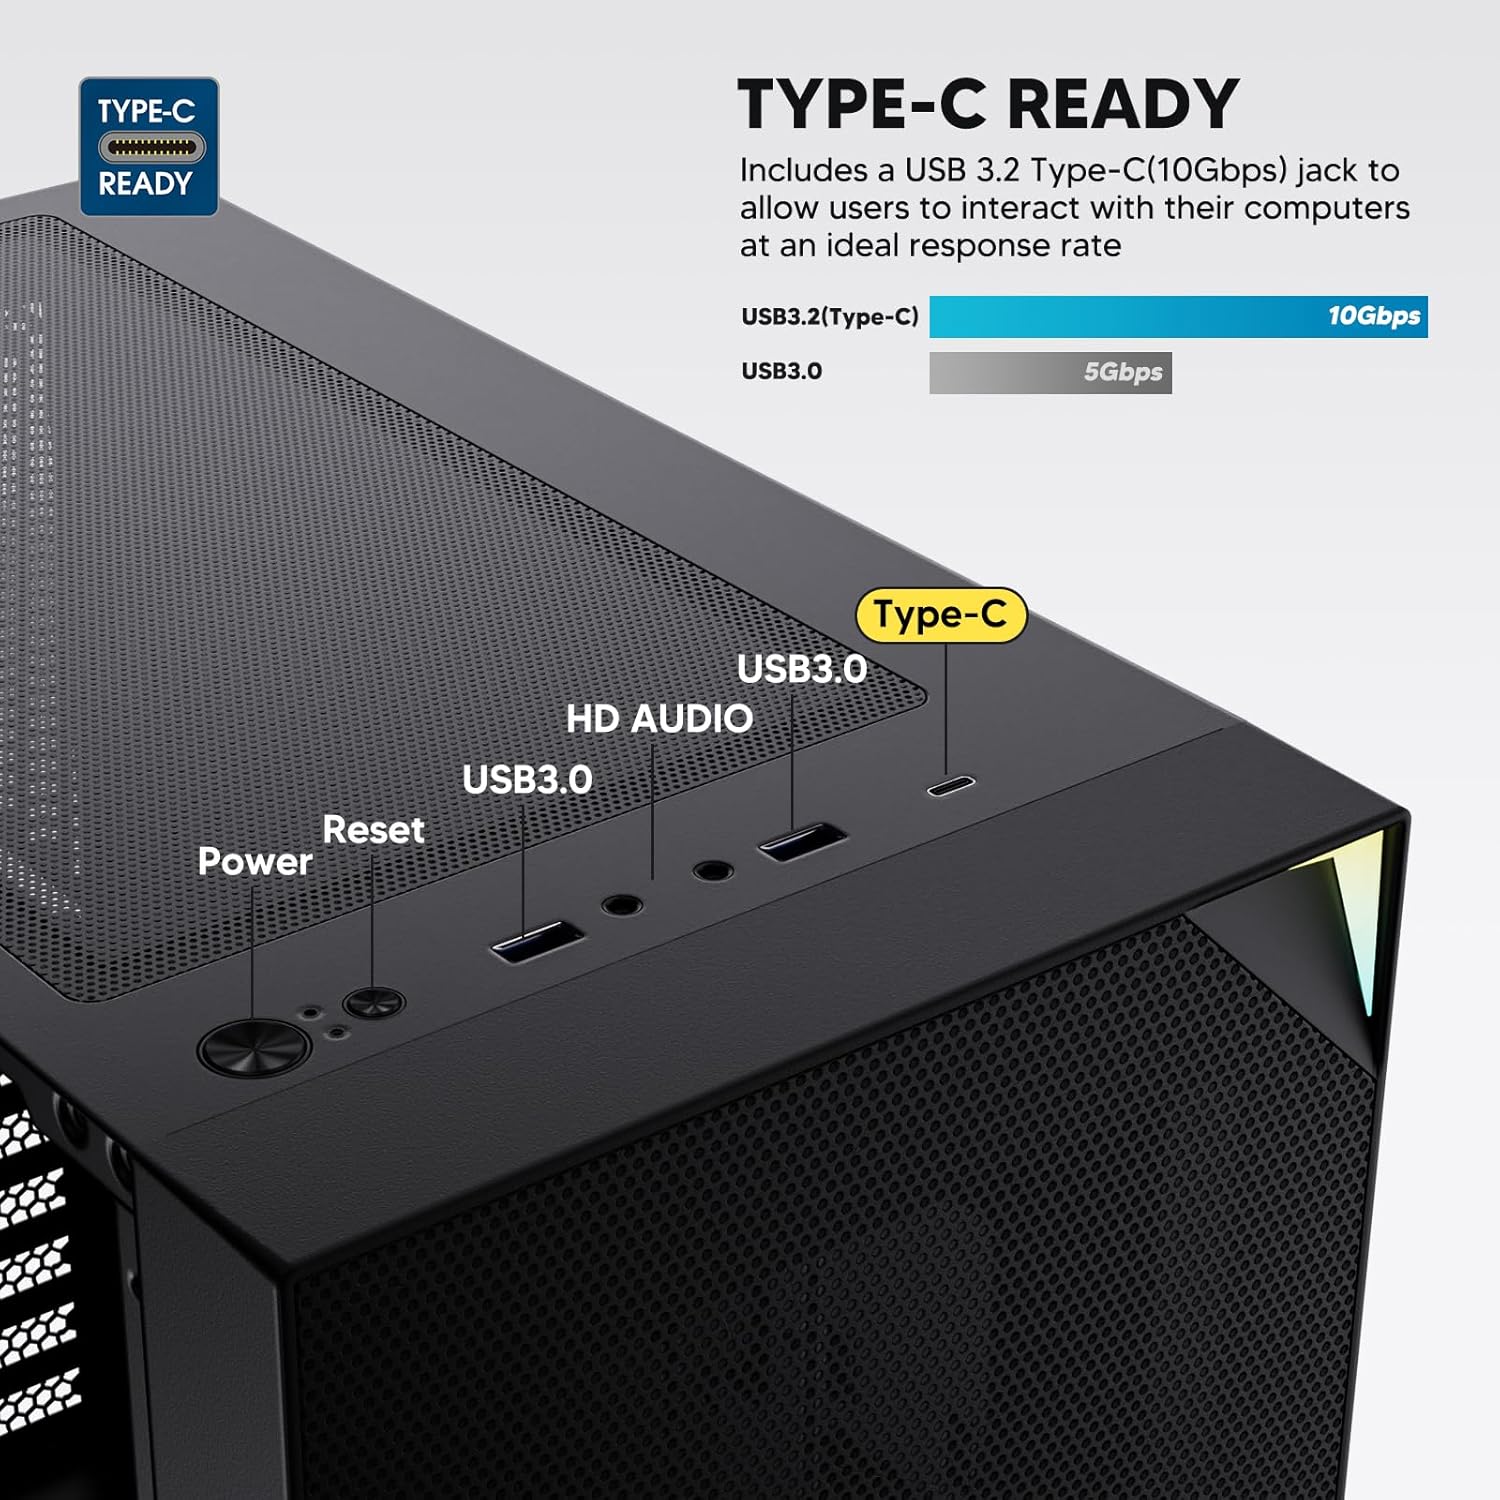
Figure 6: Top I/O Panel Connections
8. ARGB and PWM Connections
- The pre-installed fan and ARGB LED strip require connection to your motherboard.
- Connect the 4-pin PWM connector from the fan to a compatible fan header on your motherboard for speed control.
- Connect the 3-pin ARGB connector from the fan and LED strip to a 5V 3-pin ARGB header on your motherboard for lighting synchronization. Не підключайте до 12-вольтового RGB-роз'єму, оскільки це пошкодить світлодіоди.
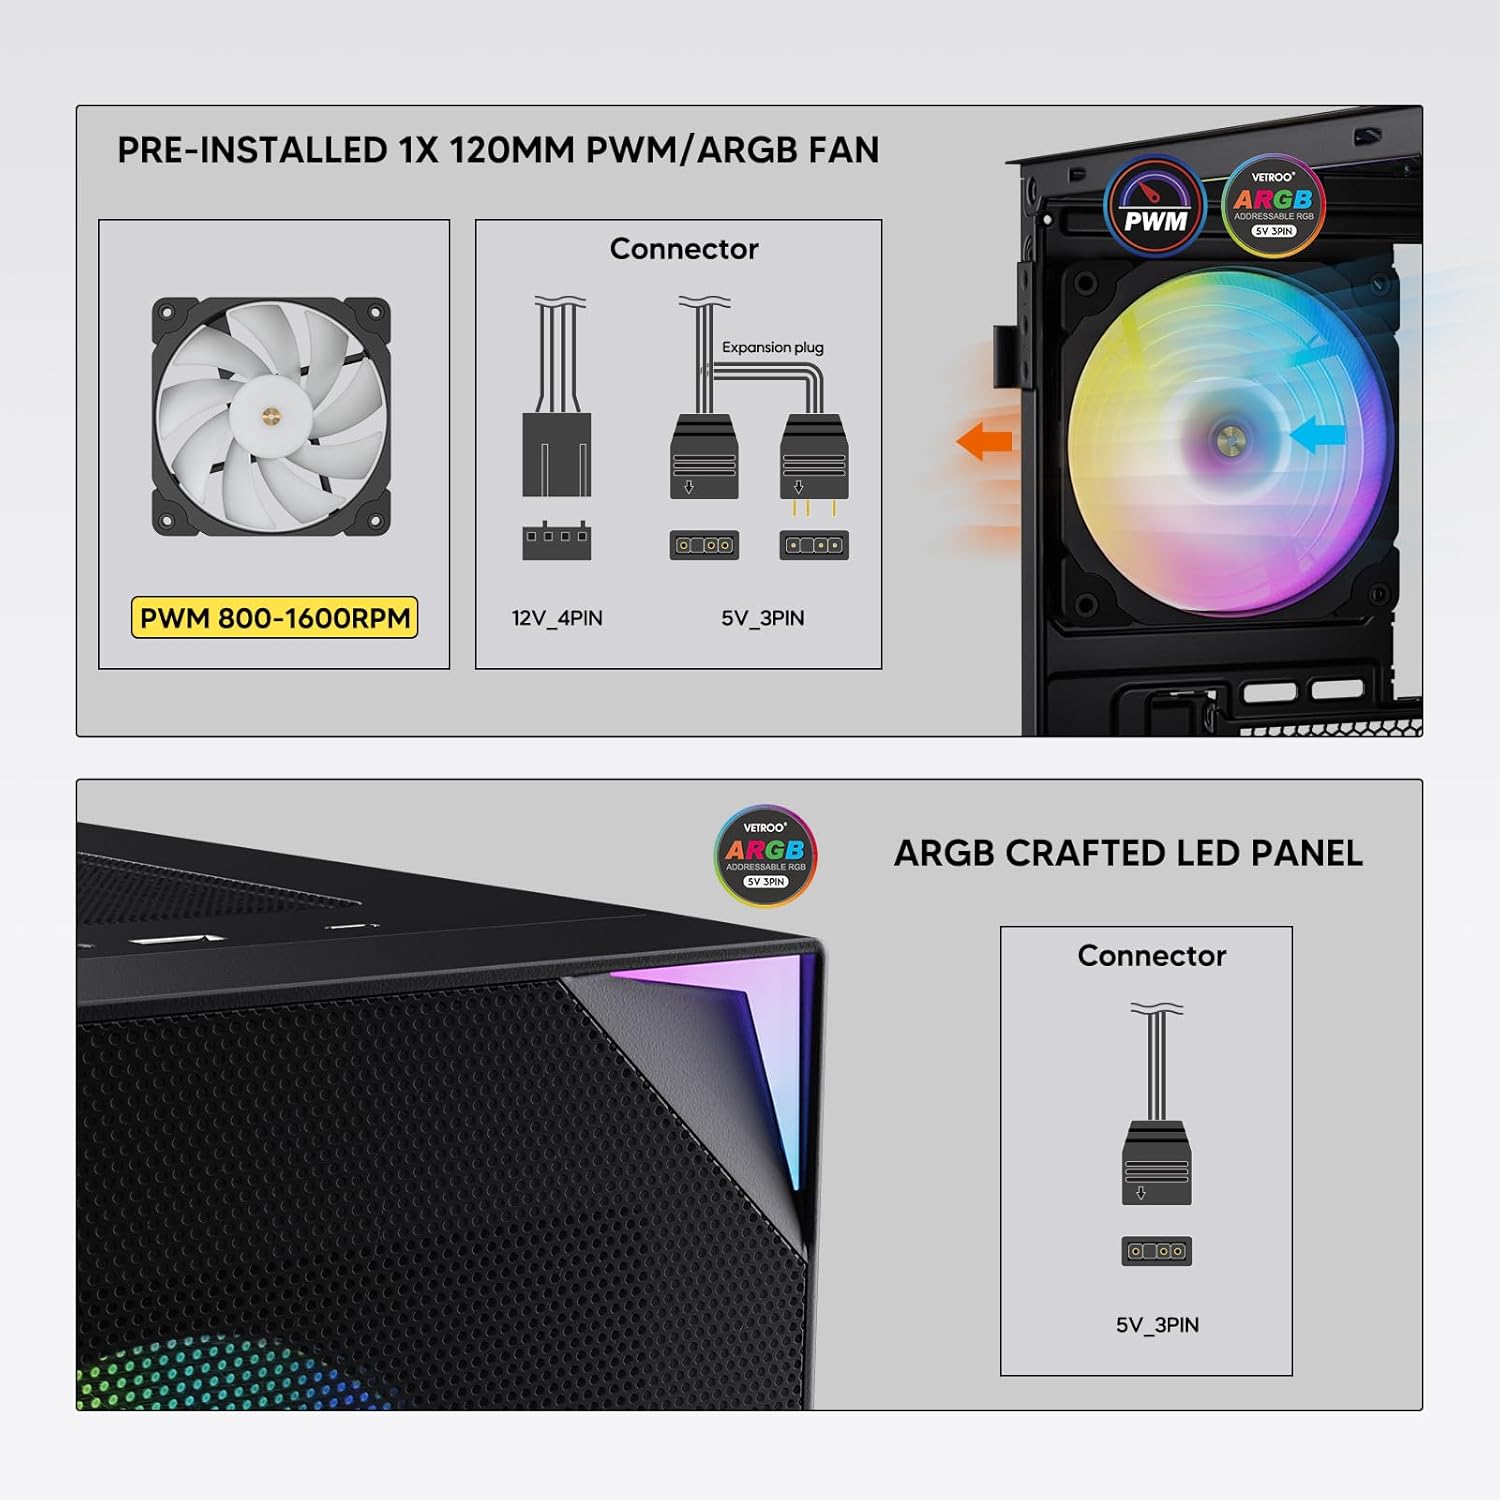
Figure 7: PWM and ARGB Connector Details
9. Кабельний менеджмент
- Utilize the cable routing cutouts and tie-down points behind the motherboard tray to organize cables.
- The soft silicone grommets help protect cables and provide a clean look.
- Proper cable management improves airflow and aesthetics.
Операція
1. Початкове увімкнення
- After all components are securely installed and cables connected, close the tempered glass side panel.
- Підключіть монітор, клавіатуру, мишу та кабель живлення до ПК.
- Flip the power switch on your PSU to the 'ON' position.
- Press the power button on the top I/O panel of the case to start your system.
2. Керування освітленням ARGB
- If connected to a compatible motherboard's 5V 3-pin ARGB header, the lighting of the pre-installed fan and LED strip can be controlled via your motherboard's RGB software (e.g., ASUS Aura Sync, MSI Mystic Light Sync, Gigabyte RGB Fusion, ASRock Polychrome Sync).
- Зверніться до інструкції до вашої материнської плати, щоб отримати конкретні інструкції щодо використання програмного забезпечення для керування ARGB.
3. Airflow Management
- The mesh front panel is designed for optimal air intake.
- Ensure that intake fans (typically front and bottom) and exhaust fans (typically rear and top) are configured to create positive or neutral air pressure for efficient cooling and dust prevention.

Figure 8: Airflow Diagram with Dust Filters
Технічне обслуговування
1. Очищення пилового фільтра
- The case is equipped with dust filters on the top and bottom panels.
- Regularly check and clean these filters to maintain optimal airflow and prevent dust buildup inside the system.
- Gently remove the magnetic dust filters and clean them with compressed air or by rinsing with water (ensure they are completely dry before re-installation).
2. Tempered Glass Panel Care
- Clean the tempered glass panel with a soft, lint-free cloth and a non-abrasive glass cleaner.
- Уникайте використання агресивних хімікатів або абразивних матеріалів, які можуть подряпати або пошкодити скло.
Усунення несправностей
- Система не вмикається:
- Переконайтеся, що кабель живлення надійно підключений як до блоку живлення, так і до розетки.
- Переконайтеся, що перемикач блоку живлення знаходиться в положенні «УВІМК.».
- Перевірте, чи кабель кнопки живлення на передній панелі правильно підключений до роз'єму материнської плати.
- Confirm all power cables (24-pin ATX, CPU, GPU) are properly seated in the motherboard and components.
- Вентилятори не обертаються / ARGB не світиться:
- Check that the fan's PWM connector is securely plugged into a motherboard fan header.
- Verify the ARGB 3-pin connector is correctly attached to a 5V 3-pin ARGB header on the motherboard (not 12V RGB).
- Переконайтеся, що програмне забезпечення ARGB вашої материнської плати встановлено та налаштовано правильно.
- USB-порти не працюють:
- Confirm the USB 3.0 and USB Type-C front panel cables are correctly connected to their respective motherboard headers.
- Перевірте інструкцію до вашої материнської плати, щоб дізнатися правильне розташування роз'ємів.
- For other component-specific issues, refer to the instruction manuals for your motherboard, CPU, GPU, and other installed hardware.
Технічні характеристики
| Бренд | Vetroo |
| Назва моделі | AL800 |
| Номер моделі товару | VT-CASE-AL800-BK (FBA) |
| Тип корпусу | Середній вежі |
| Сумісність материнської плати | ATX, M-ATX, ITX |
| Колір | чорний |
| матеріал | Метал, Загартоване скло |
| Вага товару | 12.37 фунта (приблизно 5.61 кг) |
| Розміри продукту (ДxШxВ) | 18.4 x 8.6 x 17.9 дюймів (приблизно 46.7 x 21.8 x 45.5 см) |
| Максимальна довжина GPU | 340 мм |
| Максимальна висота процесорного кулера | 165 мм |
| Максимальна довжина блоку живлення | 200 мм |
| Передні порти вводу-виводу | 1x USB 3.2 Type-C, 2x USB 3.0, HD Audio (Mic/Headphone), Power, Reset |
| Підтримка фанів | Front: 3x 120mm or 2x 140mm; Top: 2x 120mm or 2x 140mm; Rear: 1x 120mm; Bottom: 2x 120mm |
| Опора радіатора | Front: 120/140/240/280/360mm; Top: 120/140/240mm; Rear: 120mm |
| Попередньо встановлені вентилятори | 1x 120mm PWM/ARGB (Rear) |
Гарантія та підтримка
For warranty information, technical support, or to inquire about replacement parts, please visit the official Vetroo webсайт або зверніться безпосередньо до служби підтримки клієнтів. Зберігайте чек про покупку для гарантійних випадків.
Official Vetroo Store: Vetroo Amazon Store
Пов'язані документи - AL800
 |
Інструкція користувача корпусу ПК Vetroo AL800 Інструкція користувача для корпусу ПК Vetroo AL800, у якій детально описано кроки встановлення таких компонентів, як материнська плата, блок живлення, вентилятори, рідинні радіатори, жорсткі диски, твердотільні накопичувачі та відеокарти. Містить інструкцію з підключення панелі вводу/виводу та список аксесуарів. |
 |
Інструкція з експлуатації ігрового корпусу Vetroo AL800 Full Tower Вичерпний посібник з експлуатації ігрового корпусу Vetroo AL800 Full Tower. Дізнайтеся, як встановити блок живлення, материнську плату, накопичувачі (SSD/HDD), відеокарту, а також розберіться з варіантами підтримки вентиляторів і радіаторів. Містить список аксесуарів і детальні покрокові інструкції. |
 |
Керівництво користувача корпусу для ПК Vetroo MESH-7C AL SERIES Детальний посібник користувача для корпусу ПК Vetroo MESH-7C AL SERIES, що охоплює технічні характеристики, розміри, аксесуари та кроки встановлення обладнання для складання комп'ютера. |
 |
Інструкція з експлуатації корпусу Vetroo M05 M-ATX для ПК Детальна інструкція зі складання корпусу ПК Vetroo M05 M-ATX, що охоплює встановлення компонентів, використання аксесуарів та підключення панелі вводу/виводу. |
 |
Інструкція користувача корпусу ПК Vetroo AL900 ATX Інструкція користувача для ігрового корпусу Vetroo AL900 ATX для ПК, з детальним описом складання, встановлення компонентів, таких як блок живлення, та підключення панелі введення/виведення. |
 |
Керівництво користувача та посібник зі встановлення процесорного кулера Vetroo U6 Детальний посібник користувача та посібник зі встановлення процесорного кулера Vetroo U6, що охоплює сумісність з роз'ємами Intel LGA 1700/1200/115X та AMD AM5/AM4/AM3(+)/AM2(+)/FM2(+)/FM1. Містить список деталей та покрокові інструкції зі складання. |