Продукт закінченийview
The Hugolog Keyless Entry Door Lock provides convenient and secure access to your home or office. This manual outlines the installation, operation, maintenance, and troubleshooting for your device.

Зображення: Лицьова та зворотна сторони view of the Hugolog Keyless Entry Door Lock, showcasing the keypad on one side and the interior assembly on the other.
Вміст упаковки
Перед початком встановлення перевірте наявність усіх компонентів у комплекті:

Image: All components included in the Hugolog Keyless Entry Door Lock package, laid out on a white surface. This includes the exterior keypad assembly, interior assembly, latch, strike plate, mounting plate, screws, backup keys, and installation guide.
- Зовнішня клавіатура в зборі
- Внутрішня збірка
- Засувка
- Монтажна пластина
- Ручка
- Циліндр замка
- Backup Key(s)
- Інструмент скидання
- Ударна пластина
- Various Screws (Latch Screws, Mounting Screws, Interior Assembly Screws)
- Installation Guide / Programming Instruction
- Drilling Drawing (if needed for new installations)
Налаштування та встановлення
Follow these steps carefully to install your Hugolog Keyless Entry Door Lock. For visual guidance, please refer to the installation video provided below.
Перевірка перед встановленням
- Переконайтеся, що товщина ваших дверей становить від 35 до 50 мм.
- Verify the backset of your door (distance from door edge to center of bore hole) is compatible. The latch is self-adjusting for bolt side distance.
- If drilling is required for a new door, refer to the drilling drawing provided in the package.

Image: Diagram showing door dimensions and lock measurements, including backset and bore hole diameter, to ensure compatibility.
Етапи встановлення
- Встановіть засув: Insert the latch into the door edge. Ensure the angle of the latch faces the door jamb. Adjust the backset if necessary, making sure the hole is in the horizontal position.
- Встановіть запірну пластину: Secure the strike plate onto the door jamb using the provided screws. Ensure the latch angle faces the door jamb.
- Встановлення зовнішнього вузла: Slide the shaft of the exterior assembly smoothly through the hole in the latch. Ensure the notch of the lock cylinder is facing away from the door frame. The cable must go through the door hole above the latch.
- Розташування монтажної пластини: Route the cable and connector through the hole in the mounting plate. Position the mounting plate against the door.
- Безпечні збірки: Secure both the exterior assembly and the mounting plate using the mounting screws.
- Встановити внутрішню збірку: Route the cable and connector through the cable hole on the interior assembly. Connect the cable. It is recommended to insert the PCB wire into the door hole after connection. Install the interior assembly and secure it using flat head screws.
- Встановити ручку: Push the lever into the base until the catch pin is engaged. Ensure the tip of the handle points down.
- Load Batteries and Reset: Install 4x AA batteries into the interior assembly.
- Встановлення кришки батарейного відсіку: Put back the lid of the battery pack.
Відеоінструкція зі встановлення
Video: A detailed step-by-step guide on how to install the Hugolog Keyless Entry Door Lock. This video covers all physical installation aspects from preparing the door to securing the lock components.
Initial Programming - Change Master Code
The default master code is 12345678. It is required that you change it to a code of your own before programming other features.
- Прес Гюголог button twice, then enter the default master code (12345678), and press Гюголог button again. Wait for a long green light flash.
- Прес 1. Wait for a green light flash.
- Enter your new master code, then press Гюголог button. Succeed green light flash.
- Enter the new master code again, then press Гюголог button. Succeed green light flash.
Інструкція з експлуатації
Розблокування та блокування
Your Hugolog lock offers multiple ways to unlock and lock for your convenience:
- Клавіатура: Enter your user code on the keypad.
- Фізичний ключ: Використовуйте наданий резервний ключ для ручного розблокування.
- Поворот великого пальця: Rotate the interior thumb turn to manually lock or unlock the door from the inside.
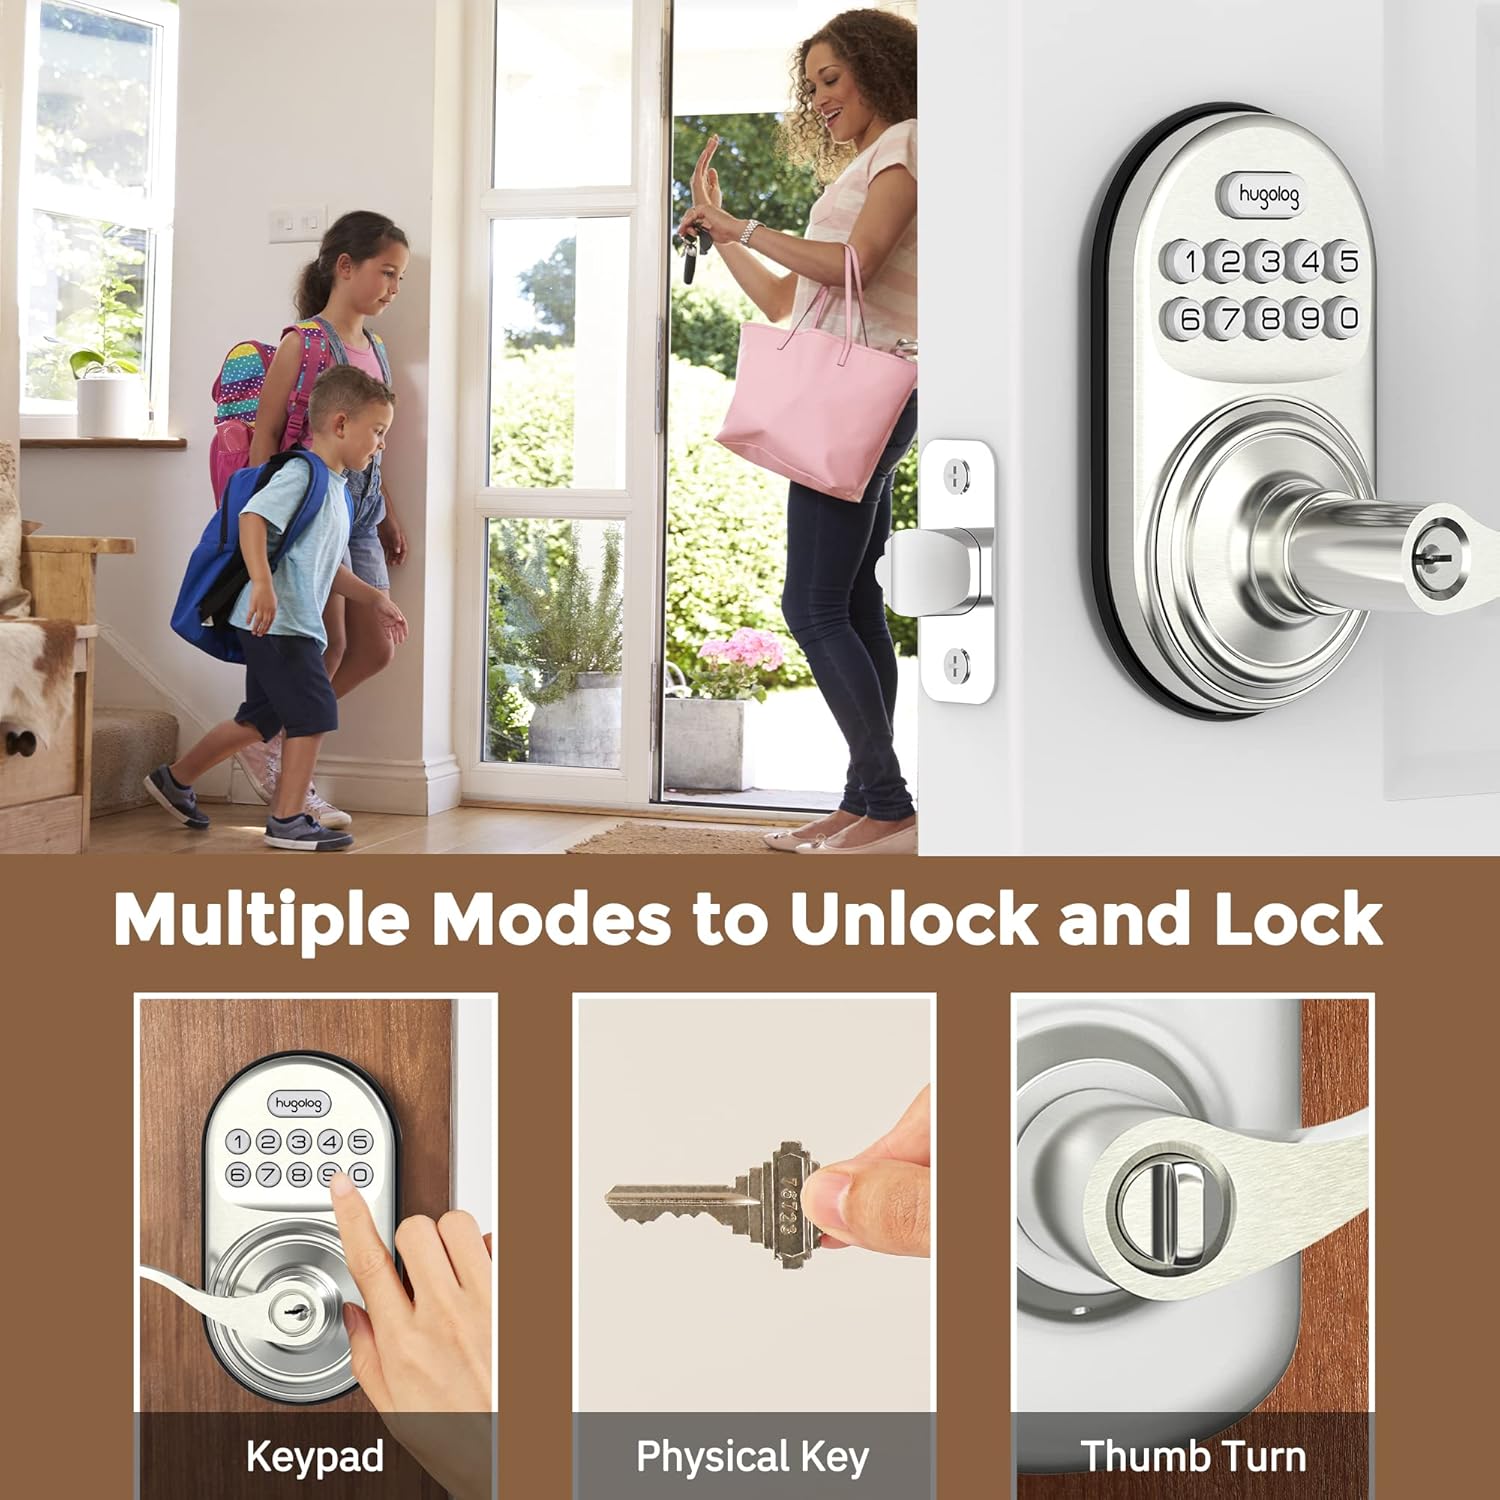
Image: Illustrates three methods of unlocking the door: using the keypad, a physical key, and the interior thumb turn.

Image: Diagram showing how to rotate the interior knob to manually lock or unlock the door, indicating ON and OFF positions.
Додавання кодів користувачів
You can add up to 20 user codes for family members or guests.
- Прес Гюголог button twice, then enter your master code, and press Гюголог button again. Wait for a green light flash.
- Прес 2. Wait for a green light flash.
- Enter the new user code, then press Гюголог button. Succeed green light flash.
- Enter the new user code again, then press Гюголог button. Succeed green light flash.

Image: Depicts two individuals communicating about setting one-time codes for friend visits, highlighting the ability to set up to 20 temporary codes.
Видалення користувацьких кодів
To remove an unwanted user code:
- Прес Гюголог button twice, then enter your master code, and press Гюголог button again. Wait for a green light flash.
- Прес 3. Wait for a green light flash.
- Enter the unwanted user code, then press Гюголог button. Succeed green light flash.
Функція автоматичного блокування
The auto-lock feature automatically locks the door after a set period (10-99 seconds) for added peace of mind.

Image: Shows the auto-lock feature, indicating it allows for a delay from 10 to 99 seconds before automatically locking the door.
Увімкніть автоматичне блокування
- Прес Гюголог button twice, then enter your master code, and press Гюголог button again. Wait for a green light flash.
- Прес 5. Wait for a green light flash.
- Прес 1, потім натисніть Гюголог button. Succeed green light flash.
Вимкнути автоматичне блокування
- Прес Гюголог button twice, then enter your master code, and press Гюголог button again. Wait for a green light flash.
- Прес 5. Wait for a green light flash.
- Прес 2, потім натисніть Гюголог button. Succeed green light flash.
Встановіть час затримки автоматичного блокування
- Прес Гюголог button twice, then enter your master code, and press Гюголог button again. Wait for a green light flash.
- Прес 8. Wait for a green light flash.
- Enter the new duration time (10-99 seconds), then press Гюголог button. Succeed green light flash.
Anti-Peep Password
The anti-peep feature allows you to enter random digits before or after your actual code to prevent others from guessing your code by observing your hand movements.

Image: Illustrates the Anti-Peep Password feature, showing how random digits can be entered before or after the correct code to safeguard against prying eyes.
Тихий режим
Enable silent mode to disable keypad beeps for quiet operation.
Увімкніть беззвучний режим
- Прес Гюголог button twice, then enter your master code, and press Гюголог button again. Wait for a green light flash.
- Прес 4. Wait for a green light flash.
- Прес 2, потім натисніть Гюголог button. Succeed green light flash.
Вимкніть беззвучний режим
- Прес Гюголог button twice, then enter your master code, and press Гюголог button again. Wait for a green light flash.
- Прес 4. Wait for a green light flash.
- Прес 1, потім натисніть Гюголог button. Succeed green light flash.
Режим відпустки
Vacation mode disables all user codes, allowing entry only with the master code or physical key. This is useful for extended absences.
Увімкнути режим відпустки
- Прес Гюголог button twice, then enter your master code, and press Гюголог button again. Wait for a green light flash.
- Прес 6. Wait for a green light flash.
- Прес 1, потім натисніть Гюголог button. Succeed green light flash.
Вимкніть режим відпустки
- Прес Гюголог button twice, then enter your master code, and press Гюголог button again. Wait for a green light flash.
- Прес 6. Wait for a green light flash.
- Прес 2, потім натисніть Гюголог button. Succeed green light flash.
Додайте одноразовий код
Create a temporary code that can be used only once.
- Прес Гюголог button twice, then enter your master code, and press Гюголог button again. Wait for a green light flash.
- Прес 7. Wait for a green light flash.
- Enter the new user code, then press Гюголог button. Succeed green light flash.
- Enter the new user code again, then press Гюголог button. Succeed green light flash.
Технічне обслуговування
Заміна батареї
The lock requires 4x AA batteries. When the battery level is low, the lock will indicate this with a visual or audible alert. Replace all four batteries simultaneously to ensure optimal performance.
Image: Close-up of the lock's keypad showing a low battery indicator, reminding users to replace the 4x AA batteries for a 1-year battery life.
Щоб замінити батареї:
- Зніміть кришку батарейного відсіку на внутрішньому блоці.
- Вийміть старі батареї.
- Insert new 4x AA batteries, ensuring correct polarity (+/-).
- Замініть кришку акумулятора.
Примітка: Always use new, high-quality alkaline batteries for best performance and longevity.
Усунення несправностей
If you encounter issues with your Hugolog Keyless Entry Door Lock, please refer to the common problems and solutions below:
| проблема | Можлива причина | Рішення |
|---|---|---|
| Замок не реагує на введення з клавіатури. | Low batteries or incorrect code entry. | Replace batteries. Ensure correct master code or user code is entered. Check for silent mode if no sound. |
| Функція автоматичного блокування не працює. | Auto-lock is disabled or time delay is set too long. | Enable auto-lock via programming. Adjust auto-lock time delay. |
| Lock is stuck or not engaging properly. | Improper installation or door alignment issues. | Re-check installation steps, especially latch and strike plate alignment. Ensure door frame is not warped. |
| Keypad lights up but lock doesn't operate. | Internal mechanism issue or cable connection problem. | Verify internal cable connection. If issue persists, contact customer support. |
| Cannot change master code or add user codes. | Incorrect master code entered or incorrect programming sequence. | Ensure you are using the correct master code. Follow programming steps precisely. |
Технічні характеристики
| Особливість | Деталь |
|---|---|
| Бренд | Гюголог |
| Номер моделі | 192728012011 |
| Тип замка | Клавіатура |
| матеріал | метал |
| Особливість | Пароль проти підглядання |
| Рекомендоване використання | двері |
| Коди користувачів | Up to 20 user codes, plus one-time temporary codes. |
| Таймер автоматичного блокування | Programmable from 10-99 seconds. |
| Джерело живлення | 4 батареї типу АА (не входять в комплект) |
| Сумісність товщини дверей | 35-50 мм |
| Протокол підключення | Wi-Fi (for potential future smart home integration, based on product data) |
Гарантія та підтримка
Hugolog provides technical support for hassle-free ownership. For any questions, issues, or warranty claims, please contact Hugolog customer service through their official channels. Please refer to the product packaging or the official Hugolog webсайт, щоб отримати найактуальнішу контактну інформацію та гарантійні умови.


