вступ
This manual provides detailed instructions for the installation, operation, and maintenance of your Morimoto M LED 2.0 Bi-LED Projector. Designed for custom automotive retrofits, this universal projector lens offers both low beam and high beam functionality with an ECE-compliant RHD (Right-Hand Drive) beam pattern and cutoff. Please read this manual thoroughly before beginning any installation or operation to ensure proper function and safety.
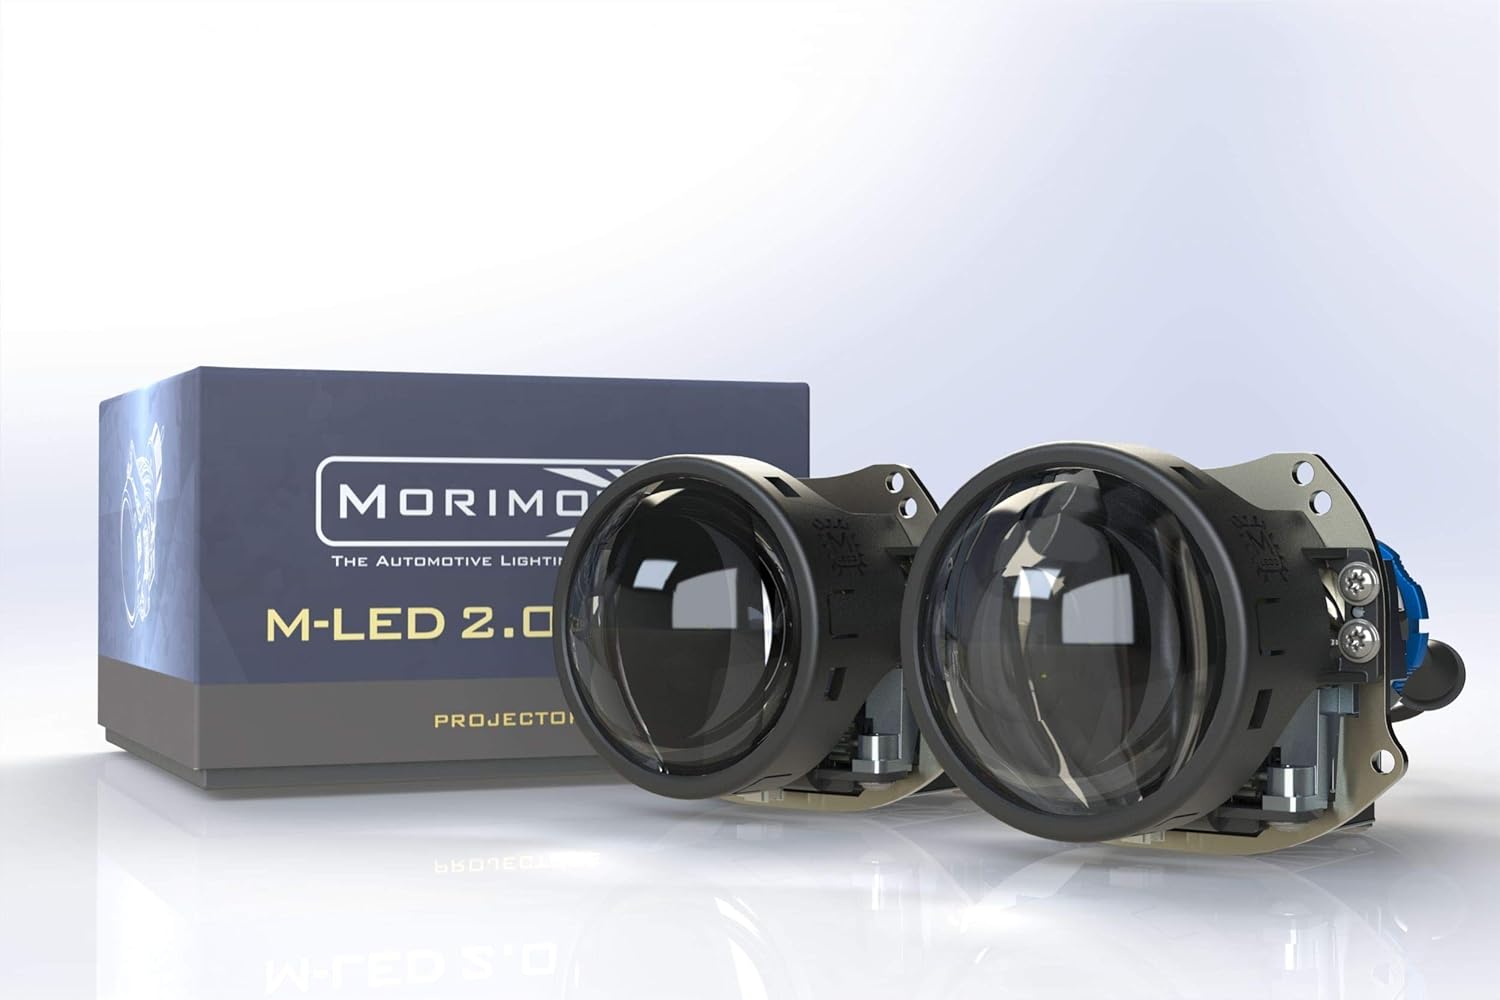
Image: The Morimoto M LED 2.0 Bi-LED Projectors, showcasing the compact design and the product packaging.
Що включено
Перш ніж продовжувати встановлення, переконайтеся, що всі компоненти є в наявності та не пошкоджені.
- проектор: 1x Morimoto M LED 2.0 Bi-LED RHD Projector
- Водій: 1x M LED 1.0 Driver
- Обладнання: 1x Threaded shaft with lock ring
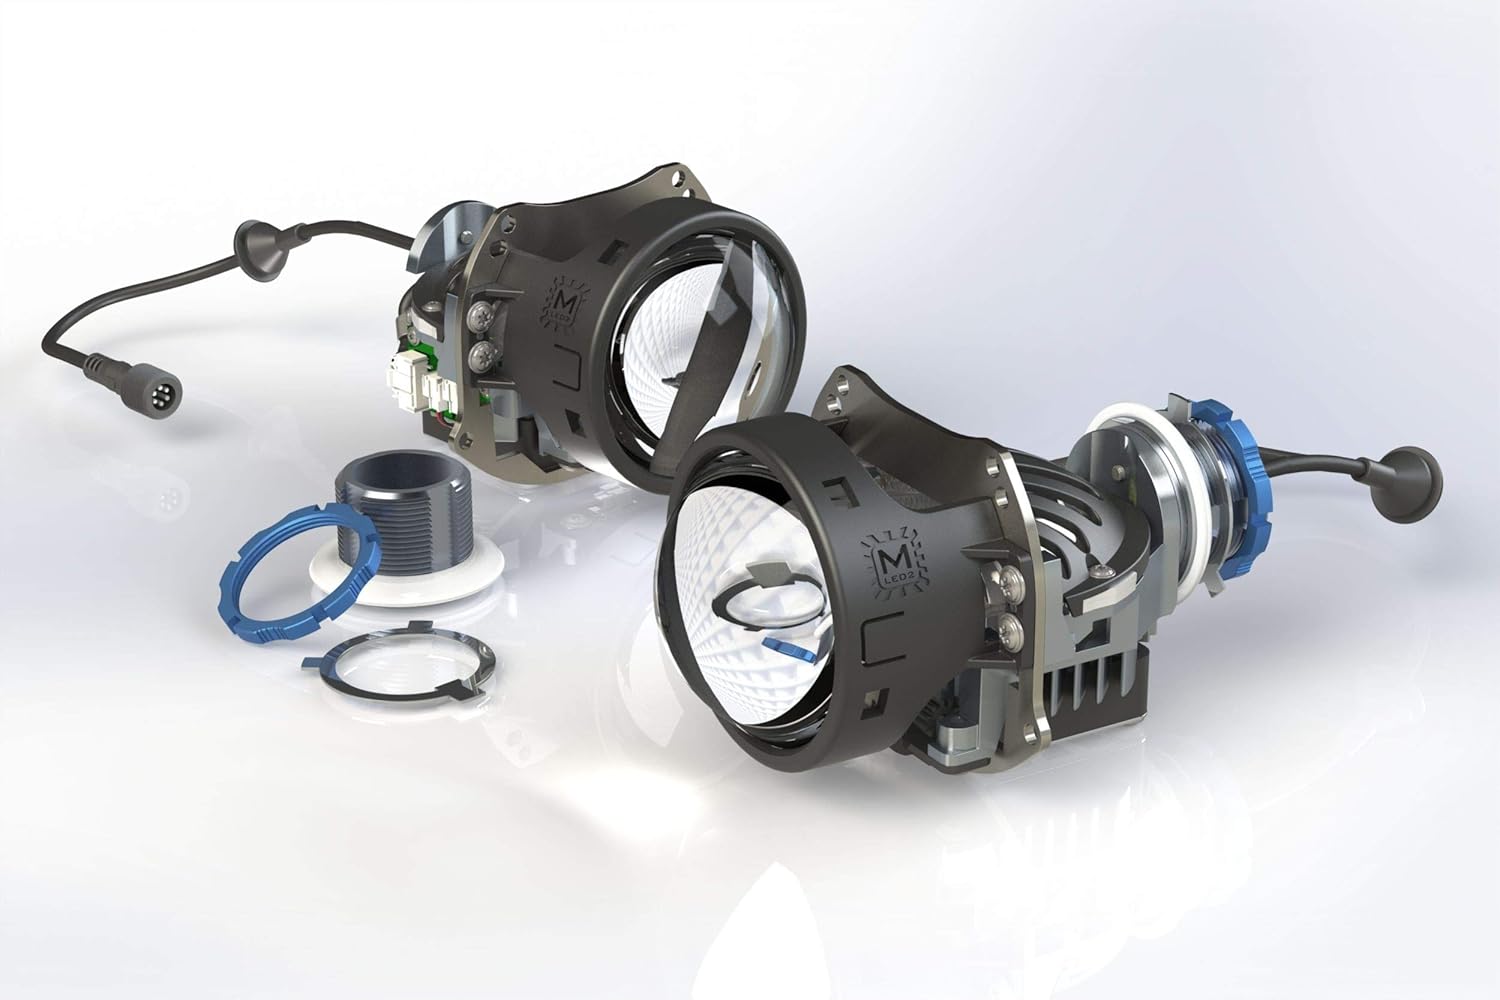
Зображення: Розгорнуте view of the projector components, illustrating the lens, housing, and associated hardware.
Налаштування та встановлення
The Morimoto M LED 2.0 Bi-LED Projector is designed for universal fitment in custom automotive retrofit applications. Due to the specialized nature of headlight retrofitting, professional installation is highly recommended. This section provides general guidance.
Перевірка перед встановленням
- Ensure the vehicle's battery is disconnected before starting any electrical work.
- Confirm the projector fits within the intended headlight housing.
- Перевірте всі компоненти на наявність будь-яких ознак пошкоджень.
Монтаж проектора
The projector utilizes a threaded shaft for secure mounting. This allows for precise adjustment and locking into place within the headlight assembly.
- Carefully insert the projector into the headlight housing opening.
- Secure the projector using the provided threaded shaft and lock ring from the rear of the housing.
- Ensure the projector is oriented correctly for the RHD beam pattern.
Електричні з'єднання
Connect the M LED 1.0 Driver to the projector and then to the vehicle's electrical system. The system operates on a 9-30V DC input.
- Connect the projector's cable to the input port on the M LED 1.0 Driver.
- Connect the driver's power input to the vehicle's low beam and high beam wiring. Consult a vehicle-specific wiring diagram if unsure.
- Переконайтеся, що всі з'єднання надійно закріплені та належним чином ізольовані, щоб запобігти коротким замиканням.

Image: The M LED 2.0 Bi-LED drivers, essential components for power regulation and function of the projectors.
Операція
The Morimoto M LED 2.0 is a Bi-LED projector, meaning it provides both low beam and high beam functionality from a single projector unit. The transition between low and high beam is controlled by an internal cutoff shield mechanism.
Low Beam Function
When the low beams are activated, the internal cutoff shield is in place, creating a sharp, ECE-compliant RHD cutoff line. This prevents glare for oncoming traffic while providing ample illumination of the road ahead.
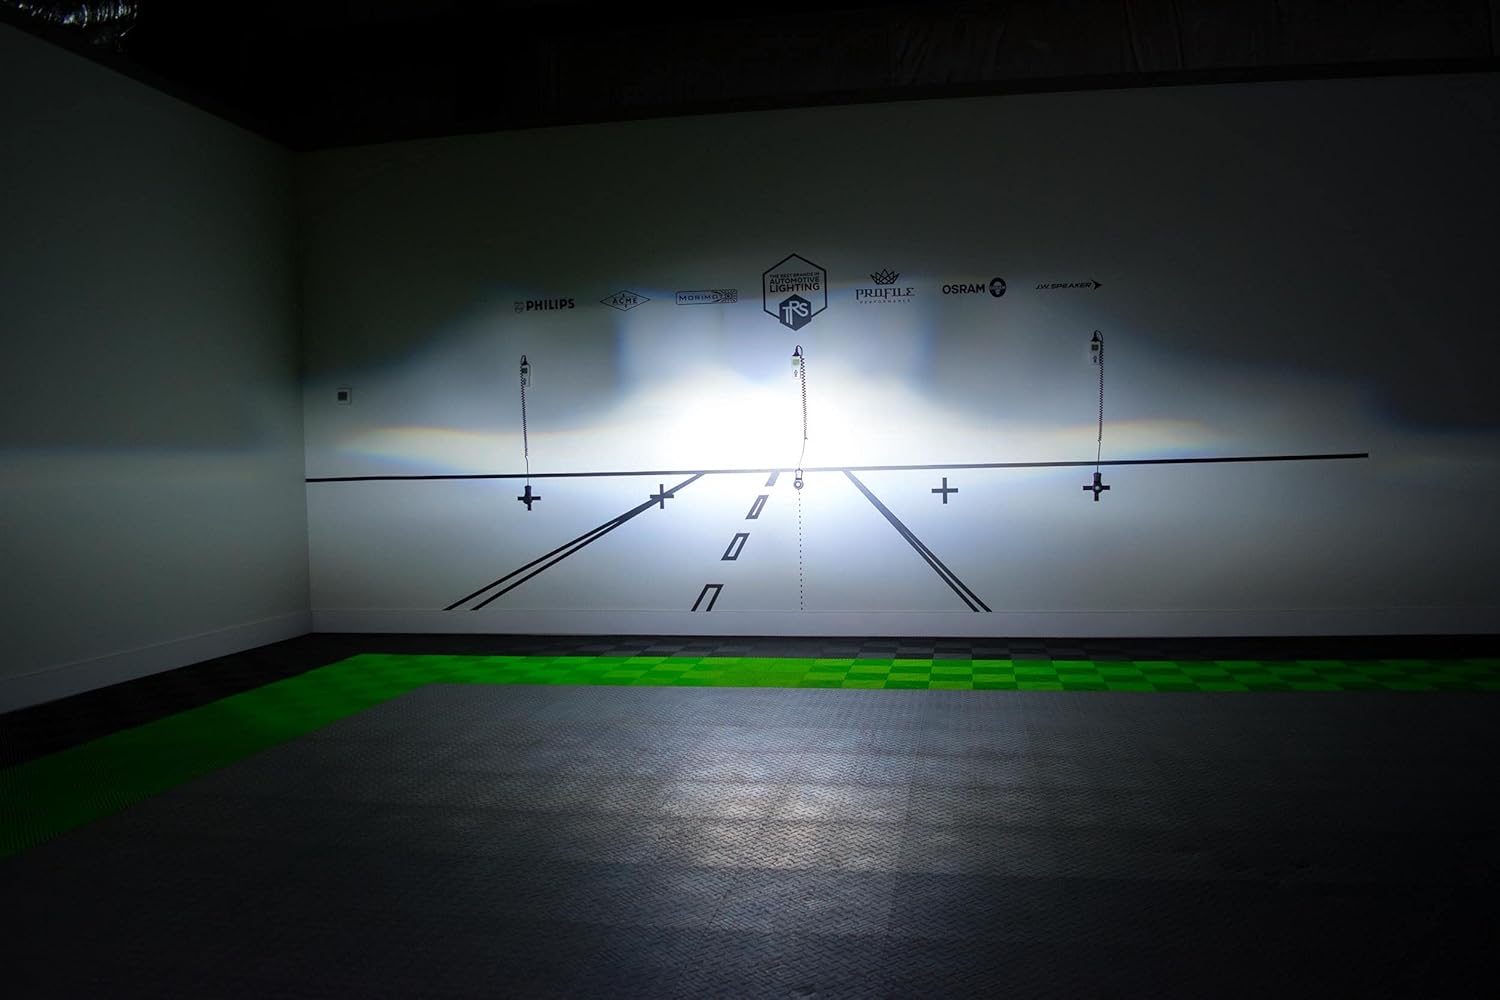
Зображення: Прample of the RHD beam pattern with a distinct cutoff line, as projected on a test wall.
High Beam Function
When the high beams are activated, the cutoff shield retracts, allowing the full light output to be projected. This provides maximum illumination for increased visibility during night driving in areas without oncoming traffic.
Light Path and Cutoff Mechanism
The projector utilizes a sophisticated optical system, including a sub-reflector and cutoff shield, to precisely control the light output and beam pattern. The RHD beam pattern ensures proper illumination for right-hand drive vehicles.

Image: Technical diagram explaining the internal optics and how the light is managed to create the desired beam patterns.
Технічне обслуговування
The Morimoto M LED 2.0 Bi-LED Projector is designed for long-term, maintenance-free operation. However, periodic checks can help ensure optimal performance.
- Прибирання: Keep the exterior lens of the headlight assembly clean from dirt and debris. Use a soft cloth and mild cleaning solution. Do not use abrasive cleaners.
- Огляд: Periodically check the wiring connections for any signs of wear or corrosion.
- Водонепроникна функція: The projector is designed to be waterproof. Ensure that the headlight housing itself is properly sealed after installation to protect the internal components from moisture.
Усунення несправностей
If you encounter issues with your Morimoto M LED 2.0 Bi-LED Projector, refer to the following common problems and solutions:
| проблема | Можлива причина | Рішення |
|---|---|---|
| Projector does not illuminate | No power, loose connection, faulty driver. | Check all wiring connections. Verify power supply to the driver. Test the driver if possible. |
| High beam not activating | Wiring issue to high beam trigger, faulty driver. | Ensure high beam trigger wire is correctly connected to the driver. Check driver functionality. |
| Improper beam pattern/cutoff | Projector not seated correctly, internal component misalignment. | Re-check projector mounting and orientation. If issue persists, contact support. |
For issues not listed here or if troubleshooting steps do not resolve the problem, please contact Morimoto customer support.
Технічні характеристики
| Особливість | Деталь |
|---|---|
| Модель | ПР353 |
| Джерело світла | HML-3 7545 LED |
| Колірна температура | 6300 тис |
| функція | Bi-LED (Low Beam & High Beam) |
| Traffic Pattern | RHD (Right-Hand Drive) with ECE Cutoff |
| Інтенсивність | 70,000 кд |
| потужність | 29.5 Вт |
| Вхідний об'ємtage | 9-30V DC |
| Діаметр лінзи | 3.0 дюймів |
| Матеріал лінзи | Сапфірове скло |
| Розміри (В x Ш x Г) | 82mm x 95mm x 124mm (150mm with shaft) |
| Діаметр валу | 35 мм |
| Вага товару | 1 фунт |
| Особливості | Водостійкий |
| Автомобільний тип | Універсальна посадка |
Гарантія та підтримка
Інформація про гарантію
The Morimoto M LED 2.0 Bi-LED Projector comes with a 5 роки гарантії. This warranty covers defects in materials and workmanship under normal use. Please retain your proof of purchase for warranty claims. For full warranty terms and conditions, please refer to the official Morimoto webсайту або зв’яжіться з їхньою службою обслуговування клієнтів.
Підтримка клієнтів
For technical assistance, troubleshooting, or warranty inquiries, please contact Morimoto customer support. You can typically find contact information on the official Morimoto webсайті або через вашого авторизованого дилера.
Інтернет-ресурси: Відвідайте Morimoto Store on Amazon для отримання додаткової інформації про продукт і ресурсів.


