1. Вступ
Thank you for choosing the FERM PDM1037s 13mm 1010W Drill. This instruction manual provides important information regarding the safe operation, setup, maintenance, and troubleshooting of your new power tool. Please read this manual thoroughly before using the drill and keep it for future reference.
The FERM PDM1037s is a robust corded electric rotary drill designed for various drilling tasks in wood, metal, and masonry. It features a powerful 1010W motor, a 13mm keyed chuck, adjustable speed, reverse rotation, and a hammer function for efficient performance.
2. Техніка безпеки
ПОПЕРЕДЖЕННЯ: Прочитайте всі застереження щодо безпеки, інструкції, ілюстрації та технічні характеристики, що надаються з цим електроінструментом. Недотримання всіх наведених нижче інструкцій може призвести до ураження електричним струмом, пожежі та/або серйозних травм.
Загальні застереження щодо техніки безпеки при роботі з електроінструментом:
- Безпека на робочому місці: Тримайте своє робоче місце чистим і добре освітленим. Захаращені або темні місця призводять до нещасних випадків. Не використовуйте електроінструменти у вибухонебезпечних середовищах, наприклад, у присутності легкозаймистих рідин, газів або пилу.
- Електрична безпека: Power tool plugs must match the outlet. Never modify the plug in any way. Do not use any adapter plugs with earthed (grounded) power tools. Avoid body contact with earthed or grounded surfaces such as pipes, radiators, ranges, and refrigerators.
- Особиста безпека: Always wear eye protection. Use hearing protection when operating noisy tools. Wear a dust mask if operations create dust. Dress properly; do not wear loose clothing or jewelry. Keep hair and clothing away from moving parts.
- Використання та догляд за електроінструментом: Не застосовуйте силу до електроінструменту. Використовуйте правильний електроінструмент для вашого застосування. Від’єднайте штекер від джерела живлення, перш ніж виконувати будь-які налаштування, змінювати аксесуари або зберігати електроінструменти.
- Сервіс: Обслуговуйте свій електроінструмент кваліфікованим спеціалістом із використанням лише ідентичних запасних частин. Це забезпечить безпеку електроінструменту.
3. Компоненти продукту
The FERM PDM1037s drill consists of several key components for its operation. Familiarize yourself with these parts before use.
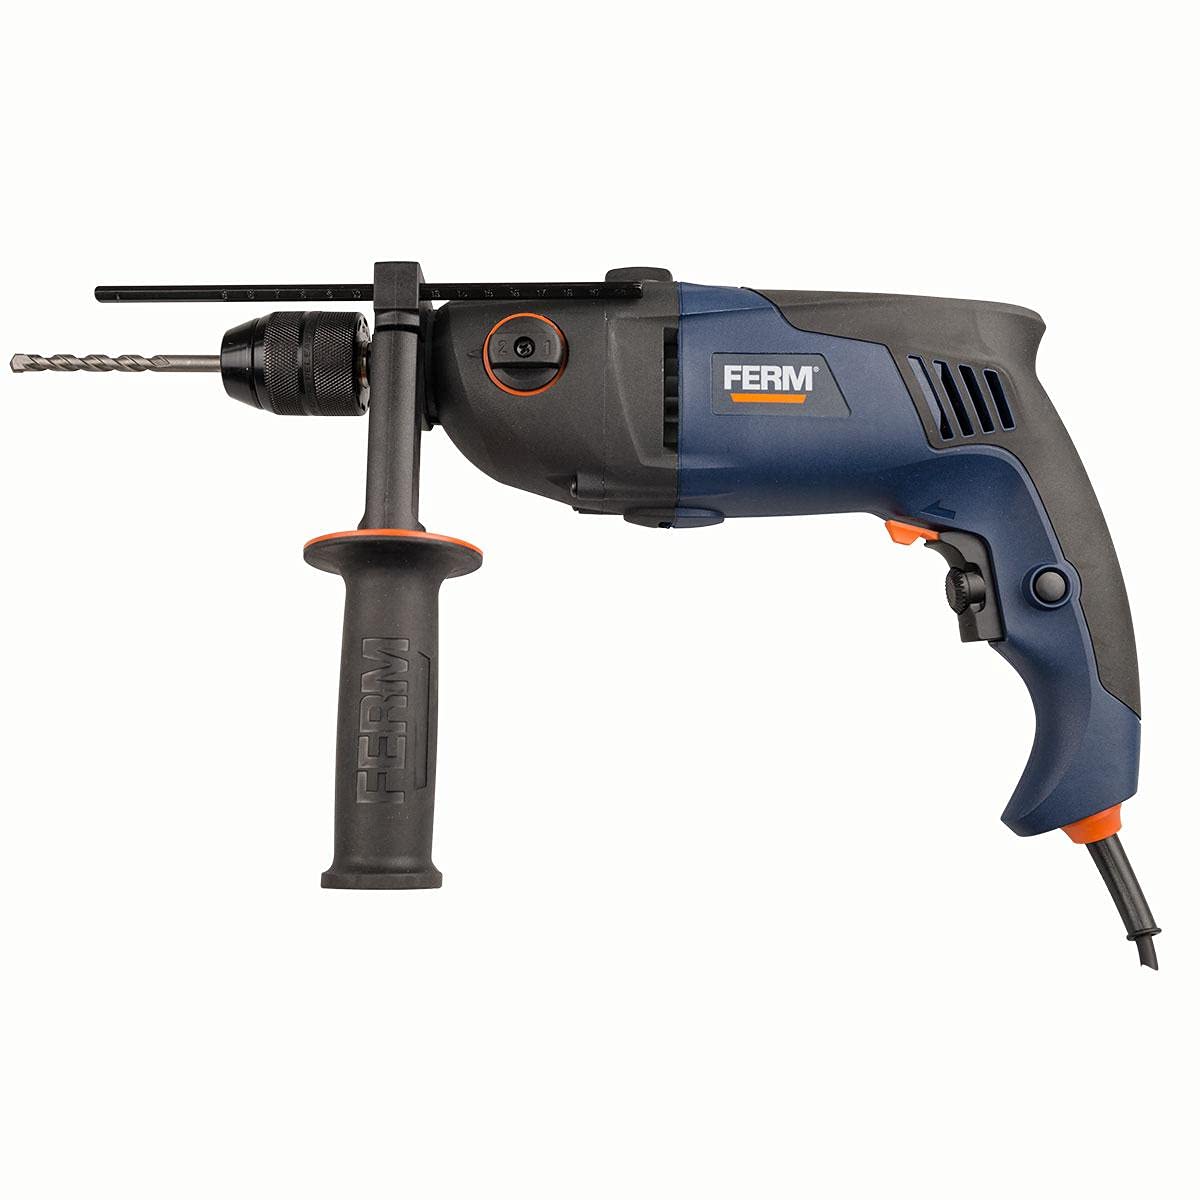
малюнок 1: закінченоview of the FERM PDM1037s drill. This image shows the main body of the drill, including the chuck, auxiliary handle, and power cord connection point.
- Чак: Holds the drill bits securely. This model uses a keyed chuck.
- Зупинка глибини: Використовується для встановлення потрібної глибини свердління.
- Допоміжна ручка: Забезпечує додаткове зчеплення та контроль під час роботи.
- Перемикач режиму: For switching between rotary drilling and hammer drilling modes.
- Циферблат регулювання швидкості: Adjusts the maximum rotational speed.
- Тригерний перемикач: Активує дриль.
- Кнопка блокування: Для безперервної роботи без утримання курка.
- Перемикач вперед/назад: Змінює напрямок обертання.
- Шнур живлення: Connects the drill to the electrical supply.
4. Технічні характеристики
Below are the technical specifications for the FERM PDM1037s drill:
| Особливість | Специфікація |
|---|---|
| Номер моделі | FERM PDM1037s |
| Бренд | ФЕРМ |
| Джерело живлення | Провідний електричний |
| Максимальна потужність | 1010 Вт |
| Тип патрона | Ключовий Чак |
| Розмір патрона | 13 мм |
| Максимальна швидкість обертання | 3000 об / хв |
| Регульована швидкість | так |
| Зворотна функція | так |
| Функція молотка | так |
| Функція викрутки | так |
| Вага товару | 11 грами |
| Колір | Багатобарвний |
| Потрібні батареї | немає |
| Дата першої доступності | 7 липня 2021 р |
| ASIN | B098TZFVWC |
5. Налаштування
5.1 Приєднання допоміжної ручки
The auxiliary handle provides better control and stability. Loosen the handle by twisting it counter-clockwise. Slide it over the chuck and position it to your desired angle. Tighten the handle by twisting it clockwise until secure.
5.2 Встановлення обмежувача глибини
Insert the depth stop into the hole on the auxiliary handle. Adjust the depth stop to the desired drilling depth by sliding it in or out. Secure it by tightening the screw or lever on the auxiliary handle.
5.3 Вставлення та виймання свердел
- Переконайтеся, що дриль відключено від джерела живлення.
- Use the chuck key to loosen the chuck jaws by turning it counter-clockwise.
- Повністю вставте свердло в патрон, переконавшись, що воно відцентроване.
- Tighten the chuck jaws firmly using the chuck key by turning it clockwise. Ensure the bit is securely held.
- To remove, loosen the chuck jaws with the chuck key and pull out the bit.
6. Інструкція з експлуатації
6.1 Підключення живлення
Підключіть шнур живлення до відповідної електричної розетки. Переконайтеся, що гучністьtage matches the drill's requirements.
6.2 Вибір режиму роботи
Use the mode selector switch (typically located on the top or side of the drill) to choose between:
- Ротаційне буріння: For drilling in wood, metal, plastics, and ceramics.
- Ударне свердління: Для свердління в цеглі, бетоні та камені.
6.3 Регулювання швидкості
The drill features an adjustable speed control dial. Rotate the dial to set the maximum speed for your application. Lower speeds are suitable for larger drill bits, softer materials, or screwdriving. Higher speeds are for smaller bits and harder materials.
6.4 Обертання вперед/назад
Use the forward/reverse switch (usually near the trigger) to select the direction of rotation. Forward rotation (clockwise) is for drilling and tightening screws. Reverse rotation (counter-clockwise) is for removing screws or freeing a jammed drill bit.
6.5 Запуск та зупинка сівалки
- Починати: Press the trigger switch. The speed is variable depending on how far the trigger is pressed.
- Для безперервної роботи: Press the trigger switch fully and then press the lock-on button. Release the trigger.
- To Stop (from continuous operation): Press the trigger switch again and release it.
- To Stop (from momentary operation): Відпустіть пусковий перемикач.
6.6 Поради щодо свердління
- Always secure your workpiece to prevent it from moving.
- Застосовуйте стабільний, рівномірний тиск. Не перевантажуйте дриль.
- For deep holes, periodically withdraw the drill bit to clear chips and allow cooling.
- When drilling metal, use cutting oil to prolong bit life and improve cutting efficiency.
- When drilling masonry, ensure the hammer function is engaged and use appropriate masonry drill bits.
7. Технічне обслуговування
Regular maintenance ensures the longevity and safe operation of your FERM PDM1037s drill.
7.1 Очищення
- Завжди відключайте дриль від мережі перед чищенням.
- Тримайте вентиляційні отвори чистими, щоб запобігти перегріву. Використовуйте м’яку щітку або стиснене повітря для очищення від пилу та сміття.
- Протріть корпус інструменту рекламнимamp тканина. Не використовуйте агресивні хімікати або абразивні засоби для чищення.
7.2 Вугільні щітки
The motor is equipped with carbon brushes. If the drill experiences excessive sparking or reduced performance, the carbon brushes may need replacement. This should be performed by a qualified service technician.
7.3 Зберігання
Store the drill in a dry, secure location out of reach of children. Protect it from moisture and direct sunlight.
8. Вирішення проблем
This section addresses common issues you might encounter with your drill.
| проблема | Можлива причина | Рішення |
|---|---|---|
| Дриль не запускається | No power supply; Faulty power cord/plug; Faulty switch; Worn carbon brushes | Check power outlet and cord; Contact qualified service technician for switch or brush replacement. |
| Знижена потужність/швидкість | Зношені вугільні щітки; Перевантаження; Неправильне налаштування швидкості | Replace carbon brushes (by technician); Reduce load; Adjust speed dial to higher setting. |
| Надмірне іскріння від двигуна | Зношені вугільні щітки; брудний колектор | Have carbon brushes and commutator checked/replaced by a qualified service technician. |
| Заклинювання свердла | Incorrect bit for material; Excessive pressure; Material too hard | Use appropriate bit; Reduce pressure; Consider hammer function for masonry. |
9. Гарантія та підтримка
FERM products are manufactured to high-quality standards and are guaranteed against manufacturing defects for a period specified by local regulations from the date of purchase. This warranty does not cover damage caused by misuse, abuse, normal wear and tear, or unauthorized repairs.
For warranty claims, technical support, or service inquiries, please contact your local FERM dealer or authorized service center. Please have your proof of purchase and the product model number (PDM1037s) available when contacting support.
For more information, visit the official FERM webсайт: www.ferm.com