1. Вступ
Дякуємо за покупкуasing the Udreamer Turntable Vinyl Record Player Model UD001. This manual provides essential information for the proper setup, operation, and maintenance of your new record player. Please read these instructions carefully before use to ensure optimal performance and longevity of the product. Keep this manual for future reference.

Image 1.1: Udreamer Turntable Vinyl Record Player Model UD001. This image shows the turntable with its clear dust cover open, revealing the black platter, tonearm, and cartridge.
2. Техніка безпеки
- Джерело живлення: Використовуйте лише зазначений адаптер живлення. Переконайтеся, що гучністьtage відповідає вашому місцевому джерелу живлення.
- Вода і вологість: Не піддавайте пристрій впливу дощу, вологи або рідин. Не ставте на пристрій предмети, наповнені рідинами, такі як вази.
- Тепло: Не розміщуйте пристрій поблизу джерел тепла, таких як радіатори, обігрівачі, печі чи інші прилади (включаючи ampліфікатори), які виробляють тепло.
- Вентиляція: Забезпечте належну вентиляцію. Не блокуйте вентиляційні отвори.
- Прибирання: Перед чищенням від’єднайте пристрій від розетки. Використовуйте лише м’яку суху тканину.
- Обслуговування: Не намагайтеся самостійно обслуговувати цей виріб. Зверніть усі послуги до кваліфікованого обслуговуючого персоналу.
- Розміщення: Place the unit on a stable, level surface to prevent damage from falling.
3. Вміст упаковки
Будь ласка, перевірте, чи всі перелічені нижче предмети входять до вашої упаковки:
- Udreamer Turntable Unit
- Пилозахисний чохол
- Блюдо
- Повстяний мат
- Противага
- Адаптер на 45 об / хв
- Адаптер живлення
- USB кабель
- Посібник користувача (цей документ)
4. Продукт закінчивсяview
Familiarize yourself with the various parts and controls of your Udreamer Turntable.

Image 4.1: Key features of the Udreamer Turntable. This image highlights the turntable's capabilities such as Vinyl to Computer conversion, Bluetooth output, iron platter, built-in phono equalizer, needle pressure adjustment, speed alignment, and moving magnet cartridge.

Зображення 4.2: Детальний опис view of the turntable's components. This image shows the solid iron platter for stability and the moving magnet cartridge, which provides accurate audio reproduction and has a longer lifespan.

Image 4.3: Internal and external components of the turntable system. This diagram illustrates the belt-driven mechanism, arm lifter, record mat, foot pads for vibration isolation, and the 45 RPM adapter.
4.1 Передня та верхня частини View
- Пилозахисний чохол: Захищає диск та тонарм від пилу.
- Блюдо: The surface on which records are placed.
- Шпиндель: Утримує платівку на місці на тарілці.
- Фетровий килимок: Provides cushioning for records and reduces static.
- Тонеарм: Утримує картридж і стилус.
- Cartridge with Stylus: Зчитує канавки платівки.
- Противага: Балансує тонарм і регулює силу притискання.
- Важіль наведення: Raises and lowers the tonearm gently.
- Підставка для тонарма: Забезпечує фіксацію тонарма, коли він не використовується.
- Перемикач швидкості: Перемикається між 33 1/3 та 45 об/хв.
- Контроль висоти: Adjusts playback speed fine-tuning.
4.2 Задня панель
- LINE/BT OUT/PHONO Switch: Selects output mode (Line Out, Bluetooth Out, Phono Out).
- RCA Output Jacks (L/R): Connects to external active speakers or an ampліфірник.
- USB-PC Port: Connects to a computer for vinyl-to-digital conversion.
- Гніздо DC IN: Підключає адаптер живлення.
- Вимикач живлення: Вмикає або вимикає пристрій.
5. Налаштування
5.1 Розпакування та розміщення
- Carefully remove the turntable from its packaging. Retain packaging for future transport.
- Place the turntable on a stable, level surface, away from direct sunlight, heat sources, and excessive dust or vibrations.
5.2 Встановлення платформи та ременя
- Помістіть тарілку на центральну шпиндель.
- Carefully lift the felt mat to expose the drive belt underneath the platter.
- Locate the motor pulley (a small brass cylinder) on the top left of the turntable chassis.
- Using the provided ribbon or your fingers, gently stretch the drive belt and hook it around the motor pulley. Ensure the belt is flat and not twisted.
- Place the felt mat back on the platter.
5.3 Counterweight Adjustment
Proper counterweight adjustment is crucial for optimal sound quality and to prevent damage to your records and stylus.

Image 5.1: Counterweight and Pitch Adjustment. This image illustrates how to accurately adjust the tonearm pressure using the counterweight and fine-tune the playback speed with the pitch control.
- Обережно зніміть захисну плівку стилуса.
- Place the counterweight onto the rear of the tonearm. Rotate it clockwise until it is fully threaded.
- Release the tonearm from its rest. Move the cueing lever to the down position.
- Carefully rotate the counterweight until the tonearm is perfectly balanced horizontally, floating freely without touching the surface or rising too high.
- Once balanced, hold the counterweight steady with one hand and rotate the numbered ring on the front of the counterweight until '0' aligns with the line on the tonearm.
- Rotate the entire counterweight (including the numbered ring) counter-clockwise to the recommended tracking force. For the pre-installed magnetic cartridge, a typical tracking force is between 2.5 to 3.5 grams. Refer to your cartridge's specific recommendations if available.
- Return the tonearm to its rest and engage the tonearm clamp.
5.4 Встановлення пилозахисної кришки
Insert the hinges of the dust cover into the hinge receptacles at the rear of the turntable chassis.
5.5 Підключення живлення
Connect the power adapter to the DC IN jack on the rear of the turntable, then plug the adapter into a wall outlet.
6. Інструкція з експлуатації
6.1 Basic Record Playback
- Place a record on the platter. If playing a 45 RPM single, place the 45 RPM adapter on the spindle first.
- Виберіть відповідну швидкість (33 1/3 або 45 об/хв) за допомогою перемикача швидкості.
- Ensure the LINE/BT OUT/PHONO switch is set to 'LINE OUT' or 'PHONO' if connecting to external speakers, or 'BT OUT' for Bluetooth.
- Turn on the turntable using the Power ON/OFF switch.
- Release the tonearm from its rest.
- Підніміть тонарм за допомогою важеля керування міттям.
- Вручну розташуйте тонарм над потрібною початковою канавкою платівки.
- Gently lower the tonearm using the cueing lever. The stylus will make contact with the record, and playback will begin.
- At the end of the record, the auto-stop function will stop the platter rotation. Lift the tonearm, return it to its rest, and turn off the turntable.
6.2 Регулювання висоти тону
Use the Pitch Control knob (refer to Image 5.1) to fine-tune the playback speed. Rotate the knob to increase or decrease the speed slightly.
6.3 Bluetooth Output
The turntable can wirelessly stream audio to Bluetooth-enabled devices such as headphones, speakers, or soundbars.

Image 6.1: Bluetooth Output functionality. This image demonstrates the turntable's ability to wirelessly connect to various Bluetooth receivers like earphones, soundbars, and external speakers.
- Ensure the LINE/BT OUT/PHONO switch on the rear is set to 'BT OUT'.
- Turn on your Bluetooth receiving device (e.g., speaker, headphones) and set it to pairing mode.
- Turn on the turntable. The Bluetooth indicator light on the turntable will flash, indicating it is searching for a device.
- Once paired, the Bluetooth indicator light will become solid. Audio from the turntable will now play through your Bluetooth device.
- If pairing fails, turn off both devices and try again.
6.4 Vinyl to Computer Recording (USB-PC)
Ви можете конвертувати свої вінілові платівки в цифровий аудіоформат files using the USB-PC output.

Image 6.2: Vinyl to Computer conversion setup. This image shows the turntable connected to a laptop via a USB cable, illustrating the process of converting vinyl audio to MP3 format for computer playback.
- Connect the USB cable from the turntable's USB-PC port to an available USB port on your computer.
- Ensure the LINE/BT OUT/PHONO switch is set to 'LINE OUT' or 'PHONO'.
- Install and open audio recording software on your computer (e.g., Audacity, a free open-source software).
- In your recording software's preferences, select the turntable as the audio input device (it may appear as 'USB Audio CODEC' or similar).
- Start recording in the software, then begin playing your record on the turntable (refer to Section 6.1).
- Once the record finishes, stop recording in the software and save your digital audio file.
6.5 Connecting External Speakers (RCA)
The turntable features RCA output jacks for connecting to external active speakers or an ampліфірник.
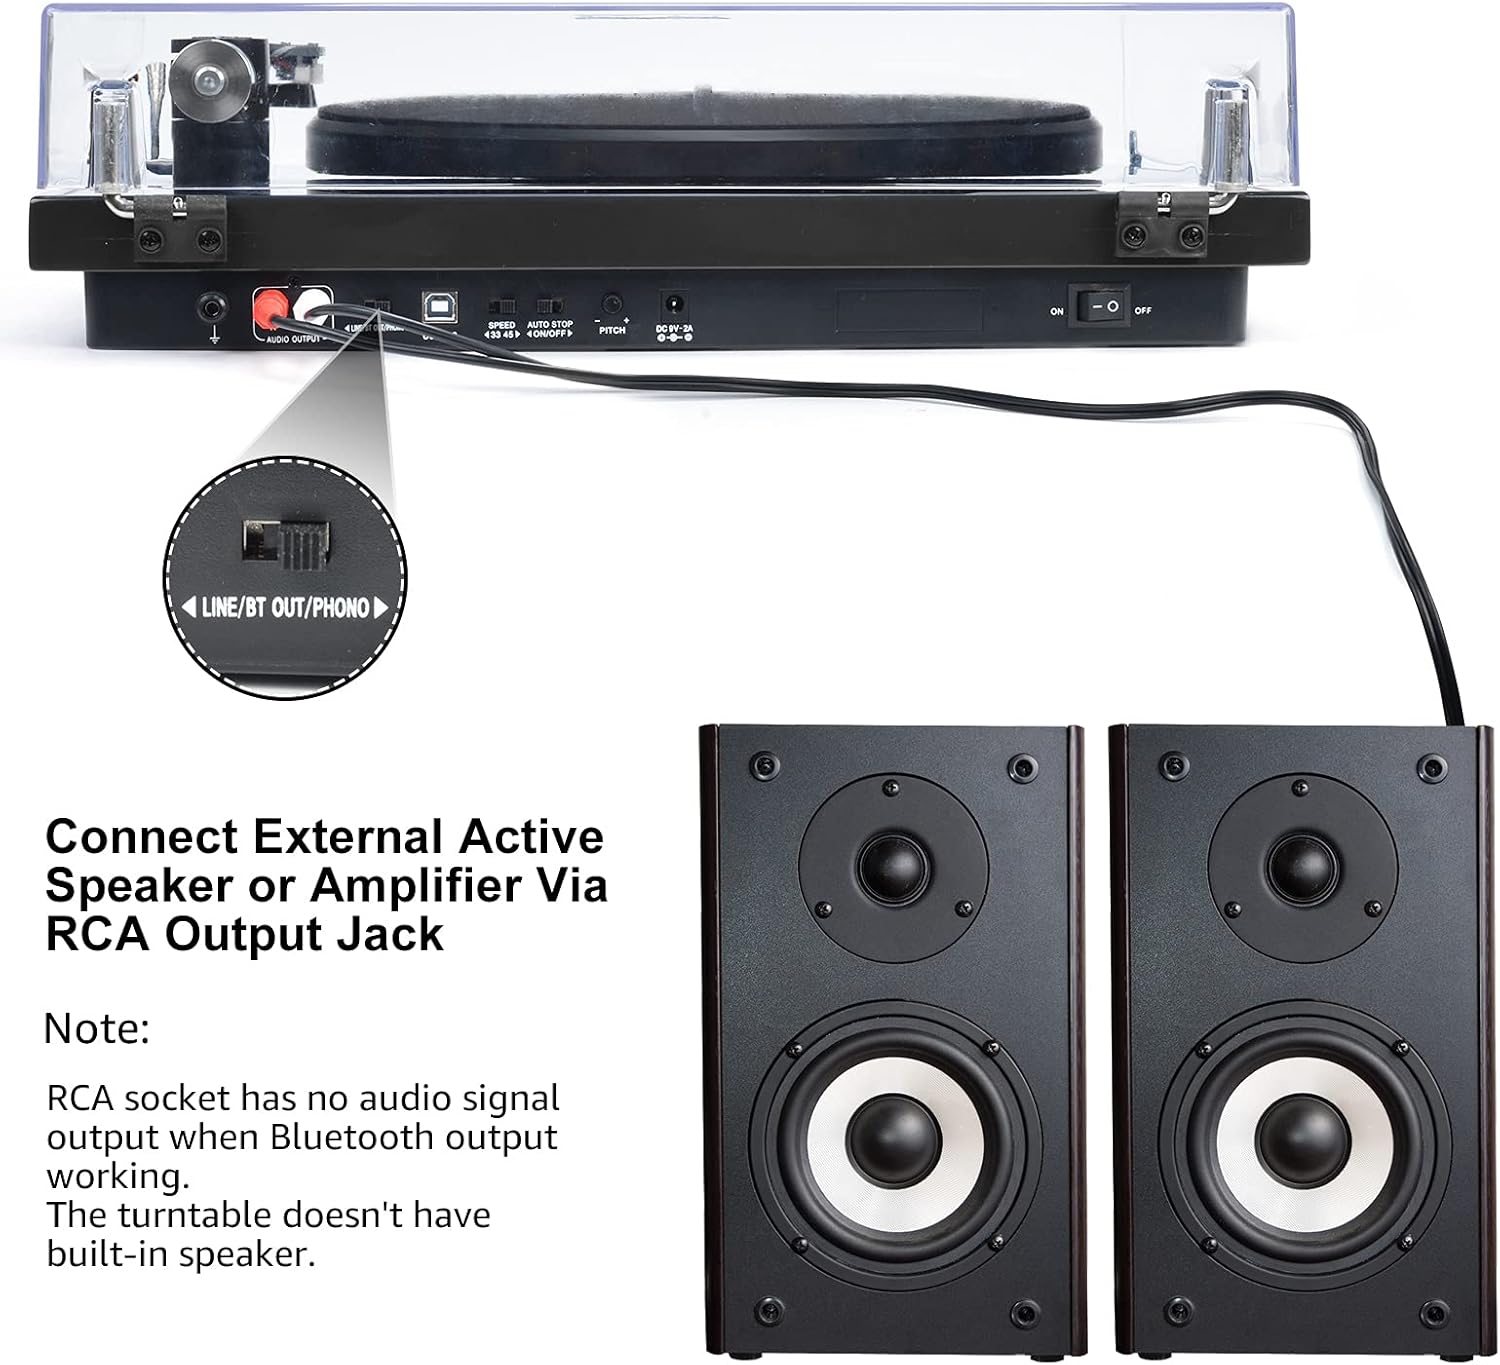
Image 6.3: Connecting to external speakers. This image shows the rear panel of the turntable with the RCA output jacks connected to a pair of external active speakers, indicating how to route audio for amplified playback.
- Ensure the LINE/BT OUT/PHONO switch on the rear is set to 'LINE OUT' if connecting to active speakers (speakers with their own amplifier) або an amplifier's 'LINE IN' input. Set to 'PHONO' if connecting to an amplifier with a dedicated 'PHONO' input.
- Connect the RCA cables (red for right channel, white for left channel) from the turntable's RCA output jacks to the corresponding input jacks on your active speakers or ampліфірник.
- Turn on your external audio system and adjust the volume.
Примітка: The Udreamer Turntable Model UD001 does not have built-in speakers. An external audio system (active speakers, amplifier, or Bluetooth device) is required for sound output.
7. Технічне обслуговування
7.1 Очищення
- Turntable Unit: Wipe the exterior with a soft, dry, lint-free cloth. Do not use harsh chemicals or abrasive cleaners.
- Пилозахисний чохол: Clean with a soft cloth and a mild, non-abrasive cleaner. Avoid scratching the surface.
- Стилус: Use a soft stylus brush, brushing gently from back to front (in the direction of play) to remove dust and debris. Never use your fingers.
7.2 Заміна стилуса
The stylus (needle) is a consumable part and will wear out over time, typically after 300-500 hours of playback. A worn stylus can damage your records and degrade sound quality. Replace the stylus when you notice a decrease in sound quality or visible wear.
- Gently grasp the front of the cartridge body.
- Pull the old stylus assembly downwards and forwards to detach it from the cartridge body.
- Вирівняйте новий стилус з корпусом картриджа та посуньте його вгору та назад, доки він не зафіксується почутим клацання.
- Re-adjust the tracking force if necessary after replacing the stylus.
8. Вирішення проблем
Якщо у вас виникли проблеми з програвачем, зверніться до наступних поширених проблем та способів їх вирішення:
| проблема | Можлива причина | Рішення |
|---|---|---|
| Немає живлення | Адаптер живлення не підключено; живлення вимкнено | Ensure power adapter is securely plugged in; Turn power switch ON |
| Ні звуку | Incorrect output mode selected; External speakers not connected/powered; Bluetooth not paired | Set LINE/BT OUT/PHONO switch correctly; Connect/power on external speakers; Pair Bluetooth device |
| Звук спотворений або пропущений | Stylus dirty or worn; Tracking force incorrect; Turntable not level; Record dirty or damaged | Clean or replace stylus; Adjust counterweight; Place turntable on a level surface; Clean record |
| Тарілка не обертається | Drive belt dislodged or broken; Auto-stop engaged | Re-install or replace drive belt; Ensure tonearm is over the record to disengage auto-stop |
| Помилка з’єднання Bluetooth | Device too far; Device not in pairing mode; Interference | Move devices closer; Ensure receiving device is in pairing mode; Restart both devices |
9. Технічні характеристики
| Особливість | Специфікація |
|---|---|
| Розміри продукту | 12.8 x 9.8 x 4.7 дюймів |
| Вага товару | 5.79 фунта |
| Номер моделі товару | UD001 |
| Бренд | Udreamer |
| Особливість | Вбудований Bluetooth-приймач |
| матеріал | пластик |
| Стиль | Vintage |
| Сумісні пристрої | Навушники, динамік |
| Тип двигуна | Двигун змінного струму |
| Формат сигналу | цифровий |
| Джерело живлення | Провідний електричний |
| Співвідношення сигнал-шум | 60 дБ |
10. Гарантія та підтримка
Udreamer products are designed and manufactured to the highest quality standards. For warranty information or technical support, please refer to the contact details provided with your purchase or visit the official Udreamer website. Please have your model number (UD001) and purchase information ready when contacting support.


