вступ
This manual provides detailed instructions for the installation, operation, and maintenance of your MPC 5-Button Remote Start System, designed for select 2005-2008 Toyota Corolla models. Please read this manual thoroughly before attempting installation or operation to ensure proper function and safety.
Інформація про безпеку
- Рекомендовано професійне встановлення: Installation requires basic automotive wiring knowledge. If you are not comfortable with electrical work, seek professional assistance.
- Від'єднайте батарею: Always disconnect the vehicle's battery before beginning any electrical installation to prevent short circuits or damage.
- Сумісність з автомобілем: Ensure this product is compatible with your specific vehicle make, model, and year. This system is for Automatic Transmission ONLY and Key-Start Ignition ONLY (not for Push-To-Start or Hybrid vehicles).
- Безпечна проводка: Ensure all wiring is securely connected and routed away from moving parts, heat sources, and sharp edges.
- Hood Pin Switch: Verify the hood pin switch is correctly installed and functioning to prevent accidental remote starting with the hood open.
Що включено
Your MPC 5-Button Remote Start System includes the following components:
- Complete remote start system
- Immobilizer module
- (2) 5-button 1-way remotes
- All necessary wiring harnesses and connectors
- Firmware preloaded for your vehicle
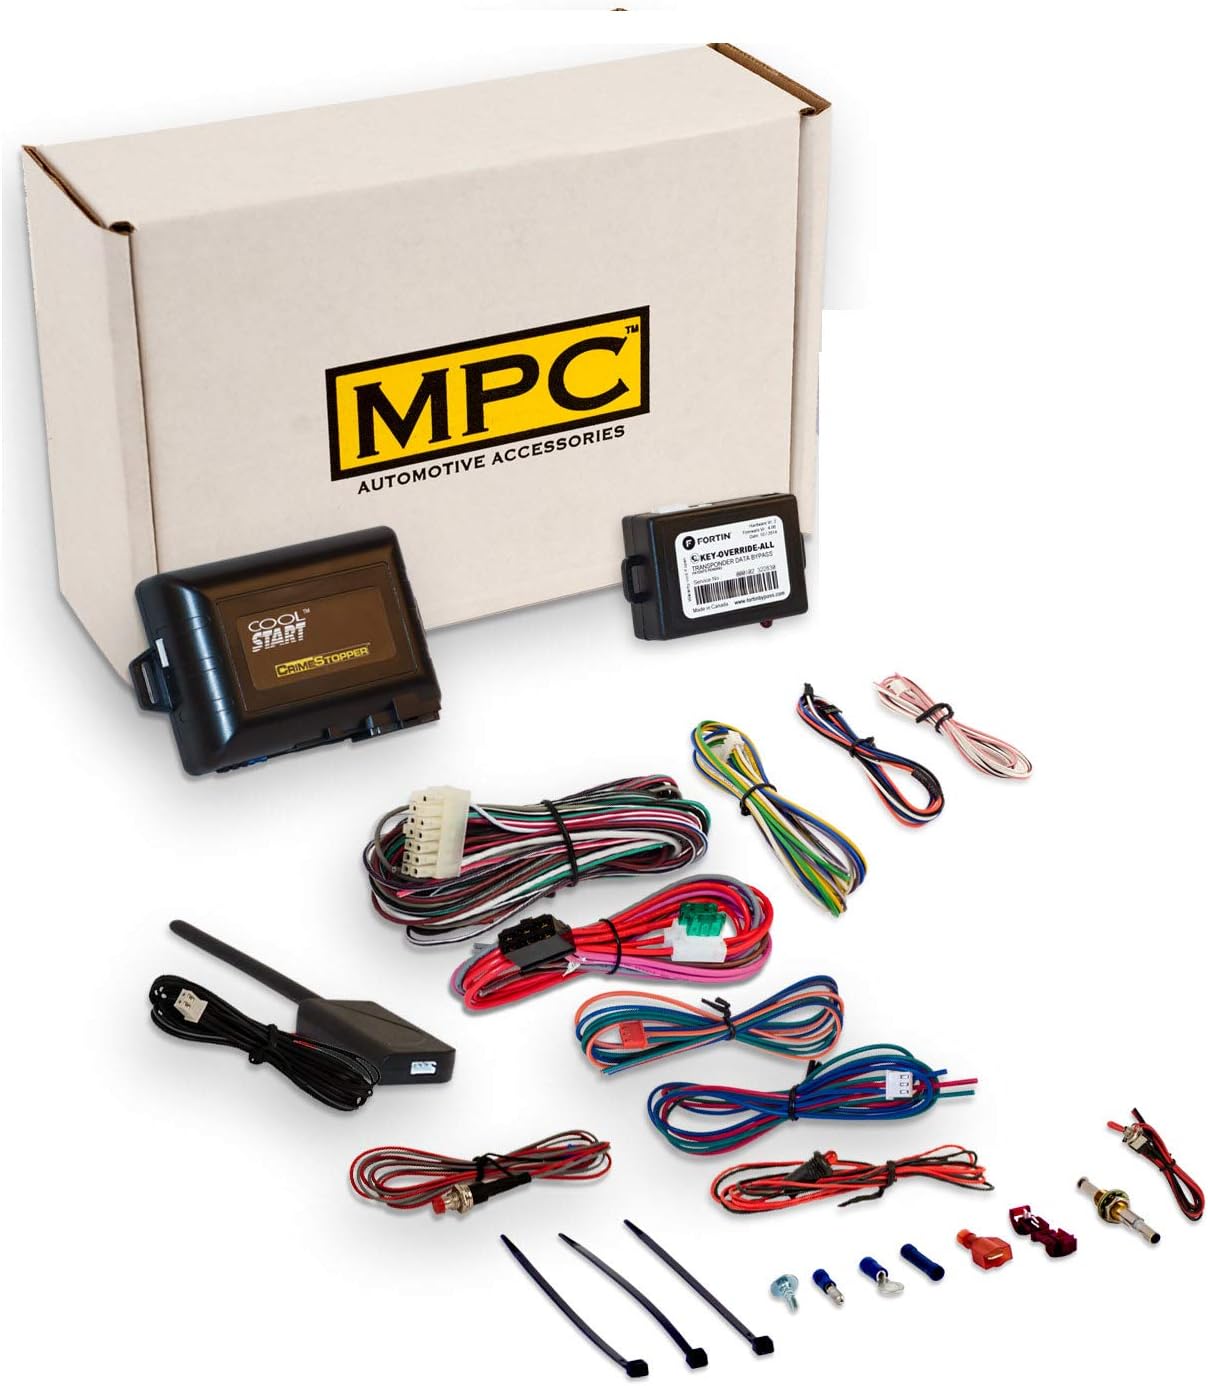
This image displays the full kit, including the main remote start module, immobilizer module, various wiring harnesses, connectors, and two 5-button remote controls. These are the essential parts for installing and operating your remote start system.
Сумісність з транспортним засобом
This remote start system is specifically designed for:
- транспортний засіб: Тойота Королла
- Модельні роки: 2005-2008
- Спосіб передавання: Automatic Transmission ONLY
- Тип запалювання: Conventional Key-Start Ignition ONLY (Does NOT work in Push-To-Start Vehicles)
- Тип двигуна: Gas Engine Only (NOT for Hybrid)

This image clearly illustrates the vehicle requirements: only conventional key-start ignitions are compatible, while push-to-start systems are not. It also specifies compatibility for gas engines only, excluding hybrid models.
Налаштування та встановлення
The installation of this product requires basic wiring knowledge. It is not a plug-and-play system. Detailed directions with wire colors and locations are provided with the product. The following steps outline the general process:
1. Підготовка
- Переконайтеся, що транспортний засіб вимкнено, а стоянкове гальмо увімкнено.
- Від'єднайте негативну клему акумулятора автомобіля.
- Gather necessary tools: Phillips head screwdriver, 10mm socket wrench, pry tool.

This image shows a specialized pry tool, which is essential for carefully detaching plastic trim pieces and panels in your vehicle's interior without scratching or breaking them during the installation process.
2. Accessing Wiring (General Guide)
У наступному відео наведено загальний оглядview of accessing wiring for a remote start installation in a Toyota Highlander. While your vehicle is a Toyota Corolla, many of the panel removal and wiring access techniques are similar. Refer to your specific product's wiring diagram for exact wire locations.
This video demonstrates the process of installing a remote starter, including removing steering column covers, accessing the ECU behind the dash, and connecting the T-harness. Although the video features a 2014-2019 Toyota Highlander, the general steps for panel removal and wiring connections are often applicable to other Toyota models like the Corolla. Always consult your specific product's wiring diagram for precise instructions for your vehicle.
Steering Column Cover Removal:
- Turn the ignition ON by pressing the push-to-start button twice (without pressing the brake pedal).
- Turn the steering wheel fully to the right to expose a Phillips screw on the steering column cover. Remove this screw.
- Turn the steering wheel fully to the left to expose another Phillips screw. Remove this screw.
- Release the steering column tilt lever and adjust the steering column all the way up and out.
- Gently pull down on the lower section of the steering column cover to separate the upper and lower halves.
Dash Panel Removal:
- Remove two Phillips screws from the bottom of the dash panel on the driver's side.
- Remove the hex fastener located to the left of the emergency brake pedal.
- Use a pry tool to carefully remove the sill panel from inside the door jamb.
- Remove the 10mm hex bolt securing the left side of the dash.
- Use a pry tool to carefully remove the cover on the left side of the dash.
- Gently pull on both sides of the lower dash assembly to release it and allow it to drop down, exposing the ECU.
3. Підключення проводів
- Locate the steering lock module plug on the underside of the steering wheel assembly.
- Remove the steering lock plug by pressing the tab and plug it into the matching plug on the T-harness assembly.
- Take the male plug from the T-harness assembly and plug it back into the module in the car.
- Locate the ECU behind the left side of the dash. The only plug to work with at the ECU is the one identified in your product's specific instructions.
- Your T-harness assembly has two sets of large white plugs, labeled 'A' and 'B'. For this installation, use only the 'B' plugs. (Note: Some T-harnesses may only have 'B' plugs).
- Remove the tape from the 'B' plug and go back to the ECU plug identified earlier.
- Release the ECU plug by pressing gently on the tab and pulling it out.
- Plug the vehicle's ECU plug into the receptacle on the T-harness.
- Take the male plug from the T-harness and plug it into the ECU in the spot you just vacated. Give it a gentle tug to ensure it's secure.
- Your T-harness assembly may have three small plugs labeled 'EVO ALL', 'EVO 1', and 'DOOR LOCK'. These plugs are not used in this installation.
4. Програмування модуля
- Locate the data link cable on your T-harness assembly (two small black plugs, each with four wires).
- Take the end of the data link cable that does NOT have the locking tab.
- While holding down the program button on the side of the EVO module, plug the data link cable into the module.
- Continue to hold the program button while the LEDs start to cycle (blue, then yellow, then red). Release the button when ONLY the blue LED is lit. If a different color LED is lit or LEDs are flashing, unplug the data link cable and restart the process.
- Insert the 20-pin white connector, the 6-pin red connector, and the 5-pin white connector into the EVO module. The blue LED should remain lit.
- Turn the ignition ON by pressing your push-to-start button two times (without your foot on the brake pedal).
- After a few seconds, the blue LED will start to flash rapidly. Press your push-to-start button one time, and the LED will shut off. Programming is now complete.
5. Тестування та повторне складання
- Закрийте всі двері.
- Press the lock button on your remote control three times within one second intervals. The vehicle's parking lights will flash, and the engine will start.
- Let the car run for a few seconds, then press the lock button three times to shut it down. (Alternatively, opening any door will also shut down the engine).
- Bundle up and stow all wires behind the dash, in front of the ECU, ensuring they do not interfere with any moving parts, especially the emergency brake assembly.
- Reassemble the dash and steering column covers in reverse order of removal.
- Replace the hex nut at the bottom of the dash.
- Perform one final test of the system. Ensure the hood is completely closed, as the system will not remote start if the hood is open.
Інструкція з експлуатації
Your MPC 5-Button Remote Start System offers convenient control over your vehicle. The included 5-button 1-way remotes provide extended range up to 2000 ft.

This image displays the two 5-button remote controls that come with the remote start system. These remotes are used to activate the remote start, lock/unlock doors, and control other features of your vehicle from a distance.
- Дистанційний запуск: Press the lock button on your remote control three times within one second intervals. The vehicle's parking lights will flash, and the engine will start.
- Дистанційна зупинка: To turn off the engine after remote starting, press the lock button on your remote control three times again. Alternatively, opening any door will also shut down the engine.
- Блокування/розблокування дверей: Use the dedicated lock and unlock buttons on your remote for standard door control.
- Trunk/Hatch Release: The remote includes a button to pop your trunk or back hatch.
- Multi-Vehicle Control: A multi-vehicle button allows for dual vehicle control if you have multiple compatible systems.
- Programmable Run Time: The system offers programmable run time options of 5, 10, 20, or 30 minutes.
- Програмований автозапуск: You can set programmable 2, 3, or 4 hourly auto-start mode options.
Технічне обслуговування
The MPC Remote Start System is designed for minimal maintenance. Key considerations include:
- Віддалена заміна акумулятора: If the range of your remote decreases significantly, it may be time to replace the battery. Refer to the remote's specific instructions for battery type and replacement procedure.
- Перевірка проводки: Periodically inspect all installed wiring connections to ensure they remain secure and free from damage.
Усунення несправностей
If you encounter issues with your remote start system, consider the following common troubleshooting steps:
- Система не запускається:
- Ensure all doors, hood, and trunk are fully closed.
- Перевірте батарейку пульта дистанційного керування.
- Перевірте, чи заряджений акумулятор автомобіля.
- Confirm the system was programmed correctly (refer to Module Programming section).
- Зменшений радіус дії дистанційного керування:
- Замініть батарею пульта дистанційного керування.
- Ensure there are no large obstructions between the remote and the vehicle.
- Несподіване завершення роботи:
- Check if any door, hood, or trunk was opened after remote start.
- Ensure the brake pedal was not pressed.
For further assistance, please contact MPC Technical Support.
Технічні характеристики
| Особливість | Деталь |
|---|---|
| Вага товару | 3 фунта |
| Розміри продукту | 8 x 5 x 2 дюймів |
| Номер моделі товару | B-1487-439-A |
| Бездротовий пульт | так |
| Віддалений діапазон | До 2000 футів |
Інформація про гарантію
The remote starters and alarms offered by MPC carry a limited lifetime warranty through the manufacturer. Physical damage or damage due to improper installation will void the manufacturer's warranty.
Within the first year of purchase, you can contact MPC for warranty issues. The product must be returned at the customer's expense for warranty service. After the first year, warranty issues must be handled directly through the manufacturer, requiring a receipt from the original purchase.
The product is warranted to the end user, when properly installed and under normal conditions of use, to be free from defects in workmanship and materials for a period of one year from the provided date of purchase, to the original purchaser of the product. This warranty does not cover abuse, operation in a manner inconsistent with the product's design, or damage resulting from exposure to the elements. If the defect is considered "under warranty", MyPushcart will, at its option, repair or replace the product free of charge to the original purchaser. MyPushcart is not liable for any installation charges, loss or damage of any kind incurred in the replacement, repair of any warranted product.
Технічна підтримка
MPC provides Premier USA Technical Support based in Tucson, AZ. Several different methods of support are available, and QR code instructions are included with your product to ensure access to the most up-to-date information.
For assistance, please refer to the contact information provided with your product or visit the official MPC webсайт.

This image shows a friendly technical support representative, symbolizing the assistance available from MPC. Support is provided from Monday to Friday, 9 AM to 5 PM (MST).


