1. Продукт закінчивсяview
This MPC Remote Start Kit provides a convenient way to remotely start your Toyota 4Runner. The kit includes a remote starter data interface module, a T-Harness, and two 1-button long-range transmitters. It is designed for semi plug-and-play installation, significantly reducing the number of required wiring connections.
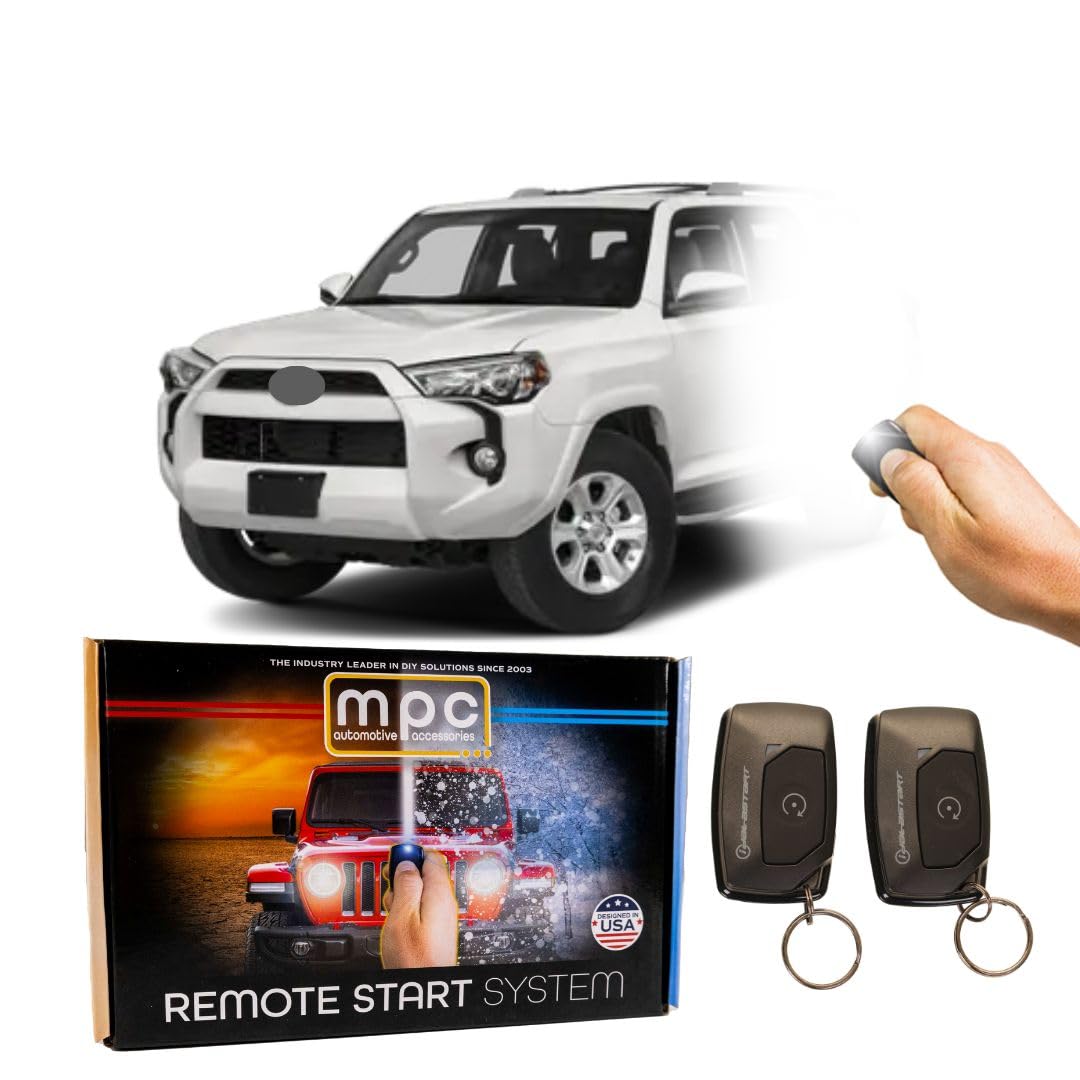
Зображення: Оверview of the MPC Remote Start Kit, showing the main module and wiring harnesses.
2. Сумісність з транспортними засобами
This remote start kit is compatible with Toyota 4Runner models manufactured between 2010 and 2019. It is designed exclusively for vehicles with a Key-Start Ignition (G-Key) і Gas Engines Only. It is not compatible with Push-to-Start vehicles or diesel engines. The vehicle must have an Automatic Transmission.

Image: Visual guide indicating compatibility with 'G' Key-Start Ignition Only and Gas Engines Only, explicitly stating incompatibility with Push-To-Start vehicles.
3. Що входить до комплекту
- Remote Starter Data Interface Module
- Vehicle-Specific T-Harness
- (2) Ultra-Compact 1-Button Long Range Transmitters
- Попереджувальна наклейка
- Zip Ties for cable management
- Optional Hood Pin (not always required as most vehicles have a factory hood switch)

Image: The main components of the remote start kit, including the module, wiring, and remote fobs.

Зображення: Крупний план view of the remote start module with various connectors and mounting holes.

Image: Two compact 1-button remote transmitters for activating the remote start function.
4. Необхідні інструменти
- Basic hand tools (e.g., screwdriver, socket wrench)
- Pry tool (included in kit)
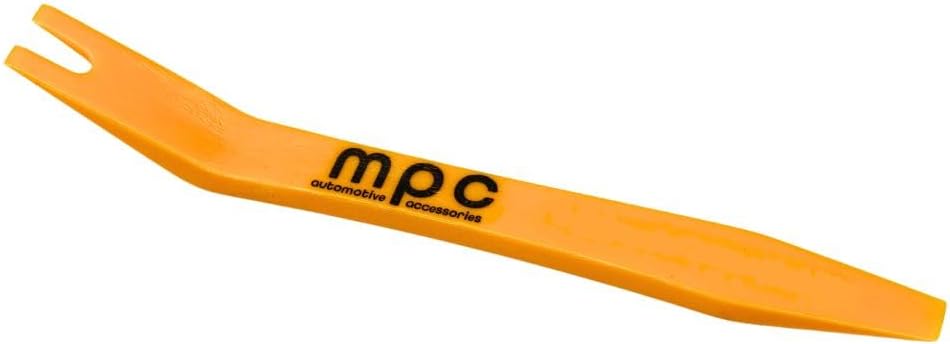
Image: An orange plastic pry tool, useful for safely removing interior trim panels without causing damage.
5. Налаштування та встановлення
This kit features a semi plug-and-play installation. While it significantly reduces the number of wiring connections compared to typical systems, some basic wiring connections are still required. Concise directions with wire colors and locations are provided. A person with basic knowledge of car electronics should be able to install this product successfully.
5.1. Підготовка
- Ensure your vehicle is turned off and the parking brake is engaged.
- Від’єднайте негативну клему акумулятора автомобіля, щоб запобігти короткому замиканню під час встановлення.
5.2. Accessing Vehicle Wiring
- Using the provided pry tool, carefully remove the necessary trim panels around the steering column and dashboard to access the vehicle's wiring harnesses.
- Locate the factory OBD2 port and the ignition barrel wiring.
5.3. T-Harness Connection
- Connect the vehicle-specific T-Harness inline with the factory wiring. The T-Harness is designed to integrate seamlessly with existing connectors.
- Переконайтеся, що всі з’єднання надійні та правильно встановлені.
5.4. Програмування модуля
- Connect the remote start module to the T-Harness.
- Follow the specific programming steps outlined in the detailed installation guide provided with your kit. This typically involves pressing a program button on the module and cycling the vehicle's ignition.
5.5. Securing the Module
- Once programmed, use the provided zip ties to secure the remote start module and excess wiring behind the dashboard, ensuring it is away from any moving parts or heat sources.
5.6. Повторне складання
- Reinstall all removed trim panels in reverse order of removal.
- Знову підключіть негативну клему акумулятора автомобіля.
6. Інструкція з експлуатації
6.1. Remote Start Function
Щоб дистанційно запустити автомобіль:
- Ensure all vehicle doors are closed and locked.
- Press the 'Lock' button on your factory key fob three (3) times consecutively.
- The vehicle's lights will flash, and the engine will start after a brief pause.
The remote start function will typically run for 15 minutes before automatically shutting off. Your vehicle's climate control settings will activate based on their last setting.
6.2. Remote Shut-Off Function
To turn off your vehicle remotely:
- Press the 'Lock' button on your factory key fob three (3) times consecutively while the engine is running via remote start.
- Alternatively, opening any vehicle door will also shut off the engine.
7. Технічне обслуговування
The MPC Remote Start Kit is designed for maintenance-free operation. Ensure all wiring connections remain secure and free from damage. Periodically check the remote transmitters' battery life and replace as needed.
8. Вирішення проблем
- Дистанційний запуск не активується: Ensure all doors are closed, the hood is closed, and the parking brake is engaged. Verify the factory key fob battery is not low.
- Engine Shuts Off Immediately: Check all wiring connections for proper seating. Ensure the module was programmed correctly.
- Vehicle Not Responding to Key Fob: Confirm the remote start module is powered and properly connected.
For further assistance, refer to the technical support section.
9. Технічні характеристики
- Номер моделі: B-4925-435
- Вага товару: 3 фунта
- Розміри продукту: 8 x 8 x 3 дюймів
- Віддалений діапазон: Up to 1,500 feet (with included 1-button remotes)
10. Інформація про гарантію
The remote starters and alarms offered by MPC carry a limited lifetime warranty through the manufacturer. Physical damage or damage due to improper installation will void the manufacturer's warranty. Within the first year of purchase, you can contact MPC for warranty issues. The product must be returned at the customer's expense for warranty service. After the first year, warranty issues must be handled directly through the manufacturer, requiring a receipt from the original purchase. The product is warranted to the end-user, when properly installed and under normal conditions of use, to be free from defects in workmanship and materials for a period of one year from the provided date of purchase, to the original purchaser. This warranty does not cover abuse, operation inconsistent with the product's design, or damage from environmental exposure. If a defect is considered 'under warranty', MyPushcart (MPC) will, at its option, repair or replace the product free of charge to the original purchaser. MyPushcart is not liable for any installation charges, loss, or damage incurred in the replacement or repair of any warranted product.
11. Технічна підтримка
MPC Technical Support is available from the United States, Tucson, AZ. Several different methods of support are available, and QR code instructions are included with the product to ensure access to the most up-to-date information.

Image: Information regarding MPC's free expert technical support, available Monday - Friday, 9 AM - 5 PM (MST).


