1. Вступ
1.1 продукт закінченоview
The AIDA PTZ-X12-IP is a Full HD IP Broadcast PTZ Camera designed for broadcast and conference applications. It features advanced IP streaming technology supporting H.264 and H.265 (HEVC) codecs. Integrated RS232 and VISCA over IP control ensure compatibility with most IP-based controllers, streamlining workflows and simplifying cable management. The camera offers multiple video output formats including 3G-SDI, HDMI, USB 3.0, and online video outputs like RTSP/RTMP.
1.2 Основні характеристики
- Full HD Progressive Scan sensor for sharp, vivid color in various lighting conditions.
- Advanced digital image processor providing detailed images with comprehensive feature access.
- Motion-compensated temporal noise reduction filter for effective noise reduction without motion blur.
- Versatile connectivity: 3G/HD-SDI, HDMI, RJ-45, USB 3.0, and USB 2.0 for seamless video performance.
- Powerful 12X Optical Zoom capability.
2. Інформація про безпеку
Please read this manual carefully before operating the device. Retain it for future reference. Observe all warnings and instructions marked on the product.
- Джерело живлення: Use only the power adapter supplied with the unit. Ensure the power voltage знаходиться в межах зазначеного діапазону.
- Установка: Install the camera on a stable surface or mount it securely according to installation guidelines. Avoid placing it in direct sunlight, near heat sources, or in areas with high humidity or dust.
- Прибирання: Від’єднайте живлення перед чищенням. Використовуйте м’яку суху тканину. Не використовуйте рідкі або аерозольні засоби для чищення.
- Обслуговування: Не намагайтеся самостійно обслуговувати цей виріб. Зверніть усі послуги до кваліфікованого обслуговуючого персоналу.
- Вода і вологість: Щоб зменшити ризик пожежі або ураження електричним струмом, не піддавайте цей прилад дії дощу або вологи.
3. Вміст упаковки
Перевірте наявність усіх елементів в упаковці:
- AIDA PTZ-X12-IP Camera Unit
- Адаптер живлення
- Пульт дистанційного керування (якщо входить до комплекту поставки певної моделі)
- Монтажний кронштейн (якщо входить до комплекту)
- Посібник користувача (цей документ)
4. Продукт закінчивсяview
4.1 Камера Views

малюнок 4.1: Лицьова сторона view of the AIDA PTZ-X12-IP camera, highlighting its compact design and the prominent lens.
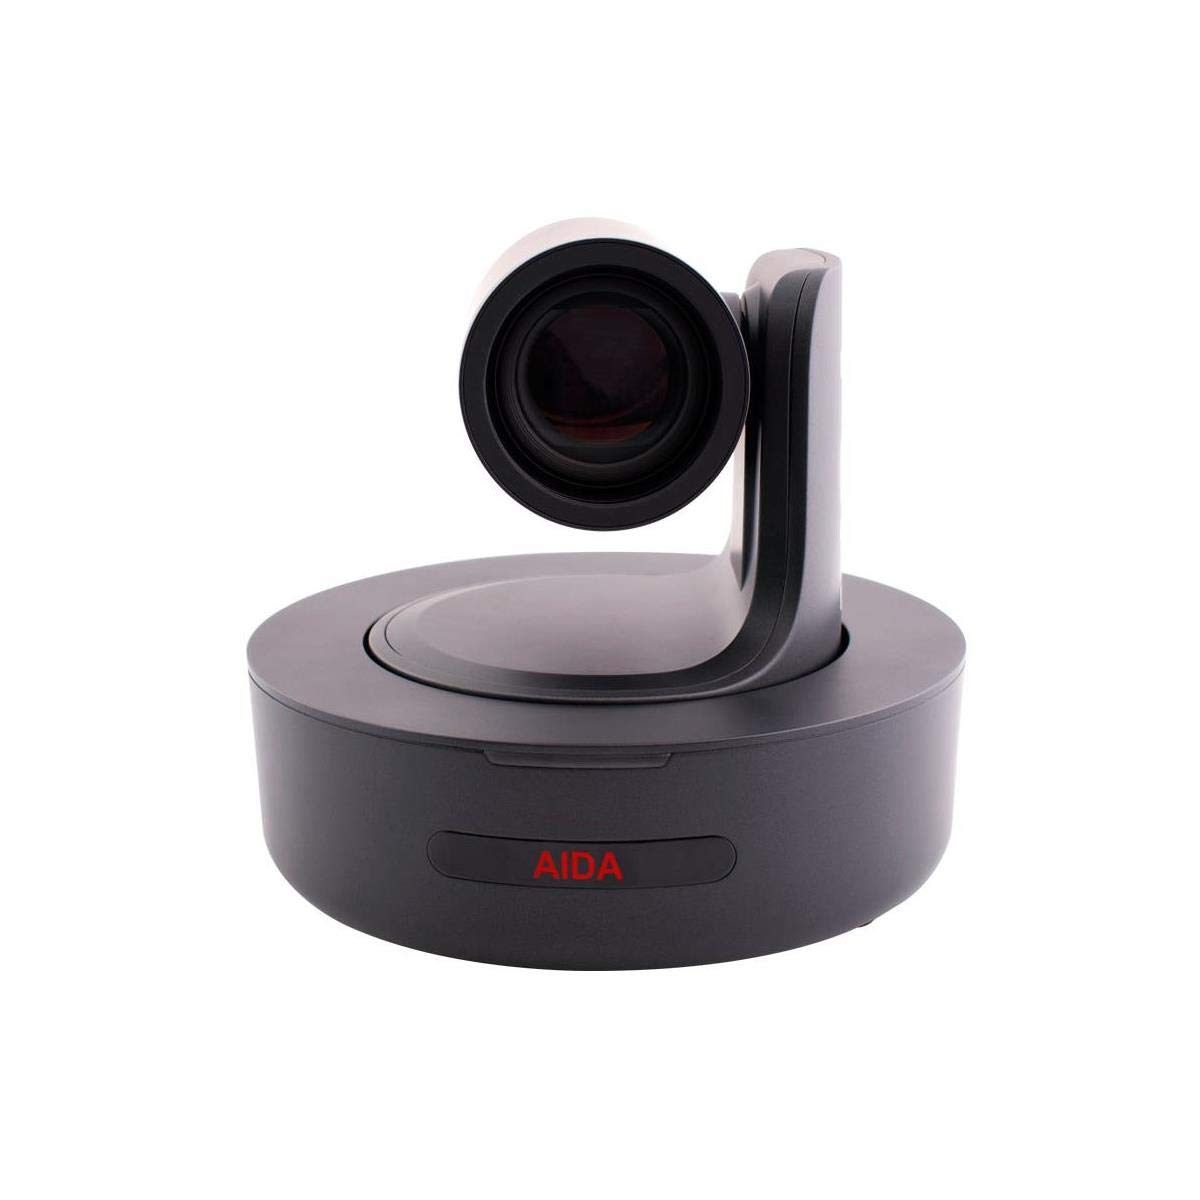
малюнок 4.2: Прямий фронт view of the AIDA PTZ-X12-IP camera, emphasizing the lens and the camera's rotational base.

малюнок 4.3: Задня view of the AIDA PTZ-X12-IP camera, detailing the various connectivity ports.
4.2 Порти та роз’єми
Refer to Figure 4.3 for the location of the following ports:
- IN-RS232-OUT: RS232 serial control ports for daisy-chaining and external control.
- USB 3.0: High-speed USB connection for video output and control.
- LAN: RJ-45 Ethernet port for IP streaming, control (VISCA over IP), and power (PoE, if supported by model).
- DC12V: Power input for the included 12V DC power adapter.
- (Note: 3G-SDI and HDMI ports are typically located on the rear panel, though not explicitly labeled in Figure 4.3, they are standard for this model.)
5. Налаштування
5.1 Встановлення
- Розміщення: Position the camera on a flat, stable surface or mount it using a compatible bracket (sold separately or included). Ensure adequate ventilation around the unit.
- Підключення живлення: Connect the supplied 12V DC power adapter to the DC12V port on the camera and then plug it into a power outlet.
- Початкове ввімкнення: The camera will perform a self-test and the lens will move to its home position.
5.2 Підключення
Connect the camera to your video system using one or more of the following methods:
- Вихід 3G-SDI: Connect a 3G-SDI cable from the camera's 3G-SDI OUT port to a compatible SDI input device (e.g., switcher, recorder).
- Вихід HDMI: Connect an HDMI cable from the camera's HDMI OUT port to an HDMI display or capture device.
- Вихід USB 3.0: Connect a USB 3.0 cable from the camera's USB 3.0 port to a computer for direct video capture and control.
- Ethernet (LAN) Connection: Connect an Ethernet cable from the camera's LAN port to a network switch or router for IP streaming and control.
- Контроль RS232: For serial control, connect an RS232 cable to the IN-RS232-OUT ports and to your control device.
6. Операційна
6.1 Основна операція
The PTZ-X12-IP camera can be controlled via its included remote control (if applicable), a dedicated PTZ controller, or via IP commands.
- Панорамування/нахил: Use the joystick or directional buttons on your controller to move the camera horizontally (pan) and vertically (tilt).
- Масштаб: Use the zoom controls to adjust the 12x optical zoom. Zoom in (Tele) to magnify the image, zoom out (Wide) to broaden the field of view.
- Фокус: The camera typically features auto-focus. Manual focus adjustment may be available through the control interface.
- Пресети: Store and recall specific camera positions (pan, tilt, zoom, focus) as presets for quick scene changes.
6.2 IP Control and Streaming
For advanced control and streaming capabilities, connect the camera to your network via the LAN port.
- IP-адреса: The camera will obtain an IP address via DHCP by default. You can find its IP address using a network scanner or by accessing the camera's web інтерфейс.
- Web Інтерфейс: Access the camera's settings and live view by entering its IP address into a web browser. This interface allows for detailed configuration of video settings, network parameters, and PTZ control.
- VISCA через IP: The camera supports VISCA over IP for integration with professional PTZ controllers and software. Refer to the camera's network settings for port information.
- RTSP/RTMP Streaming: Configure streaming protocols (RTSP/RTMP) through the web interface to stream video to compatible platforms or servers.
7. Технічне обслуговування
7.1 Очищення
- Об'єктив: Use a soft, lint-free cloth specifically designed for optical lenses. If necessary, use a small amount of lens cleaning solution. Avoid touching the lens with bare fingers.
- Корпус камери: Протріть корпус камери м’якою сухою тканиною. Для видалення стійкого бруду злегкаamp тканину можна використовувати, але переконайтеся, що волога не потрапила всередину камери.
- Роз'єми: Keep connectors free of dust and debris. Use compressed air if needed.
7.2 Зберігання
When not in use for extended periods, store the camera in a cool, dry place, away from direct sunlight and extreme temperatures. Use the original packaging or a protective case to prevent dust accumulation and physical damage.
8. Вирішення проблем
Якщо у вас виникли проблеми, зверніться до наступної таблиці, щоб знайти поширені проблеми та способи їх вирішення.
| проблема | Можлива причина | Рішення |
|---|---|---|
| Немає живлення | Адаптер живлення не підключений або несправний. | Перевірте підключення живлення. Переконайтеся, що розетка справна. Спробуйте інший адаптер живлення, якщо він є. |
| Немає відеовиходу | Incorrect cable connection; wrong input selected on display; camera not powered on. | Verify all video cables are securely connected. Select the correct input source on your display/switcher. Ensure camera is powered on. |
| Не працює керування PTZ | Control cable disconnected; incorrect control protocol/settings; IP address conflict. | Check RS232 or Ethernet cable connections. Verify control protocol (e.g., VISCA) and camera ID settings. Check for IP address conflicts on the network. |
| Зображення розмите | Lens is dirty; focus is incorrect; lighting conditions are poor. | Clean the lens. Adjust focus manually if auto-focus is not performing correctly. Improve lighting in the environment. |
| IP stream not accessible | Network cable disconnected; incorrect IP settings; firewall blocking access. | Ensure Ethernet cable is connected. Verify camera's IP address and network settings. Check firewall rules on your computer/network. |
Якщо проблема не зникає після спроби цих рішень, зверніться до служби підтримки клієнтів.
9. Технічні характеристики
Technical specifications for the AIDA PTZ-X12-IP camera:
| Особливість | Деталь |
|---|---|
| Назва моделі | PTZ-X12-IP |
| Розміри продукту | 11.8 x 11 x 10.9 дюймів |
| вага | 7.8 фунта |
| Оптичний зум | 12x |
| Технологія підключення | Wired (3G-SDI, HDMI, USB 3.0, RJ-45) |
| Формати виведення відео | 3G-SDI, HDMI, USB 3.0, RTSP/RTMP (IP) |
| Інтерфейси управління | RS232, VISCA over IP |
| IP Streaming Codecs | H.264, H.265 (HEVC) |
| Рекомендоване використання | Indoor, Outdoor (with appropriate protection) |
| Виробник | Зображення AIDA |
10. Гарантія та підтримка
10.1 Інформація про гарантію
AIDA products are designed and manufactured to the highest quality standards. This product is covered by a limited warranty against defects in materials and workmanship. Specific warranty terms and duration may vary by region and retailer. Please retain your proof of purchase for warranty claims.
10.2 Підтримка клієнтів
For technical assistance, troubleshooting, or warranty inquiries, please contact AIDA customer support. You can find contact information and additional resources on the official AIDA webсайті або через продавця вашого товару.
Відвідайте AIDA Store для отримання додаткової інформації.


