VIVOHOME 110V 1/4 HP 3.5 CFM Single Stage Rotary Vane Air Vacuum Pump
Model: VH409 | Brand: VIVOHOME
Продукт закінченийview
The VIVOHOME 110V 1/4 HP 3.5 CFM Single Stage Rotary Vane Air Vacuum Pump is engineered for efficient and reliable vacuum operations in various applications, particularly for automotive and HVAC systems. Its robust design ensures durability and consistent performance, making it an essential tool for professionals and DIY enthusiasts.
Правила безпеки
Always read and understand all instructions before operating the vacuum pump. Wear appropriate personal protective equipment (PPE), including safety glasses and gloves, during operation and maintenance. Ensure the work area is well-ventilated. Disconnect power before performing any maintenance or troubleshooting.
УВАГА: To prevent explosion and serious injury, avoid handling refrigerants without proper training and equipment. Read and understand all applicable air conditioning system manuals. Use only approved refrigerants and follow all local regulations.

The main unit of the VIVOHOME vacuum pump, highlighting the warning label regarding safe operation and refrigerant handling.
Налаштування та початкова підготовка
1. Розпакування та перевірка
Carefully remove all components from the packaging. Inspect the pump and accessories for any signs of damage during transit. Ensure all listed parts are present.
This video demonstrates the unboxing and initial setup of the VIVOHOME 3.5 CFM Vacuum Pump Set, including connecting hoses and preparing the unit for use.
2. Заправка олією
The vacuum pump is shipped without oil. Before first use, or after an oil change, fill the pump with the provided vacuum pump oil. Unscrew the oil mist trap cap and pour oil into the oil fill port until the level is between the 'MIN' and 'MAX' marks on the sight glass. Reattach the cap securely.
This image illustrates the components related to oil filling and the exhaust port, including the visible scale marks for oil levels (Max 310ml, Min 220ml).
3. Підключення шлангів
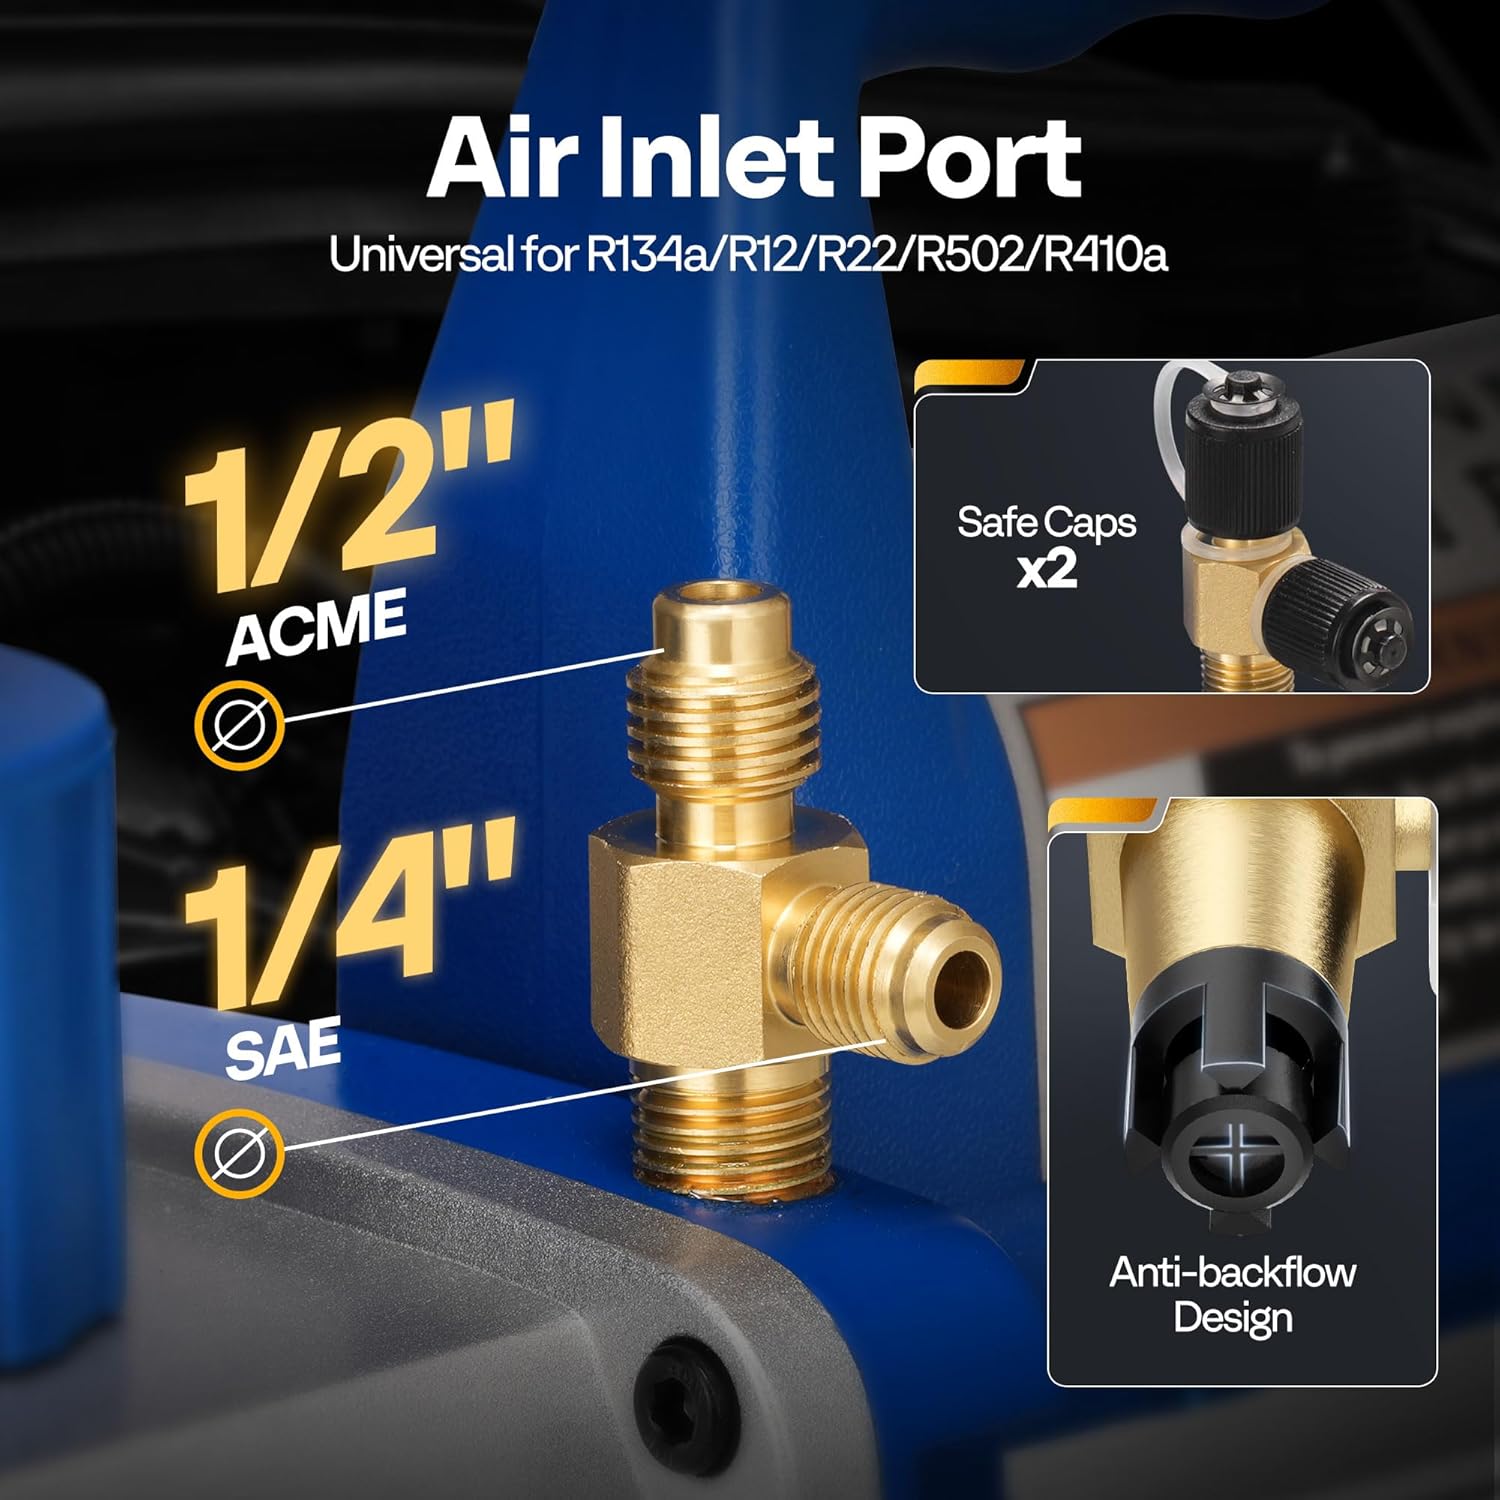
Connect the appropriate hoses to the vacuum pump's intake fittings (1/4-inch SAE and 1/2-inch Acme). Ensure all connections are tight to prevent leaks. For R410a systems, a 5/16-inch adapter (not included) may be required for compatibility.

This image details the universal air inlet ports, compatible with various refrigerants, and highlights the anti-backflow design.
Operating the Vacuum Pump
1. Vacuuming the System (Automotive A/C)
- Connect the manifold gauge set to the vehicle's high-pressure (red) and low-pressure (blue) service ports.
- Connect the yellow hose from the manifold gauge to the vacuum pump's intake port.
- Ensure the manifold gauge valves are open (both high and low sides).
- Turn on the vacuum pump using the ON/OFF switch.
- Allow the pump to run for 10-15 minutes, or until the low-pressure gauge reaches -1 bar (or 29.9 inHg), indicating a deep vacuum.
- Once the desired vacuum is achieved, close the manifold gauge valves (both high and low sides) to isolate the system.
- Turn off the vacuum pump and disconnect the yellow hose from the pump to prevent backflow.
- Monitor the low-pressure gauge for 5-10 minutes. If the needle does not rise, it confirms a leak-free system.
2. Vacuuming the System (HVAC Split Unit)
- Connect the blue hose from the manifold gauge to the low-pressure port of the air conditioner's outdoor unit. (For R410A units, use a 1/4" male to 5/16" female adapter if needed).
- Connect the yellow hose from the manifold gauge to the vacuum pump's intake port.
- Open the blue knob of the manifold gauge.
- Увімкніть вакуумний насос.
- Continue vacuuming for 10-15 minutes until the low-pressure gauge reaches -1 bar.
- Rotate the blue knob clockwise to close the manifold gauge.
- Disconnect the yellow hose from the vacuum pump to prevent backflow.
- Вимкніть вакуумний насос.
- Maintain pressure for 5-10 minutes, observing the low-pressure gauge to check if the needle rises, confirming no leaks in the air conditioning system.
3. Adding New Refrigerant (Automotive A/C)
- After successful vacuuming, reconnect the refrigerant can to the yellow hose using an R134a can tap.
- Rotate the can tap clockwise to pierce the refrigerant can.
- Turn on the vehicle's air conditioner and switch to cooling mode.
- Add refrigerant according to the amount specified on the air conditioner's nameplate.
- When there's little refrigerant left in the can, invert the can for better addition.
- Unscrew the copper cap on the 3-way valve of the gauge and press the valve core to release air. Screw the copper cap back on.
- Rotate the blue knob counterclockwise to open the manifold gauge and allow refrigerant to flow into the system.
- Once the desired amount of refrigerant is added, rotate the blue and red quick couplers counterclockwise to close and remove them, completing the refrigerant charging process.
4. Adding New Refrigerant (HVAC Split Unit)
- Place the refrigerant cylinder on an electronic scale and zero the weight.
- Connect the yellow hose to the liquid port (red high-pressure port) of the refrigerant cylinder.
- Open the liquid port valve of the refrigerant cylinder.
- Unscrew the copper cap on the main port connector of the manifold gauge and press the valve core to release air. Screw the copper cap back on.
- Rotate the blue knob counterclockwise to open the manifold gauge.
- Turn on the air conditioner and switch to cooling mode.
- Monitor the electronic scale to ensure the refrigerant charge matches the amount listed on the air conditioner's nameplate.
- Rotate the blue knob clockwise to close the manifold gauge.
- Rotate the refrigerant cylinder valve to close.
- Quickly unscrew the blue connecting hose on the low-pressure side of the air conditioner's outdoor unit to complete the filling.
This video provides a comprehensive guide on how to vacuum and add refrigerant to both automotive and HVAC systems using the VIVOHOME vacuum pump and accessories.
Технічне обслуговування
Заміна масла
Regular oil changes are crucial for maintaining pump performance and longevity. Change the oil once in a while or when you can't achieve your usual maximum vacuum point on a leak-free system. To drain oil, locate the bottom oil drain valve and open it. Tilt the pump forward to ensure all old oil is removed. Refill with new vacuum pump oil as described in the Setup section.
This image highlights the convenient locations for adding and draining oil, simplifying routine maintenance.
Зберігання
When not in use, store the vacuum pump with the inlet and exhaust caps securely in place to prevent contamination and prolong its lifespan.
Усунення несправностей
Excessive Oil Mist from Air Outlet
- Overfilled Oil Reservoir: Check oil level and drain excess if necessary.
- Contaminated or Degraded Oil: Виконайте заміну масла.
- Витоки вакууму: Перевірте всі з'єднання та шланги на наявність витоків.
- Clogged or Failing Oil Mist Separator: Clean or replace the cotton layer filter at the exhaust port.
- Overloading or Operating Outside Design Parameters: Ensure the pump is used within its specified limits.

This image provides a visual guide to understanding and resolving issues related to oil mist, including common causes like overfilling or contaminated oil.
Pump Leaking Oil
If the pump is leaking oil from the metal case or other areas, inspect for cracks or loose fittings. Ensure all caps and seals are properly seated. If a crack is identified, professional repair or replacement may be necessary.
Технічні характеристики продукту
| Особливість | Деталь |
|---|---|
| Бренд | VIVOHOME |
| Модель | VH409 |
| Джерело живлення | Провідний електричний |
| томtage | 110 В |
| Потужність двигуна | 1/4 к.с. (180 Вт) |
| Швидкість потоку | 3.5 CFM |
| Абсолютний вакуум | 5 Па |
| матеріал | Алюміній |
| Вага товару | 11.4 фунта |
| Розміри продукту | 10.8 x 9 x 4.5 дюймів |
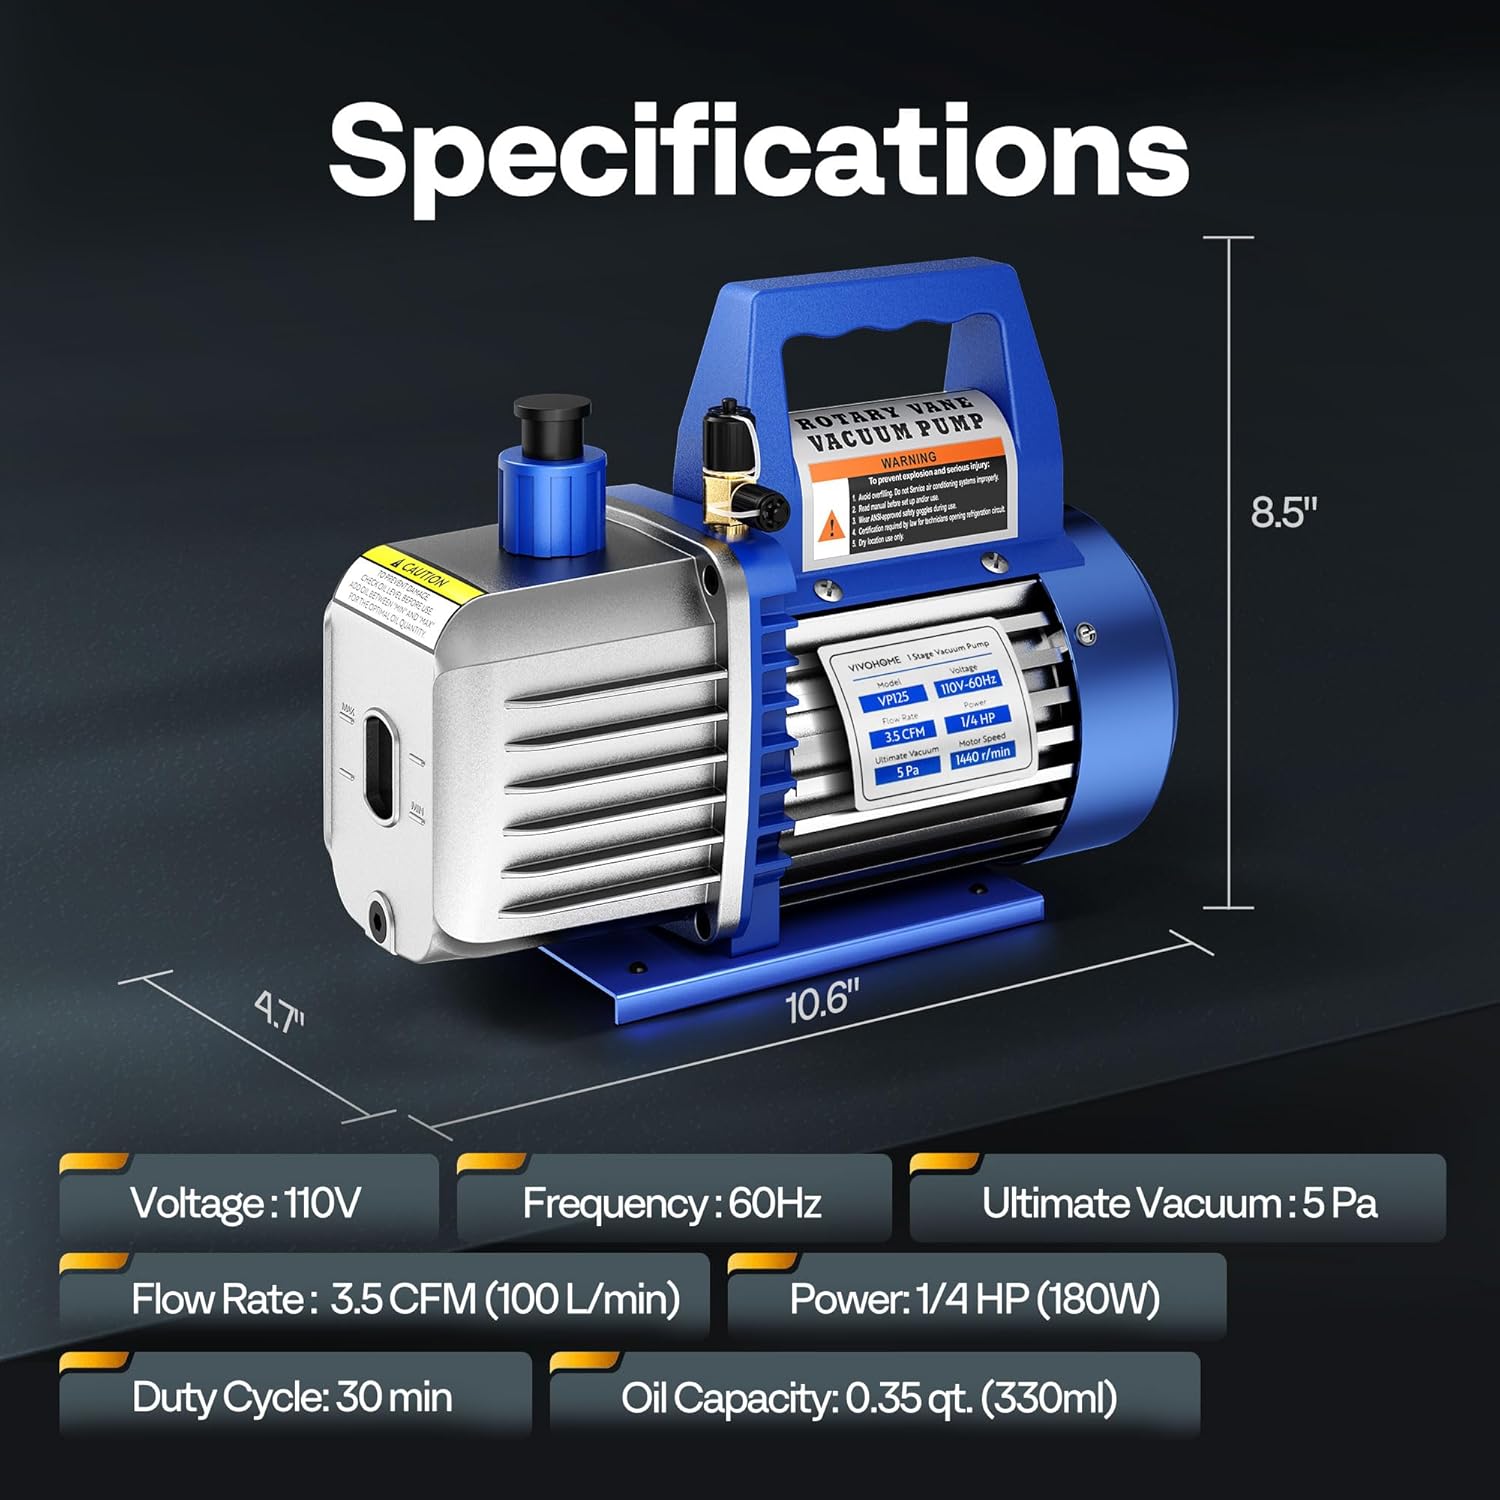
This image provides a visual summary of the product's technical specifications, such as voltage (110V), frequency (60Hz), ultimate vacuum (5 Pa), flow rate (3.5 CFM), power (1/4 HP), duty cycle (30 min), and oil capacity (0.35 qt).
Гарантія та підтримка
Specific warranty information is typically provided with your product packaging or on the manufacturer's official website. For technical support, troubleshooting assistance, or warranty claims, please refer to the contact information provided in your product's original documentation or visit the VIVOHOME official webсайт.
For additional resources and product information, visit the official VIVOHOME Store: VIVOHOME Store