1. Вступ
The Radiolink PIXHAWK is an advanced 32-bit flight controller designed for FPV RC drones, long-wheelbase quadcopters, and 6-8 axis multirotors. It offers robust flight control capabilities, including GPS handling, telemetry, and various flight modes for stable and precise operation. This manual provides essential information for setting up, operating, maintaining, and troubleshooting your PIXHAWK flight controller.
2. Що в коробці
- Radiolink PIXHAWK Flight Controller
- Модуль живлення
- Карта Micro SD
- Запобіжний вимикач
- звуковий сигнал
- GPS Module (may vary by package)
- З'єднувальні кабелі

малюнок 2.1: The image displays the contents typically included in the Radiolink PIXHAWK Flight Controller package, featuring the main flight controller unit, GPS module, power module, various cables, and a micro SD card.
3. Продукт закінчивсяview
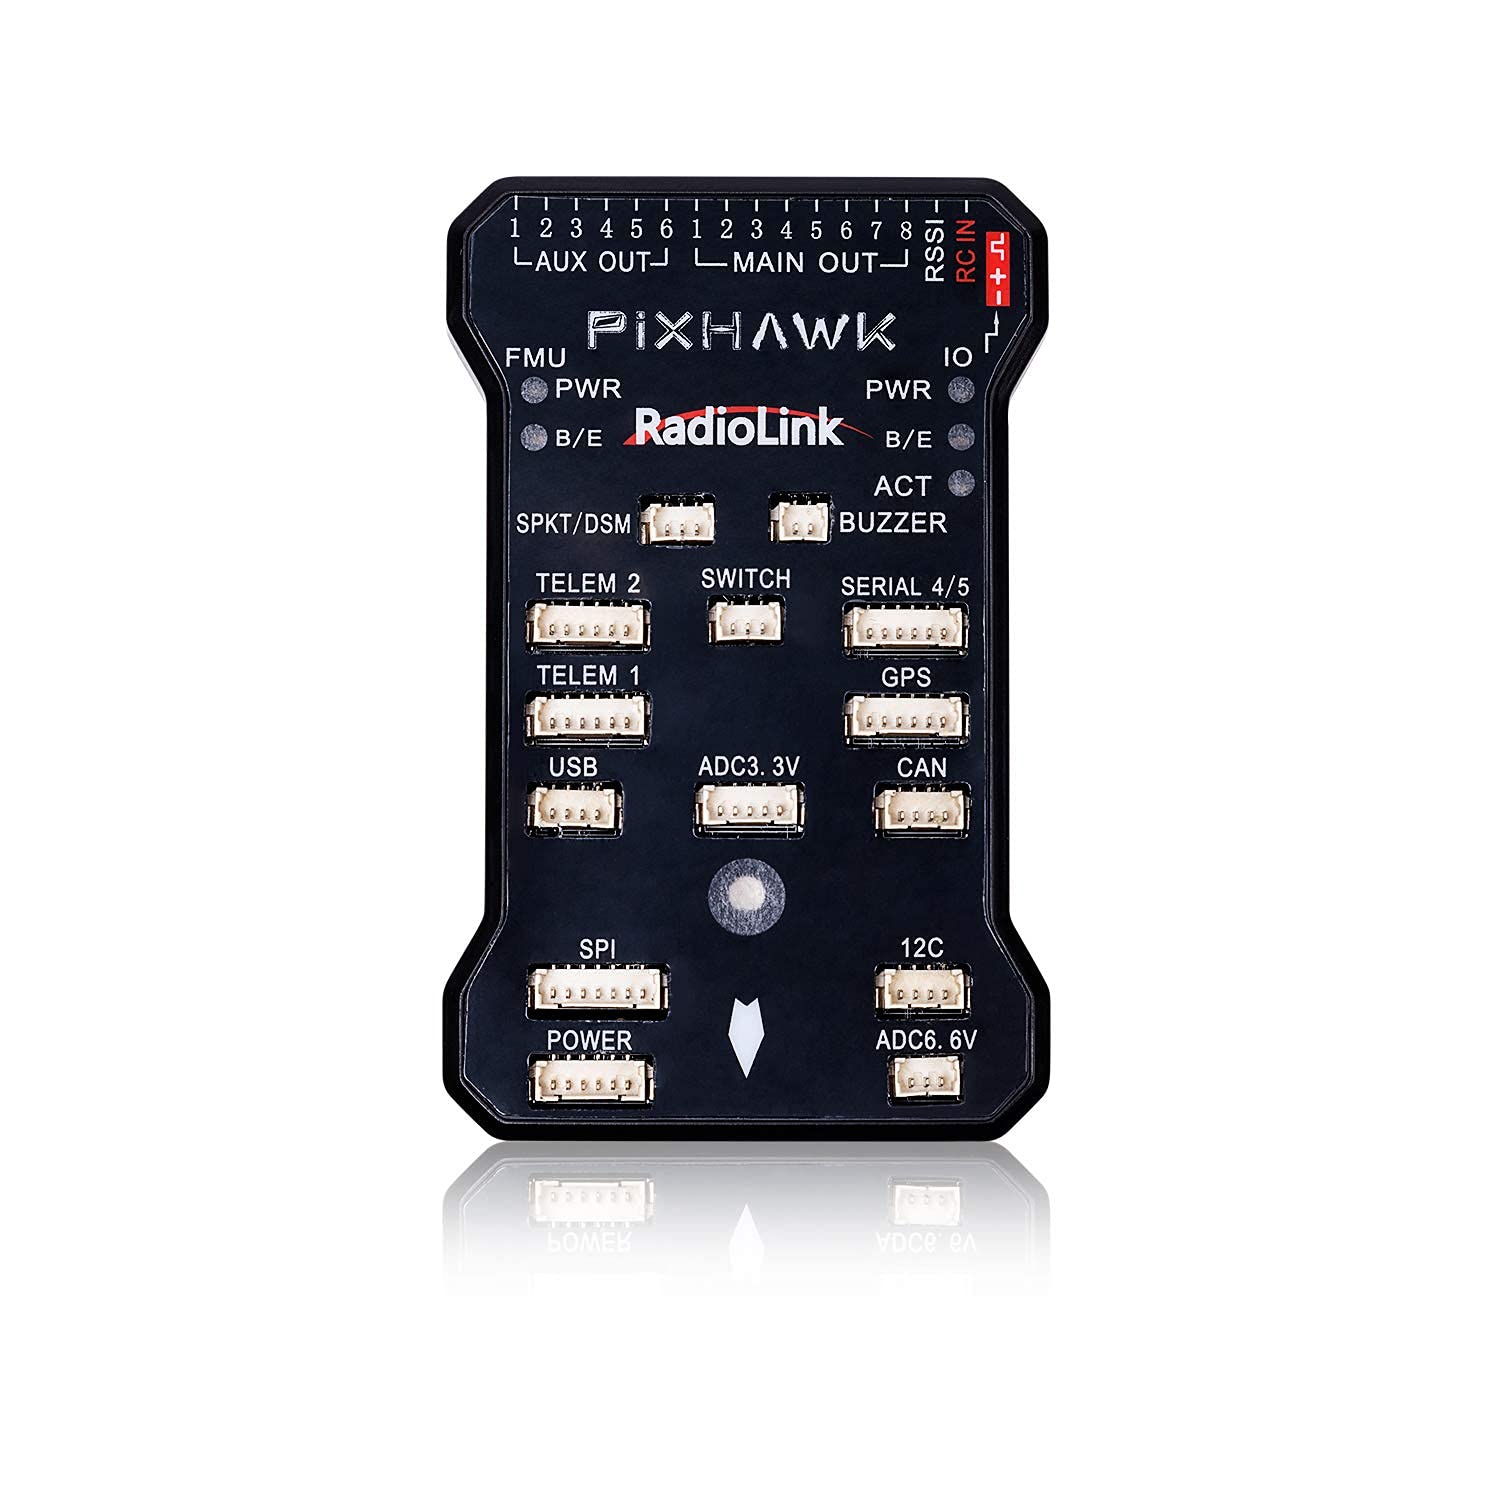
The PIXHAWK flight controller features a high-end configuration with multiple ports for various peripherals and sensors, ensuring reliable and redundant operation.
малюнок 3.1: Вибухнув view of the PIXHAWK flight controller, highlighting its internal high-end configuration and advanced circuitry for reliable performance.
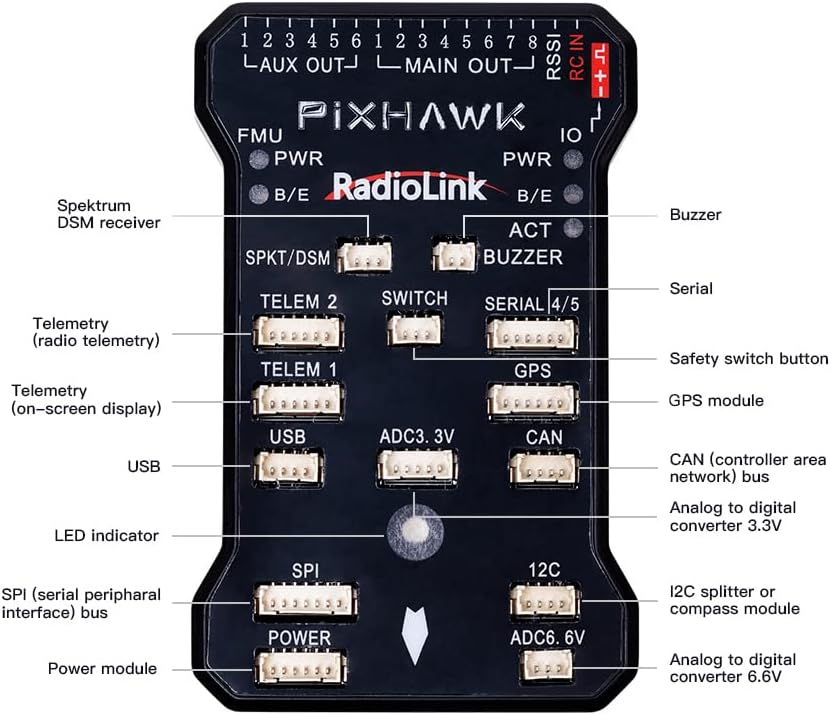
малюнок 3.2: This image provides a detailed layout of the PIXHAWK flight controller's ports, including FMU, PWR, SPKT/DSM, TELEM1, TELEM2, SWITCH, SERIAL 4/5, GPS, USB, ADC3.3V, CAN, SPI, POWER, I2C, and ADC6.6V, along with their respective functions.

малюнок 3.3: The PIXHAWK flight controller's dimensions (6.7"L x 4.2"W x 2"H) are shown, along with examples of compatible long-wheelbase quadcopters and multirotors.
4. Налаштування
4.1. Firmware Update and Compass Calibration
Proper firmware and compass calibration are crucial for safe and stable flight. Follow the steps outlined in the video below for a successful setup.
Відео 4.1: This tutorial demonstrates how to update the PIXHAWK firmware and calibrate the compass using the ArduPilot Mission Planner software. It covers connecting the flight controller, selecting the correct firmware version (V3.X is recommended if V4.0 causes compass calibration issues without an external GPS module), and performing the physical rotation for compass calibration.
Steps for Firmware Update:
- Open the ArduPilot Mission Planner software.
- Connect the PIXHAWK to your computer via USB. Do NOT click "CONNECT" yet.
- Navigate to "INITIAL SETUP" > "Install Firmware".
- Select the corresponding model (e.g., ArduCopter V4.0.7 Quad) to update the latest version online.
- If prompted "Is this a CubeBlack?", click "No".
- If prompted "Upload ChibiOS", click "Yes".
- Wait for the upload to complete.
- Alternatively, to use firmware V3.X (if V4.0 causes compass issues without an external GPS module), click "Download Firmwares" and select any version below V4.0 (e.g., stable-3.6.9). Find the "fmv2" file and download "arducopter.apj". Then, click "Load custom firmware" in Mission Planner and open the downloaded .apj file.
- After successful firmware upload, select the COM port in the upper right corner and click "CONNECT".
Steps for Compass Calibration:
- In Mission Planner, navigate to "INITIAL SETUP" > "Install Firmware Manifest" > "Compass".
- Click "Start" to begin the calibration process.
- Hold the PIXHAWK device in the air and rotate it slowly so that each side (front, back, left, right, top, and bottom) points down towards the earth for a few seconds in turn.
- During the calibration, observe the green progress bar for Mag 1 moving.
- If using a GPS module with compass (e.g., SE100), ensure it is connected and its direction is consistent with the PIXHAWK during calibration.
- Click "OK" when the calibration is finished.
5. Режими роботи
The PIXHAWK flight controller supports various flight modes, offering flexibility and stability for different applications. The video below demonstrates some of these modes.
Відео 5.1: Це відео забезпечує завершенняview and flight demonstration of the Radiolink PIXHAWK Flight Controller, showcasing its capabilities with a long-wheelbase quadcopter. It highlights modes such as Stabilize, Loiter, and Return to Launch, demonstrating the controller's stability and ease of use for various flight tasks.
Key Flight Modes:
- Stabilize Mode: This is a basic flight mode where the flight controller automatically levels the aircraft, making it easier to fly. The pilot directly controls the roll, pitch, and yaw.
- Режим байдикування: In Loiter mode, the aircraft maintains its current position, altitude, and heading automatically. This mode is ideal for beginners or for tasks requiring stable hovering, such as aerial photography.
- Return to Launch (RTL): This safety feature allows the aircraft to automatically return to its launch point and land. It is particularly useful in situations where the pilot loses visual contact or needs to bring the drone back safely.
- Waypoint Navigation: The PIXHAWK can be programmed to follow a series of waypoints, enabling autonomous flight missions. This is managed through the ground control station software.

малюнок 5.1: A drone equipped with the PIXHAWK flight controller demonstrates stable flight, showcasing the built-in barometer's ability to reduce airflow interference and maintain altitude hold stabilization.

малюнок 5.2: The PIXHAWK flight controller is shown connected to a laptop running Radiolink's Mission Planner software, illustrating the ease of parameter setting via USB for various flight configurations.
6. Технічні характеристики
| Особливість | Специфікація |
|---|---|
| Бренд | Радіолінк |
| Назва моделі | PIXHAWK |
| Особливість | Advanced Flight Control and FPV Capabilities |
| Колір | чорний |
| Технологія підключення | Радіочастота |
| Вага товару | 1.28 унції |
| Розміри продукту | 6.7 см (Д) x 4.2 см (Ш) x 2 см (В) |
| матеріал | пластик |
| Тип управління | Пульт дистанційного керування |
| Рівень майстерності | Початківець |
7. Технічне обслуговування
To ensure the longevity and optimal performance of your Radiolink PIXHAWK Flight Controller, regular maintenance is recommended:
- Тримати в чистоті: Regularly clean the flight controller and its components to prevent dust and debris buildup, which can affect sensor performance.
- Перевірте підключення: Periodically check all cable connections for looseness or damage. Secure any loose connections to prevent intermittent issues during flight.
- Оновлення прошивки: Stay updated with the latest stable firmware versions to benefit from performance improvements and bug fixes. Always follow the official update procedures.
- Правильне зберігання: Store the flight controller in a dry, cool environment, away from direct sunlight and extreme temperatures, to prevent damage to electronic components.
8. Вирішення проблем
If you encounter issues with your PIXHAWK flight controller, consider the following troubleshooting steps:
- Compass Calibration Issues: If the compass fails to calibrate or shows errors, ensure you are performing the calibration correctly as shown in Video 4.1. If using firmware V4.0 or higher, an external GPS module with a compass might be required, or you may need to revert to a V3.X firmware version.
- Без GPS-блокування: Переконайтеся, що GPS-модуль має чіткий view of the sky. Interference from other electronic components or indoor environments can prevent a satellite lock.
- Проблеми з підключенням: Verify that the USB cable is securely connected to both the PIXHAWK and the computer. Check that the correct COM port is selected in Mission Planner.
- Safety Switch Blinking Yellow: This indicates that the flight controller is not ready to arm. Check for any pre-arm checks that are failing (e.g., compass calibration, GPS lock, accelerometer calibration).
- Нестабільний політ: Re-check all calibrations (accelerometer, compass, radio). Ensure propellers are balanced and correctly installed. Verify that the frame type is correctly configured in the Mission Planner.
9. Гарантія та підтримка
Radiolink products are covered by a limited warranty against manufacturing defects. For specific warranty terms, technical support, or service inquiries, please refer to the official Radiolink webсайт або зверніться безпосередньо до служби підтримки клієнтів. Зберігайте чек про покупку як підтвердження покупки.


