1. Вступ
Дякуємо за вибір KOLINK Refractor Midi-Tower computer case. This manual provides essential information for the proper installation, operation, and maintenance of your new PC chassis. Please read this manual carefully before beginning the assembly process to ensure a smooth and safe build.
1.1 Інформація про безпеку
- Завжди від’єднуйте блок живлення від розетки перед встановленням або видаленням будь-яких компонентів.
- Одягайте антистатичний браслет, щоб запобігти пошкодженню чутливих компонентів електростатичним розрядом (ESD).
- Handle components with care. Avoid touching pins or circuit boards directly.
- Тримайте дрібні деталі та інструменти подалі від дітей.
- Забезпечте належну вентиляцію навколо корпусу, щоб запобігти перегріву.
2. Вміст упаковки
Будь ласка, перевірте, чи всі наступні предмети присутні у вашій упаковці:
- KOLINK Refractor Midi-Tower Chassis
- Коробка з аксесуарами (містить гвинти, стійки, кабельні стяжки тощо)
- Посібник користувача (цей документ)
If any items are missing or damaged, please contact your retailer or KOLINK support.
3. Продукт закінчивсяview
Familiarize yourself with the key features and components of your KOLINK Refractor Midi-Tower.
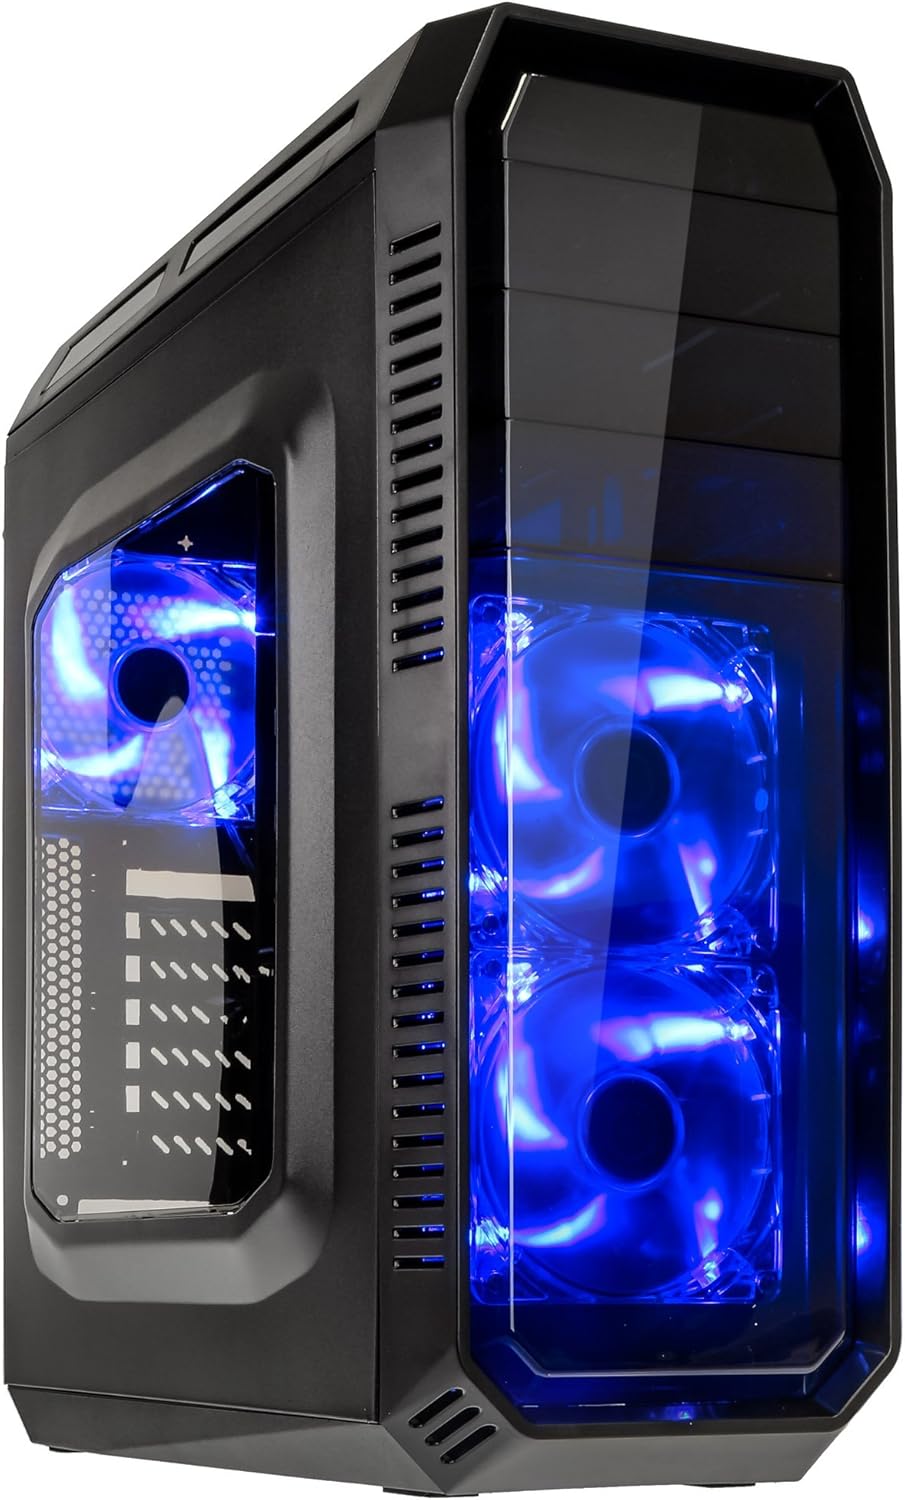
This image displays the KOLINK Refractor Midi-Tower from a front-left perspective, highlighting its sleek black design. The front panel features two pre-installed 120mm blue LED fans, visible through a transparent section, providing both cooling and aesthetic appeal. The left side panel includes a window, allowing visibility of internal components.

Верхній фронт view of the case, illustrating the conveniently located I/O panel on the top. This panel includes two USB 3.0 ports, two USB 2.0 ports, and audio input/output jacks. The top surface also features a mesh area for additional ventilation, contributing to optimal airflow.

This image shows the right side panel of the KOLINK Refractor Midi-Tower. It is a solid black panel, designed for cable management behind the motherboard tray, ensuring a clean and organized interior.

This composite image provides three distinct views of the case. The left panel shows the front with its blue LED fans. The middle panel displays the rear of the case, featuring the motherboard I/O cutout, seven expansion slots, and a 120mm fan mount. The right panel offers a close-up of the top I/O ports, including USB 3.0, USB 2.0, and audio jacks.

A detailed close-up of the top I/O panel. It clearly shows the power and reset buttons, two USB 3.0 ports, two USB 2.0 ports, and the microphone and headphone jacks, providing easy access for peripherals.
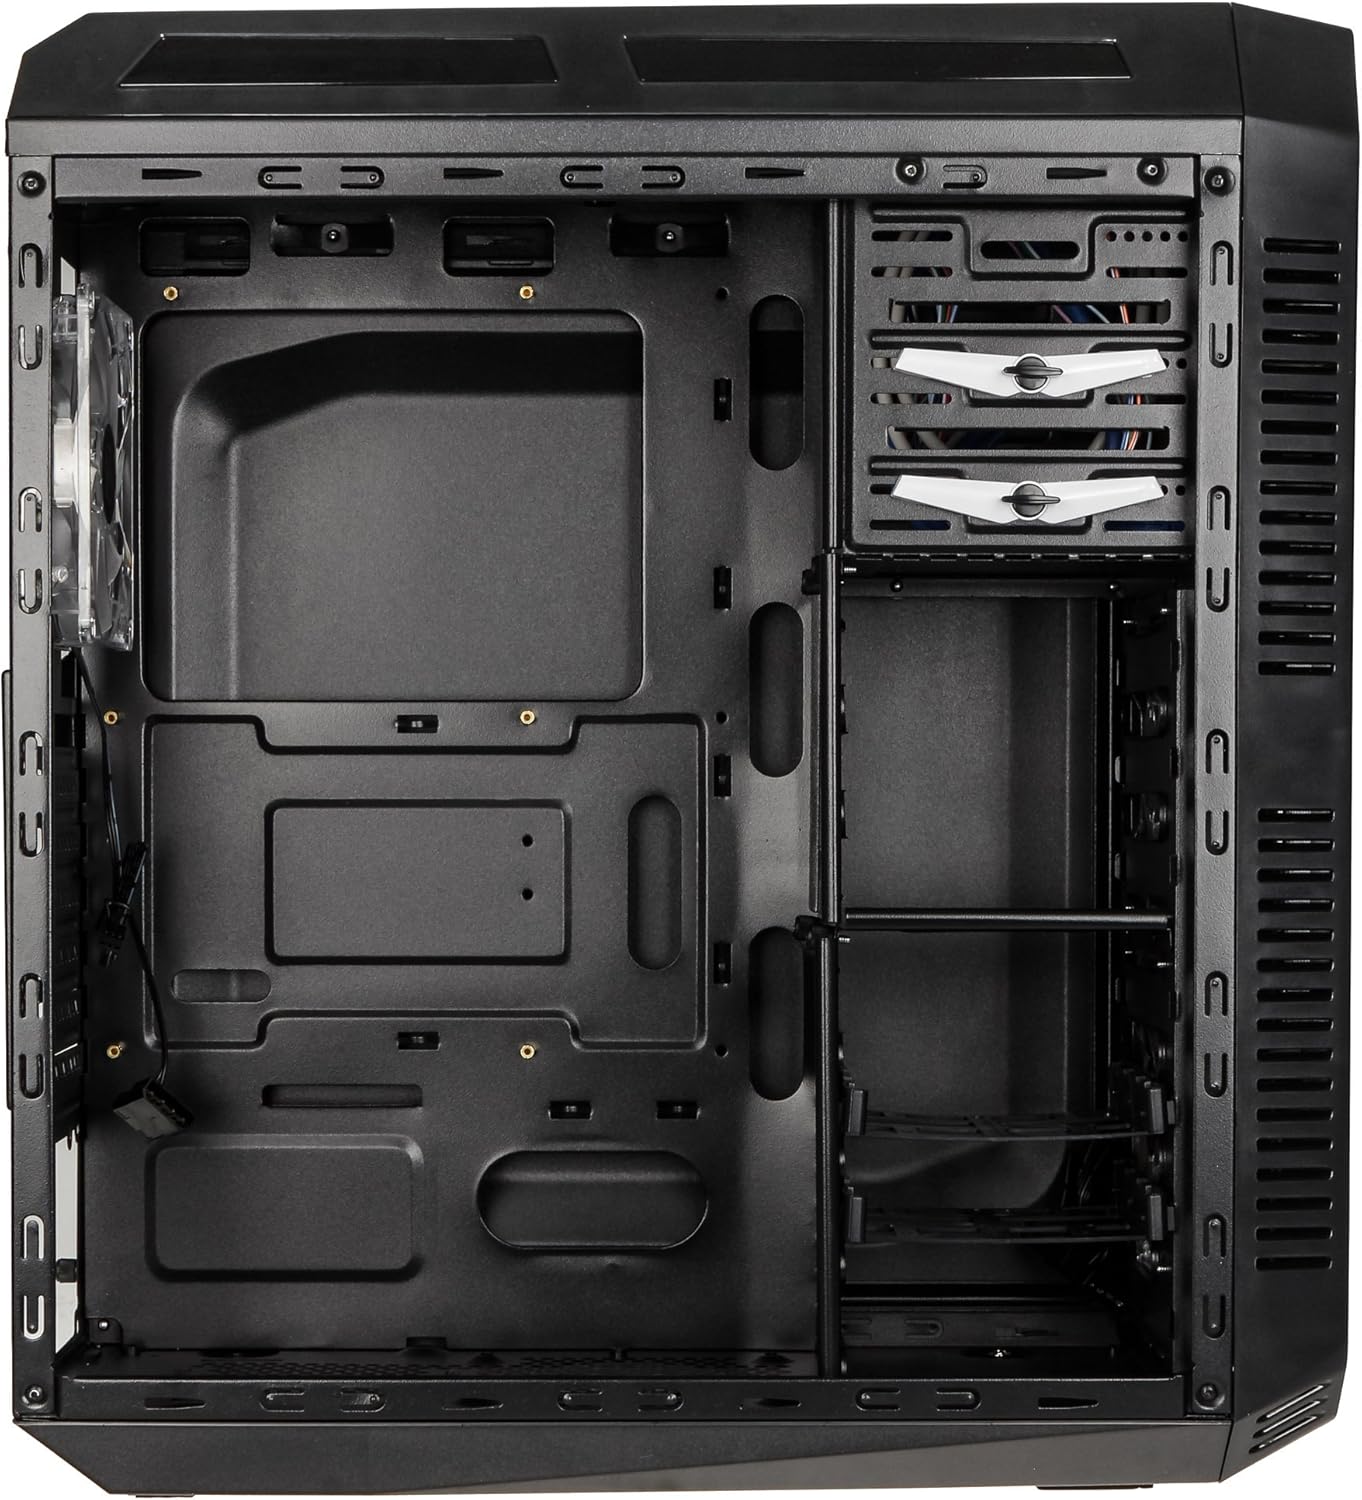
This image presents the interior of the case from the left side, revealing the spacious motherboard tray compatible with ATX motherboards. It features a large cutout behind the CPU area for easy cooler installation and multiple grommeted holes for efficient cable routing.

Внутрішній view from the right side, focusing on the drive bay configuration. The case offers three external 5.25-inch bays and seven internal 2.5/3.5-inch drive bays, providing ample storage expansion options.

A closer look at the internal drive bays, illustrating the design for mounting 2.5-inch or 3.5-inch storage drives. These bays are designed for easy installation and removal of hard drives and SSDs.

Це зображення забезпечує внутрішнє view looking down from the top, showcasing the pre-installed 120mm blue LED fan at the rear for exhaust. The top panel's mesh area for additional fan mounting is also visible, contributing to overall system cooling.
4. Налаштування та встановлення
Follow these steps to install your computer components into the KOLINK Refractor Midi-Tower.
4.1 Підготовка справи
- Поставте корпус на рівну, стійку поверхню.
- Remove the left and right side panels by unscrewing the thumbscrews at the rear of the case and sliding the panels backward.
4.2 Встановлення материнської плати
- Install the I/O shield that came with your motherboard into the cutout at the rear of the case.
- Ensure the correct motherboard standoffs are installed for your ATX motherboard. Adjust or add standoffs as necessary using the provided accessory kit.
- Обережно встановіть материнську плату на опори, суміщаючи отвори для гвинтів.
- Закріпіть материнську плату відповідними гвинтами з комплекту аксесуарів.
4.3 Встановлення блоку живлення
- Position your ATX power supply unit (PSU) in the designated compartment at the bottom rear of the case.
- Зіставте блок живлення з отворами для гвинтів на задній панелі корпусу.
- Secure the PSU using the screws provided with your power supply.
4.4 Встановлення приводу
5.25-inch External Drives:
- Remove the desired 5.25-inch bay cover from the front panel.
- Slide your optical drive or other 5.25-inch device into the bay from the front.
- Secure the drive using the tool-less clips or screws.
2.5/3.5-inch Internal Drives:
- Locate the internal drive bays.
- Mount your 2.5-inch SSD or 3.5-inch HDD into the drive trays.
- Slide the populated drive trays back into the drive cage until they click into place.
4.5 Встановлення плати розширення
- Зніміть необхідні кришки слотів розширення на задній панелі корпусу.
- Insert your graphics card or other PCIe expansion card into the corresponding slot on the motherboard.
- Secure the card with the provided screws.
4.6 Організація кабелів
Utilize the cable routing holes and tie-down points behind the motherboard tray to organize cables. This improves airflow and gives your build a cleaner appearance.
4.7 Fan Installation (Optional)
The case comes with two 120mm blue LED fans pre-installed at the front and one 120mm blue LED fan at the rear. Additional fan mounting locations include:
- Top: 1x 120/140mm fan
- Bottom: 1x 120mm fan (under the PSU)
Install additional fans as needed for optimal cooling, ensuring proper airflow direction.
5. Інструкція з експлуатації
5.1 Початкове ввімкнення
- Once all components are installed and cables are connected, replace both side panels.
- Connect your monitor, keyboard, mouse, and other peripherals.
- Підключіть кабель живлення до блоку живлення, а потім до розетки.
- Press the power button on the top I/O panel to start your system.
5.2 Використання вводу/виводу на передній панелі
Верхня панель вводу/виводу забезпечує зручний доступ до:
- Порти USB 3.0 (x2): Для високошвидкісної передачі даних із сумісними пристроями.
- Порти USB 2.0 (x2): Для підключення стандартних USB-пристроїв.
- Audio Jacks (Headphone/Microphone): Для підключення гарнітури або зовнішніх аудіопристроїв.
- Кнопка живлення: Щоб увімкнути/вимкнути систему.
- Кнопка скидання: Для перезавантаження системи.
5.3 світлодіодне освітлення
The pre-installed front and rear fans feature blue LED lighting, which illuminates when the system is powered on, adding an aesthetic element to your build.
6. Технічне обслуговування
Regular maintenance helps ensure optimal performance and longevity of your computer system.
6.1 Очищення
- Пилові фільтри: The case includes a removable dust filter under the PSU. Regularly remove and clean this filter to prevent dust buildup and maintain airflow.
- Зовні: Протріть зовнішні поверхні м’якою, damp тканина. Уникайте абразивних очищувачів.
- Інтер'єр: Periodically use compressed air to remove dust from internal components and fan blades. Ensure the system is powered off and unplugged before cleaning the interior.
6.2 Оптимізація повітряного потоку
Ensure that the case's ventilation areas (front, top, rear, bottom) are not obstructed. Proper cable management also contributes significantly to unrestricted airflow within the case.
7. Вирішення проблем
У цьому розділі розглядаються поширені проблеми, з якими ви можете зіткнутися.
7.1 Загальні проблеми
- Система не вмикається:
- Перевірте, чи кабель живлення надійно підключений як до блоку живлення, так і до розетки.
- Переконайтеся, що перемикач блоку живлення знаходиться в положенні «УВІМК.».
- Перевірте, чи кабель кнопки живлення на передній панелі правильно підключений до материнської плати.
- Confirm all internal power cables (24-pin ATX, CPU, GPU) are properly seated.
- Вентилятори не обертаються:
- Check if the fan power cables are correctly connected to the motherboard or fan controller.
- Ensure the system is receiving power.
- Порти USB не працюють:
- Verify that the front panel USB 3.0 and USB 2.0 headers are correctly connected to the motherboard.
- Ensure the device you are connecting is functioning correctly.
- Audio Ports Not Working:
- Check that the front panel audio header (HD Audio) is correctly connected to the motherboard.
- Confirm your audio drivers are installed and up to date.
For further assistance, please refer to your motherboard manual or contact KOLINK support.
8. Технічні характеристики
Детальні технічні характеристики для KOLINK Refractor Midi-Tower.
| Особливість | Специфікація |
|---|---|
| Назва моделі | Refractor Midi-Tower |
| Розміри (Ш x В x Г) | 190 x 475 x 445 мм (7.5 x 18.7 x 17.5 дюймів) |
| матеріал | Steel (body), Plastic (front) |
| вага | прибл. 4.8 кг (10.6 фунта) |
| колір | чорний |
| Форм-фактор | Міді Тауер |
| Сумісність материнської плати | ATX |
| Зовнішні відсіки для дисків | 3x 5.25 дюймів |
| Внутрішні відсіки для дисків | 7x 2.5/3.5-inch |
| Слоти розширення | 7 |
| Попередньо встановлені вентилятори | 2x 120mm (front, blue LED), 1x 120mm (rear, blue LED) |
| Fan Support (Total Possible) | Front: 2x 120mm, Top: 1x 120/140mm, Bottom: 1x 120mm, Rear: 1x 120mm |
| Панель введення/виведення | 2x USB 3.0, 2x USB 2.0, 1x Audio In/Out |
| Максимальна довжина відеокарти | 360 мм |
| Максимальна висота процесорного кулера | 174 мм |
| PSU Compatibility | Standard ATX (optional) |
| Пилові фільтри | Floor (under PSU, removable) |
9. Гарантія та підтримка
KOLINK products are manufactured to high-quality standards. This product is covered by a manufacturer's warranty against defects in materials and workmanship. The specific terms and duration of the warranty may vary by region and retailer.
Please retain your proof of purchase for warranty claims. For technical support, warranty inquiries, or to report missing/damaged parts, please contact your point of purchase or visit the official KOLINK webсайт для ресурсів підтримки.
KOLINK Official Webсайт: www.kolink.eu (Please note: This is a general link and may not lead directly to a support page for this specific model.)


