1. Вступ
This manual provides essential instructions for the proper installation and maintenance of your DTM Ariens Compatible Snowblower Auger Gear and Shaft Rebuild Kit. This kit is designed to replace worn or damaged auger worm gears and shafts in compatible Ariens snowblower models. Please read this manual thoroughly before proceeding with any installation or maintenance to ensure safe and effective operation.
2. Продукт закінчивсяview
The DTM rebuild kit includes both the auger worm gear and the auger shaft, manufactured to meet or exceed original specifications. These components are crucial for the proper functioning of your snowblower's auger system, which collects and expels snow.

малюнок 2.1: The DTM Ariens Compatible Snowblower Auger Gear and Shaft Rebuild Kit, showing both the worm gear and the shaft.

малюнок 2.2: Детальний view of the DTM Ariens Compatible Snowblower Auger Worm Gear, highlighting its construction.
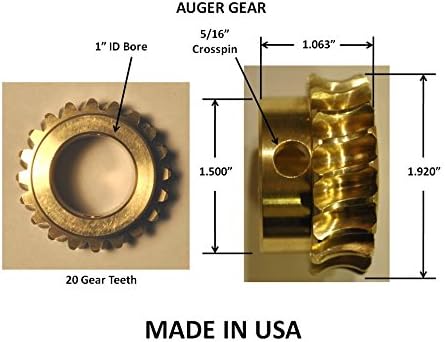
малюнок 2.3: Technical diagram illustrating the dimensions of the auger gear, including 1" ID Bore, 5/16" Crosspin, 1.500" diameter, 1.063" width, 1.920" overall height, and 20 gear teeth. This diagram is crucial for verifying compatibility.

малюнок 2.4: Technical diagram illustrating the dimensions of the auger shaft, including a 1/2" pilot, 3/16" diameter thruhole, 1/4" diameter thruhole, 3/4" diameter section, and a woodruff key slot. Key measurements are 3-3/8", 11-3/4", 12-3/4", and 17-1/2" for various sections. This diagram is crucial for verifying compatibility.
The kit is proudly manufactured in the USA, ensuring quality and durability.

малюнок 2.5: Image indicating the product is Made in USA.
3. Сумісність
This rebuild kit is designed to replace Ariens part numbers 52402600 and the obsolete part 52422700. It is compatible with a wide range of Ariens snowblower models. It is critical to compare the dimensions and number of teeth of your existing parts with the diagrams provided in this manual (Figures 2.3 and 2.4) to ensure proper fitment.
Known Compatible Ariens Models:
- 924027 (001001) ST8
- 924036 (000101) ST524
- 924039 (000101) ST824
- 924040 (000101) ST824
- 924046 (000101) ST524, (012001) ST524, (014501) ST524
- 924048 (000101) ST724, (019001) ST724, (024501) ST724
- 924050 (000101) ST824, (027001) ST824, (036501) ST824
- 924054 (000101) ST832
- 924072 (000101) ST824
- 924080 (000101) TT 8
- 924081 (000101) ST824S
- 924082 (000101) ST824, (011145) ST824, (039200) ST824
- 924093 (000101) ST924, (001700) ST924
- 924100 (000101) ST824, (008200) ST824
- 924102 (002600) ST1032
- 924104 (001400) ST1028
- 924105 (000200) TT 8
- 924106 (002200) ST1024
- 924107 (000101) ST1336LE
- 924108 (000101) ST824
- 924109 (000101) ST1028
- 924110 (000101) ST824
- 924118 (000101) ST8524
- 924119 (000101) ST1028
- 924121 (000101) ST1128
- 924311 (000101) ST824
- 924312 (000150) ST924
- 924318 (000101) ST824, (000500) ST824
- 924319 (000101) ST924E
- 924323 (000101) ST1024
- 924324 (000101) ST1128LE
- 924325 (000101) ST1132LE
- 924326 (000101) ST1336LE
- 924328 (000101) ST824
- 924329 (000101) ST928
- 924550 (000101) ST824
- 924551 (000101) ST8524
- 932308 (000101) ST824
- 932309 (000101) ST824
- 932500 (000101) ST520
- 932501 (000101) ST724
- 932502 (000101) ST8524LE
If your model is not listed, please verify compatibility by comparing the dimensions of your original parts with the provided diagrams before purchase or installation.
4. Інформація про безпеку
Always prioritize safety when working with power equipment and mechanical components. Failure to follow safety precautions can result in serious injury or damage to equipment.
- Відключити живлення: Before beginning any work on your snowblower, ensure the engine is off, the spark plug wire is disconnected, and the key is removed to prevent accidental starting.
- Одягайте захисне спорядження: Завжди одягайте відповідні засоби індивідуального захисту (ЗІЗ), включаючи захисні окуляри, рукавички та міцне взуття.
- Закріпіть машину: Ensure the snowblower is stable and cannot move during maintenance. Use wheel chocks if necessary.
- Read Snowblower Manual: Refer to your snowblower's original owner's manual for specific disassembly and reassembly procedures.
- Обережно поводьтеся з деталями: Components may have sharp edges or be heavy. Handle with care to avoid injury.
- Відповідні інструменти: Use the correct tools for each task to prevent damage to parts or injury.
5. Інструкції зі встановлення
Replacing the auger gear and shaft requires mechanical aptitude. If you are unsure about any step, it is recommended to consult a qualified service technician.
- Приготування:
- Ensure the snowblower is on a flat, stable surface.
- Disconnect the spark plug wire and remove the ignition key.
- Gather necessary tools, which typically include wrenches, sockets, screwdrivers, a hammer, and a punch for roll pins.
- Access the Auger Housing:
- Depending on your snowblower model, you may need to remove the belt cover, chute, or other components to gain access to the auger gearbox.
- Carefully remove any shear pins or bolts securing the auger assembly.
- Видалити старі компоненти:
- Locate the auger gearbox. You will typically find the worm gear and shaft inside.
- Remove any retaining clips, bolts, or roll pins that secure the old worm gear and shaft. Note their orientation for reassembly.
- Carefully extract the old auger shaft and worm gear. Inspect surrounding components for wear or damage.
- Встановити нові компоненти:
- Apply a small amount of appropriate grease to the new auger shaft and the bore of the new worm gear.
- Slide the new worm gear onto the auger shaft, ensuring the cross-pin hole aligns correctly.
- Insert the new auger shaft and worm gear assembly into the gearbox housing.
- Secure the worm gear to the shaft using a new roll pin (not included in this kit, often recommended for replacement).
- Ensure all components are seated correctly and move freely without binding.
- Зберіть:
- Reattach any covers, belts, or chute components that were removed.
- Переконайтеся, що всі кріплення затягнуті відповідно до специфікацій виробника.
- Replace shear pins with new ones if they were removed or damaged.
- Остаточна перевірка:
- Before starting the engine, manually rotate the auger to ensure smooth operation and no obstructions.
- Знову підключіть провід свічки запалювання.
- Perform a test run in a clear area, following your snowblower's operating instructions.
Note: New roll pins are often recommended for replacement during this process but are not included in this kit. Please acquire them separately if needed.
6. Технічне обслуговування
Proper maintenance extends the life of your snowblower components, including the auger gear and shaft.
- Змащення: Periodically check the auger gearbox for proper lubrication levels as specified in your snowblower's manual. Use only recommended lubricants.
- Огляд: Regularly inspect the auger gear and shaft for signs of wear, corrosion, or damage, especially after heavy use.
- Очистити перешкоди: Always clear any foreign objects (rocks, sticks, etc.) from the auger housing immediately to prevent damage to the auger and gearbox components.
- Зсувні штифти: Ensure shear pins are in good condition and replace them with the correct type if they break or show signs of fatigue. Shear pins are designed to protect the auger gearbox from damage.
7. Технічні характеристики
| Назва продукту: | DTM Ariens Compatible Snowblower Auger Gear and Shaft Rebuild Kit |
| Бренд: | DTM |
| Замінює номери деталей: | Ariens 52402600, 52422700 (obsolete) |
| матеріал: | High-quality metals |
| Розміри продукту (упаковки): | 18 x 2 x 2 дюймів |
| Вага товару: | 3 фунта |
| Походження виробництва: | США |
| Auger Gear Details: | 1" ID Bore, 5/16" Crosspin, 1.500" diameter, 1.063" width, 1.920" overall height, 20 teeth (Refer to Figure 2.3) |
| Auger Shaft Details: | 1/2" Pilot, 3/16" Dia. Thruhole, 1/4" Dia. Thruhole, 3/4" Dia. section, Woodruff Key slot, 17-1/2" total length (Refer to Figure 2.4) |
8. Гарантія та підтримка
For questions regarding this DTM Ariens Compatible Snowblower Auger Gear and Shaft Rebuild Kit, including compatibility verification or installation assistance, please contact the manufacturer or your point of purchase. While specific warranty details are not provided in this manual, please retain your proof of purchase for any warranty claims.
It is recommended to consult with a qualified technician for complex installations or if you encounter issues beyond basic troubleshooting.


