вступ
This manual provides comprehensive instructions for the installation, operation, maintenance, and troubleshooting of the ASUS Prime H810M-E-CSM Intel H810 mATX Commercial CSM Motherboard. This motherboard is engineered for Intel Core Ultra (Series 2) processors, offering robust performance and essential features for commercial and AI PC applications.
Інформація про безпеку
Завжди дотримуйтесь наступних запобіжних заходів під час встановлення та експлуатації:
- Від’єднайте шнур живлення від розетки, перш ніж торкатися будь-яких компонентів.
- Одягайте антистатичний браслет, щоб запобігти пошкодженню компонентів електростатичним розрядом (ESD).
- Тримайте компоненти за краї, щоб уникнути дотику до чутливих частин.
- Забезпечте належну вентиляцію всередині корпусу ПК, щоб запобігти перегріву.
- Refer to the specific component manuals for additional safety guidelines.
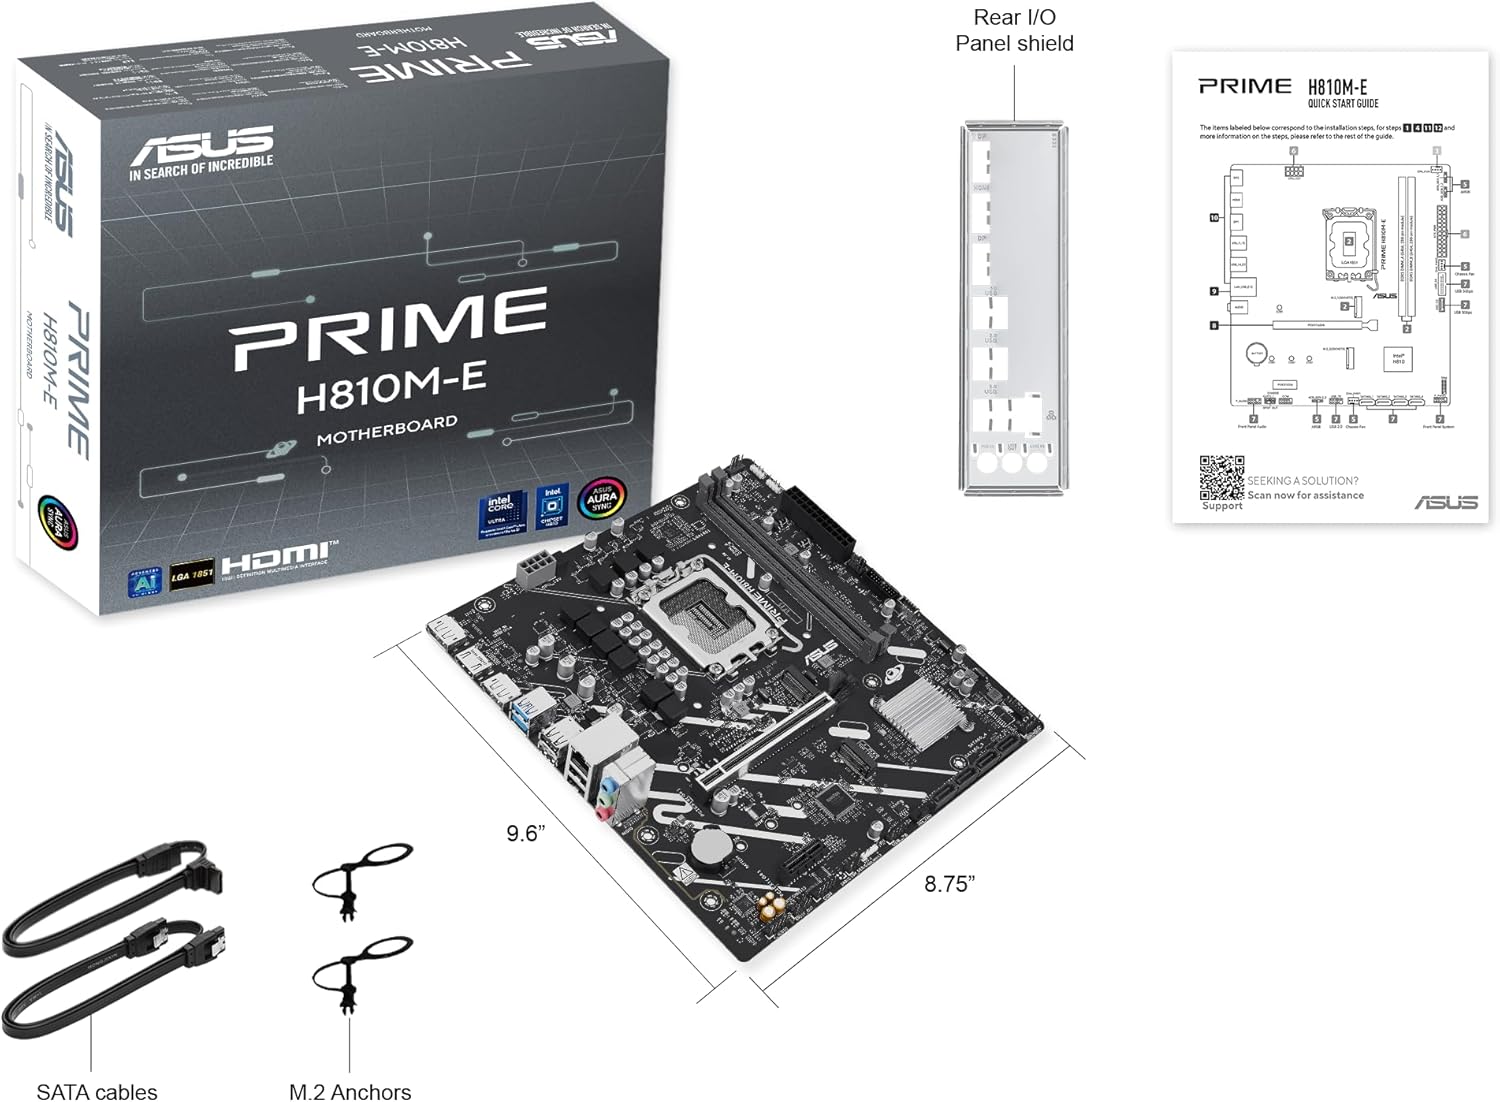
Вміст упаковки
Перевірте, чи всі компоненти присутні в упаковці вашої материнської плати:
- ASUS Prime H810M-E-CSM Motherboard
- SATA 6Gb/s Data Cables (2x)
- M.2 SSD Anchors (2x)
- Rear I/O Shield
- Посібник користувача / Короткий посібник
Макет материнської плати
Ознайомтеся з ключовими компонентами та роз'ємами на материнській платі.


Налаштування
1. Встановлення процесора
This motherboard supports Intel Core Ultra (Series 2) processors with an LGA 1851 socket.
- Open the CPU socket lever and remove the protective cap.
- Carefully align the CPU with the socket, ensuring the notches on the CPU match the keys on the socket.
- Обережно вставте процесор у роз'єм, не докладаючи зусиль.
- Закрийте важіль роз'єму, щоб закріпити процесор.
- Встановіть кулер процесора відповідно до інструкцій виробника.
2. Встановлення пам'яті (ОЗП)
The motherboard features two DDR5 DIMM slots, supporting up to 128GB of RAM.
- Відкрийте затискачі з обох кінців гнізда DIMM.
- Зіставте модуль пам’яті зі слотом, переконавшись, що виїмка на модулі збігається з ключем у слоті.
- Міцно натисніть на обидва кінці модуля пам’яті, доки затискачі не зафіксуються на місці.
3. Встановлення сховища
The motherboard supports M.2 SSDs and SATA drives.
Встановлення M.2 SSD:
- Знайдіть слот M.2 на материнській платі.
- Вставте твердотільний накопичувач M.2 у слот під кутом 30 градусів.
- Gently push down the SSD and secure it with the provided M.2 anchor or screw.

Встановлення SATA-диска:
- Підключіть один кінець кабелю передачі даних SATA до порту SATA на материнській платі.
- Connect the other end of the SATA data cable to your storage drive (HDD/SSD).
- Connect a SATA power cable from your power supply unit (PSU) to the storage drive.
4. Встановлення карти PCIe
Install graphics cards or other expansion cards into the PCIe 4.0 slots.
- Open the retention clip at the end of the PCIe slot.
- Align the expansion card with the slot and press down firmly until it is seated and the clip snaps shut.
- Закріпіть карту до корпусу ПК за допомогою гвинта.

5. Підключення живлення
Connect the power supply unit (PSU) cables to the motherboard.
- 24-контактний роз'єм живлення ATX: Connect the main 24-pin power cable from your PSU to the corresponding connector on the motherboard.
- 8-pin CPU Power Connector (EATX12V): Connect the 8-pin CPU power cable from your PSU to the connector located near the CPU socket.
6. Підключення передньої панелі
Connect your PC case's front panel cables (power button, reset button, USB ports, audio jacks, LED indicators) to the corresponding headers on the motherboard. Refer to the motherboard diagram for exact locations.
Операційна
Перше завантаження та налаштування BIOS/UEFI
Після складання системи підключіть монітор, клавіатуру та мишу. Увімкніть систему.
- Натисніть Видалити клавішу під час запуску, щоб увійти до утиліти налаштування BIOS/UEFI.
- Налаштуйте порядок завантаження, системний час та інші важливі параметри.
- Збережіть зміни та вийдіть з BIOS.

Driver and Operating System Installation
Install your preferred operating system (e.g., Windows 10/11) from a bootable USB drive or DVD. After OS installation, install the latest drivers for the motherboard chipset, LAN, audio, and any other integrated components from the ASUS support webсайт для забезпечення оптимальної продуктивності та стабільності.
Технічне обслуговування
прибирання
Regularly clean your PC to prevent dust buildup, which can lead to overheating and component failure. Use compressed air to remove dust from heatsinks, fans, and other components. Ensure the system is powered off and unplugged before cleaning.
Оновлення BIOS
Періодично перевіряйте службу підтримки ASUS website for BIOS updates. BIOS updates can improve system stability, compatibility, and performance. Follow the instructions provided by ASUS carefully when performing a BIOS update to avoid system damage.
Усунення несправностей
У цьому розділі розглядаються поширені проблеми, з якими ви можете зіткнутися.
- No Display / No Post:
- Переконайтеся, що всі кабелі живлення (24-контактний ATX, 8-контактний процесор) надійно підключені.
- Reseat the RAM modules. Try booting with only one RAM stick.
- Verify the CPU is correctly seated and the CPU cooler is properly installed.
- Check that the graphics card is fully seated in its PCIe slot and has adequate power.
- If using integrated graphics, ensure your monitor is connected to the motherboard's video output (HDMI).
- Нестабільність системи / Збої:
- Переконайтеся, що всі драйвери оновлені.
- Перевірте температуру процесора та відеокарти за допомогою програмного забезпечення для моніторингу.
- Запустіть інструменти діагностики пам'яті, щоб перевірити наявність несправної оперативної пам'яті.
- Перевірте стан блоку живленняtage достатньо для всіх компонентів.
- Периферійний пристрій не виявлено:
- Спробуйте підключити периферійний пристрій до іншого порту.
- Install or update drivers for the peripheral.
- Перевірте налаштування BIOS, щоб переконатися, що порт увімкнено.
Технічні характеристики
| Особливість | Специфікація |
|---|---|
| Бренд | ASUS |
| Назва моделі | PRIME H810M-E-CSM |
| Гніздо ЦП | LGA 1851 |
| Сумісні процесори | Процесори Intel Core Ultra (серія 2) |
| Тип чіпсета | Intel H810 |
| Технологія оперативної пам'яті | DDR5 |
| Доступні слоти пам'яті | 2 |
| Ram Memory Maximum Size | 128 ГБ |
| Інтерфейс графічної карти | PCI Express 4.0 |
| Total PCIe Ports | 2 |
| Total SATA Ports | 4 |
| Total M.2 Slots | 1 |
| Загальна кількість портів USB | 11 (різні типи) |
| Total Number of HDMI Ports | 1 |
| Кількість портів Ethernet | 1 (1Gb LAN) |
| Тип основного роз'єму живлення | 24-контактний |
| Платформа | Вікна 10, Windows 11 |
| Розміри предмета Д х Ш х В | 9.6 см (Д) x 8.7 см (Ш) x 1.5 см (В) |
| Вага товару | 1.1 фунта |
Інформація про гарантію
The ASUS Prime H810M-E-CSM Motherboard comes with a 3-річна гарантія виробника. For detailed terms and conditions, please refer to the warranty card included in your package or visit the official ASUS support webсайт.
Підтримка
Для отримання додаткової допомоги, технічної підтримки, завантаження драйверів або оновлення BIOS, будь ласка, відвідайте офіційний сайт підтримки ASUS. webсайт:
You can also find additional resources and FAQs on the ASUS product page for the Prime H810M-E-CSM.