
1. Вступ
This manual provides detailed instructions for the installation, operation, and maintenance of your plplaaoo 100A MPPT Solar Charge Controller. This advanced controller is designed to optimize energy harvest from your solar panels and manage battery charging efficiently for 12V, 24V, 36V, and 48V solar power systems. Please read this manual thoroughly before installation and use to ensure proper function and safety.
2. Техніка безпеки
Будь ласка, дотримуйтесь наступних запобіжних заходів під час встановлення та експлуатації:
- Ensure all wiring is correctly connected and securely fastened to prevent loose connections and overheating.
- Завжди відключайте сонячну панель та живлення акумулятора перед встановленням або налаштуванням контролера.
- Use appropriate tools and wear protective gear, including eye protection, during installation.
- Install the controller in a well-ventilated area, away from flammable gases and liquids.
- Не розбирайте та не намагайтеся ремонтувати контролер самостійно. Зверніться до кваліфікованого персоналу для обслуговування.
- Ensure the battery bank is properly sized and compatible with the controller's voltagе та поточні рейтинги.
- Уникайте короткого замикання сонячної панелі, акумулятора або клем навантаження.
3. Особливості продукту
- Відстеження точки максимальної потужності (MPPT): Achieves up to 98% conversion efficiency by intelligently tracking the maximum power point of solar panels under varying conditions.
- Автоматичний випtage Adaptation: Automatically detects and adapts to 12V, 24V, 36V, or 48V battery systems.
- Багатофункціональне керування: Supports various operating modes including PWM charging, constant current output, and voltage регулювання.
- Integrated USB and DC Outputs: Features dual 5V 1A USB ports and a 2A DC output for charging external devices.
- Комплексний захист: Includes safeguards against overvoltage, overcurrent, overtemperature, overload, short circuits, and reverse polarity.
- Зручний інтерфейс: Equipped with a backlit LCD display for real-time monitoring and intuitive buttons for configuration.
- Міцна конструкція: Features an aluminum heatsink for efficient cooling and robust design for harsh environments (0°C to 60°C).
- Сумісність з акумулятором: Compatible with gel, sealed lead-acid, and lithium batteries.
4. Вміст упаковки
- 1 x plplaaoo 100A MPPT Solar Charge Controller
- 1 х посібник користувача
5. Продукт закінчивсяview і компоненти
Familiarize yourself with the main components and interface of the solar charge controller.

малюнок 5.1: Фронт view of the solar charge controller, highlighting the LCD screen and various connection terminals.
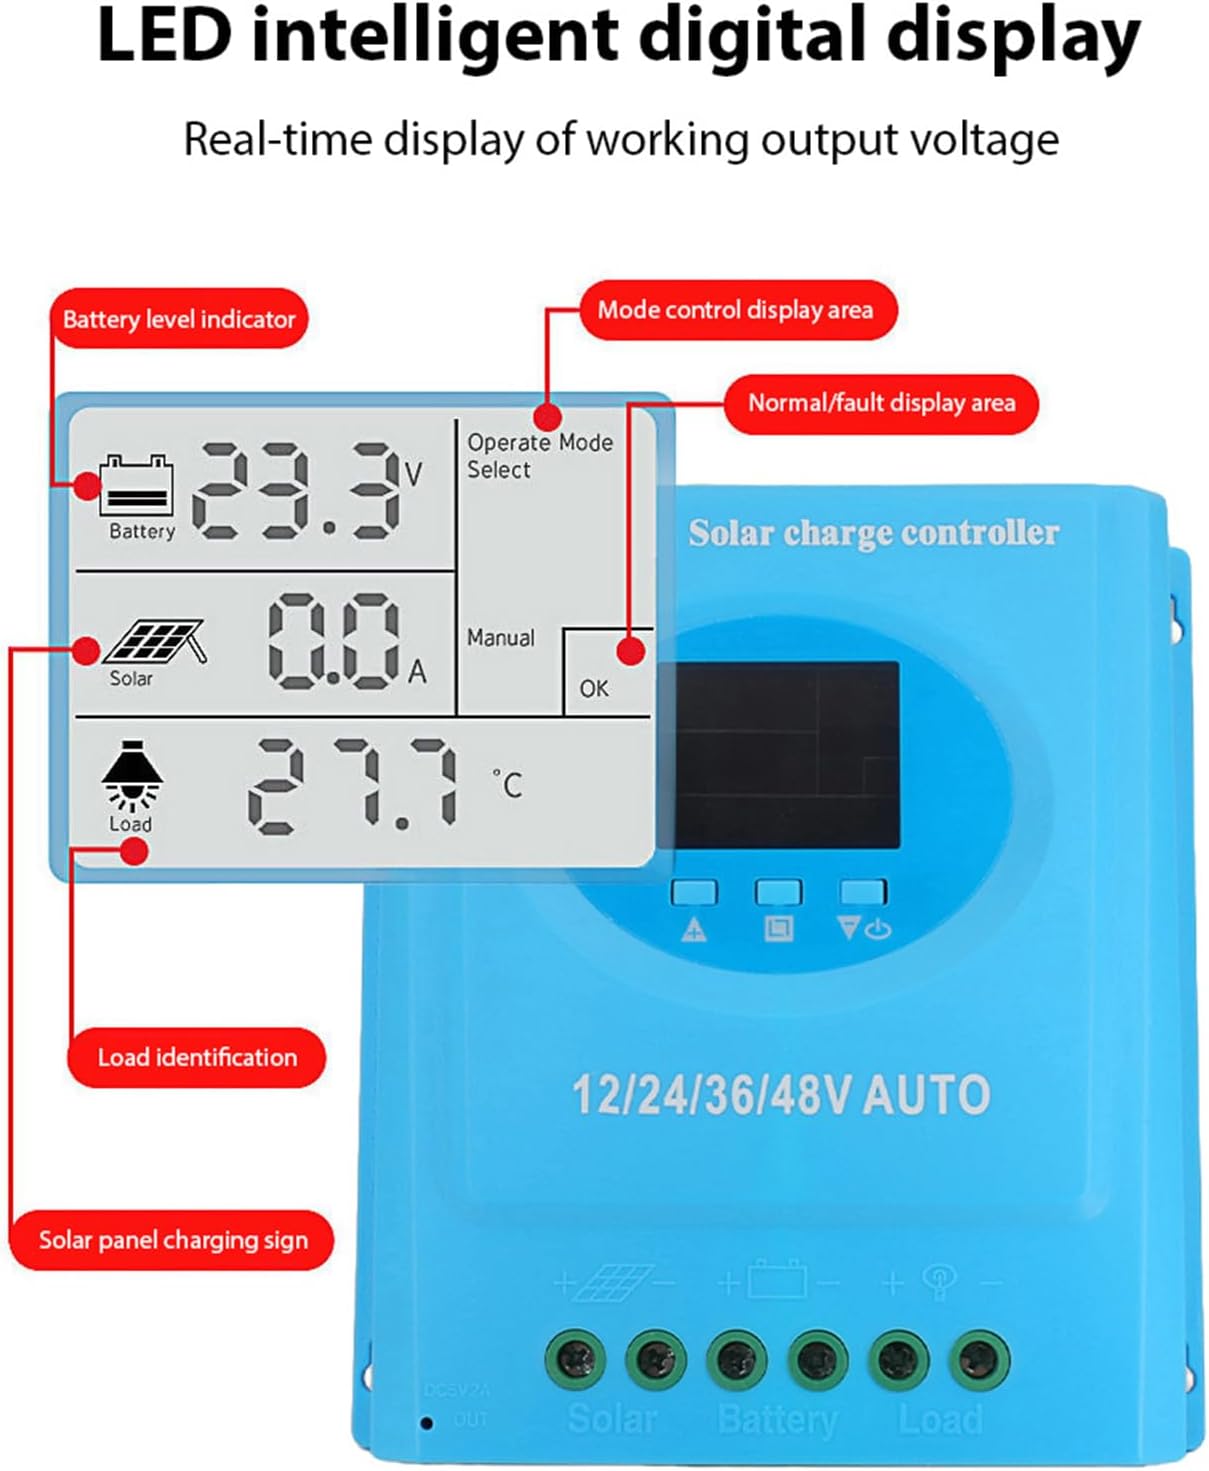
The controller features an intuitive LCD display and clearly labeled ports for easy connection. The display provides real-time information about the system's status.
малюнок 5.2: Детальний view of the controller's connection ports.

малюнок 5.3: Детальний view of the LCD display, indicating battery level, solar panel charging sign, load identification, operating mode, and real-time voltage.
5.1. Порти підключення
- Подвійний USB-інтерфейс: Two 5V 1A USB ports for charging mobile devices.
- Порт сонячної панелі: Connects to your solar panels (positive and negative).
- Порт акумулятора: Connects to your battery bank (positive and negative).
- DC Load Port: Connects to your DC loads (positive and negative).
- Вихідний порт постійного струму: Additional DC output.
6. Налаштування та встановлення
Follow these steps for proper installation of the solar charge controller. Ensure all power sources are disconnected before beginning.
6.1. Спосіб підключення
Connect the components in the following order to prevent damage:
- Підключіть батарею: Connect the battery to the controller's battery terminals (positive to positive, negative to negative). The controller will automatically detect the battery voltage.
- Підключіть сонячну панель: Connect the solar panel to the controller's solar panel terminals (positive to positive, negative to negative).
- Підключення навантаження постійного струму: Connect the DC load to the controller's load terminals (positive to positive, negative to negative).
Важливо: Завжди спочатку підключайте акумулятор, потім сонячну панель і, нарешті, навантаження. Від’єднуйте у зворотному порядку.

малюнок 6.1: Solar energy system wiring diagram. Note the correct polarity for all connections.
6.2. Монтаж
Mount the controller vertically on a flat surface in a well-ventilated area, ensuring adequate clearance for air circulation around the heatsink. Avoid direct sunlight, high temperatures, and humid environments.
7. Інструкція з експлуатації
Once installed, the controller will automatically begin operating. The LCD display provides real-time system status.
7.1. Інформація про РК-дисплей
На РК-екрані відображаються різні параметри:
- Індикатор рівня заряду батареї: Shows the current charge status of the battery.
- Solar Panel Charging Sign: Indicates when the solar panels are actively charging the battery.
- Ідентифікація навантаження: Shows the status of the connected DC load.
- Operating Mode Display Area: Displays the current operating mode (e.g., manual, automatic).
- Normal/Fault Display Area: Indicates normal operation or displays error codes if a fault occurs.
- Real-time Working Output Voltage: Показує поточний об'ємtage системи.
7.2. Функції кнопок
The controller typically features multiple buttons for navigation and setting adjustments:
- Кнопка меню: Used to enter and exit the menu settings.
- Кнопки вгору/вниз: Використовується для навігації по пунктах меню та налаштування значень параметрів.
- Кнопка ОК: Used to confirm selections and save settings.
Refer to the on-screen menu for specific parameter adjustments such as battery type, load control mode, and charging thresholds.
8. Технічне обслуговування
Регулярне технічне обслуговування забезпечує оптимальну продуктивність та довговічність вашого контролера сонячного заряду.
- Прибирання: Періодично очищуйте зовнішню частину контролера сухою ганчіркою, щоб видалити пил та сміття. Переконайтеся, що вентиляційні отвори чисті.
- Перевірка підключення: Щорічно перевіряйте всі з'єднання проводів на міцність та наявність корозії. За потреби підтягніть.
- Екологічна перевірка: Переконайтеся, що середовище встановлення залишається в межах зазначеного робочого діапазону температур і не містить надмірної вологи або пилу.
- Перевірка батареї: Regularly check the battery terminals for corrosion and ensure the battery is in good condition.
9. Вирішення проблем
Якщо у вас виникли проблеми з контролером сонячного заряду, зверніться до наступних поширених проблем та рішень:
| проблема | Можлива причина | Рішення |
|---|---|---|
| Контролер не вмикається / РК-дисплей порожній |
|
|
| Акумулятор не заряджається |
|
|
| Навантаження не працює |
|
|
| Відображається код помилки | Конкретна системна помилка. | Refer to the controller's display for the specific error code and consult the full product documentation or contact support for detailed interpretation and resolution. |
10. Технічні характеристики
| Параметр | Значення |
|---|---|
| Модель | plplaaoozi6egog4wm-0A |
| Бренд | plplaaoo |
| Номінальний струм | 100А |
| System Voltage | 12V / 24V / 36V / 48V Automatic Adaptation |
| Тип зарядки | MPPT (Відстеження точки максимальної потужності) |
| Ефективність перетворення | до 98% |
| Вихід USB | Dual 5V 1A ports |
| Вихід постійного струму | 2A |
| Робоча температура | від 0°C до 60°C |
| Розміри (прибл.) | 19.5 см x 18.3 см x 6.8 см (7.7 дюйма x 7.2 дюйма x 2.7 дюйма) |

малюнок 10.1: Approximate dimensions of the solar charge controller.
11. Гарантія та підтримка
Щоб отримати інформацію щодо гарантії, технічної підтримки або звернутися до сервісного центру, зверніться безпосередньо до продавця або виробника. Зберігайте чек про покупку як підтвердження покупки.