1. Вступ
This manual provides comprehensive instructions for the Denash X99D3M M ATX Motherboard. It is designed to assist users with the proper installation, configuration, and maintenance of the motherboard to ensure stable and efficient operation of your computer system. Please read this manual thoroughly before proceeding with installation.

Зображення 1.1: закінченоview of the Denash X99D3M M ATX Motherboard. This image displays the general layout of the motherboard, highlighting key components such as the CPU socket, RAM slots, and various expansion ports.
2. Особливості продукту
- Підтримка ЦП: Designed for LGA 2011-3 sockets, supporting E5 V3/V4 and i7 58xx/68xx series CPUs.
- Пам'ять: Features 4 x DDR4 DIMM slots, supporting up to 128GB of DDR4 2666, 2400, or 2133MHz memory.
- Зберігання: Equipped with 4 x SATA 2.0 ports and 1 x NVME M.2 interface (supporting NGFF and NVME protocols).
- Розширення: Includes 1 x PCIE x16 graphics card slot and 1 x PCIE X1 slot.
- Підключення: Offers 4 x USB 2.0 and 4 x USB 3.0 ports, 1 x RJ45 network port, and PS/2 keyboard/mouse universal port.
- Довговічність: Constructed with metal and PCB materials, featuring all solid-state capacitors for stable performance and extended lifespan.
3. Вміст упаковки
Перевірте наявність усіх елементів в упаковці:
- 1 x Denash X99D3M M ATX Motherboard
- 1 x Metal I/O Plate
- 1 x SATA кабель для передачі даних
4. Налаштування та встановлення
Before beginning installation, ensure your workspace is clean, well-lit, and static-free. It is recommended to wear an anti-static wrist strap to prevent damage to components.
4.1. Встановлення процесора
- Знайдіть роз'єм процесора LGA 2011-3 на материнській платі.
- Обережно натисніть на важіль навантаження та потягніть його з роз'єму, щоб відкрити рамку кріплення процесора.
- Carefully align the CPU with the socket, ensuring the gold triangle on the CPU matches the triangle on the socket. Do not force the CPU into place.
- Lower the CPU into the socket. Close the retention frame and secure it with the load lever.
- Нанесіть термопасту на процесор та встановіть кулер процесора відповідно до інструкцій виробника.

Image 4.1: Close-up of the LGA 2011-3 CPU socket. This image shows the socket where the processor is installed, emphasizing the retention mechanism.
4.2. Встановлення пам'яті (ОЗП)
- Відкрийте затискачі з обох кінців слотів DDR4 DIMM.
- Зіставте виїмку на модулі оперативної пам’яті з ключем у гнізді DIMM.
- Міцно натисніть на обидва кінці модуля оперативної пам'яті, доки затискачі не зафіксуються на місці.

Зображення 4.2: View of the four DDR4 DIMM slots. This image illustrates the memory slots where RAM modules are to be installed.
4.3. Storage Device Installation (SATA & M.2)
- Накопичувачі SATA: Connect SATA data cables from your storage drives (HDDs/SSDs) to the SATA 2.0 ports on the motherboard. Connect SATA power cables from your power supply to the drives.
- M.2 NVME SSD: Locate the M.2 slot. Insert the M.2 SSD at a 30-degree angle, then gently push it down and secure it with the provided screw. Ensure the jumper switch for the M.2 interface is set correctly for Serial ATA or PCIE mode as required by your M.2 device.

Image 4.3: Close-up of the SATA 2.0 ports and M.2 NVME interface. This image details the connectivity options for storage devices.
4.4. Підключення живлення
- Підключіть 24-контактний роз'єм живлення ATX від блока живлення до основного роз'єму живлення на материнській платі.
- Connect the 8-pin CPU power connector (EPS12V) from your power supply to the CPU power socket near the CPU.
4.5. Передня панель та підключення вводу/виводу
- Connect the front panel headers (power switch, reset switch, HDD LED, power LED) to their respective pins on the motherboard. Refer to the motherboard's silkscreen labels for correct orientation.
- Connect USB 2.0 and USB 3.0 front panel cables to the corresponding USB headers.
- Connect the audio front panel cable to the audio header.
- Install your graphics card into the PCIE x16 slot and secure it.
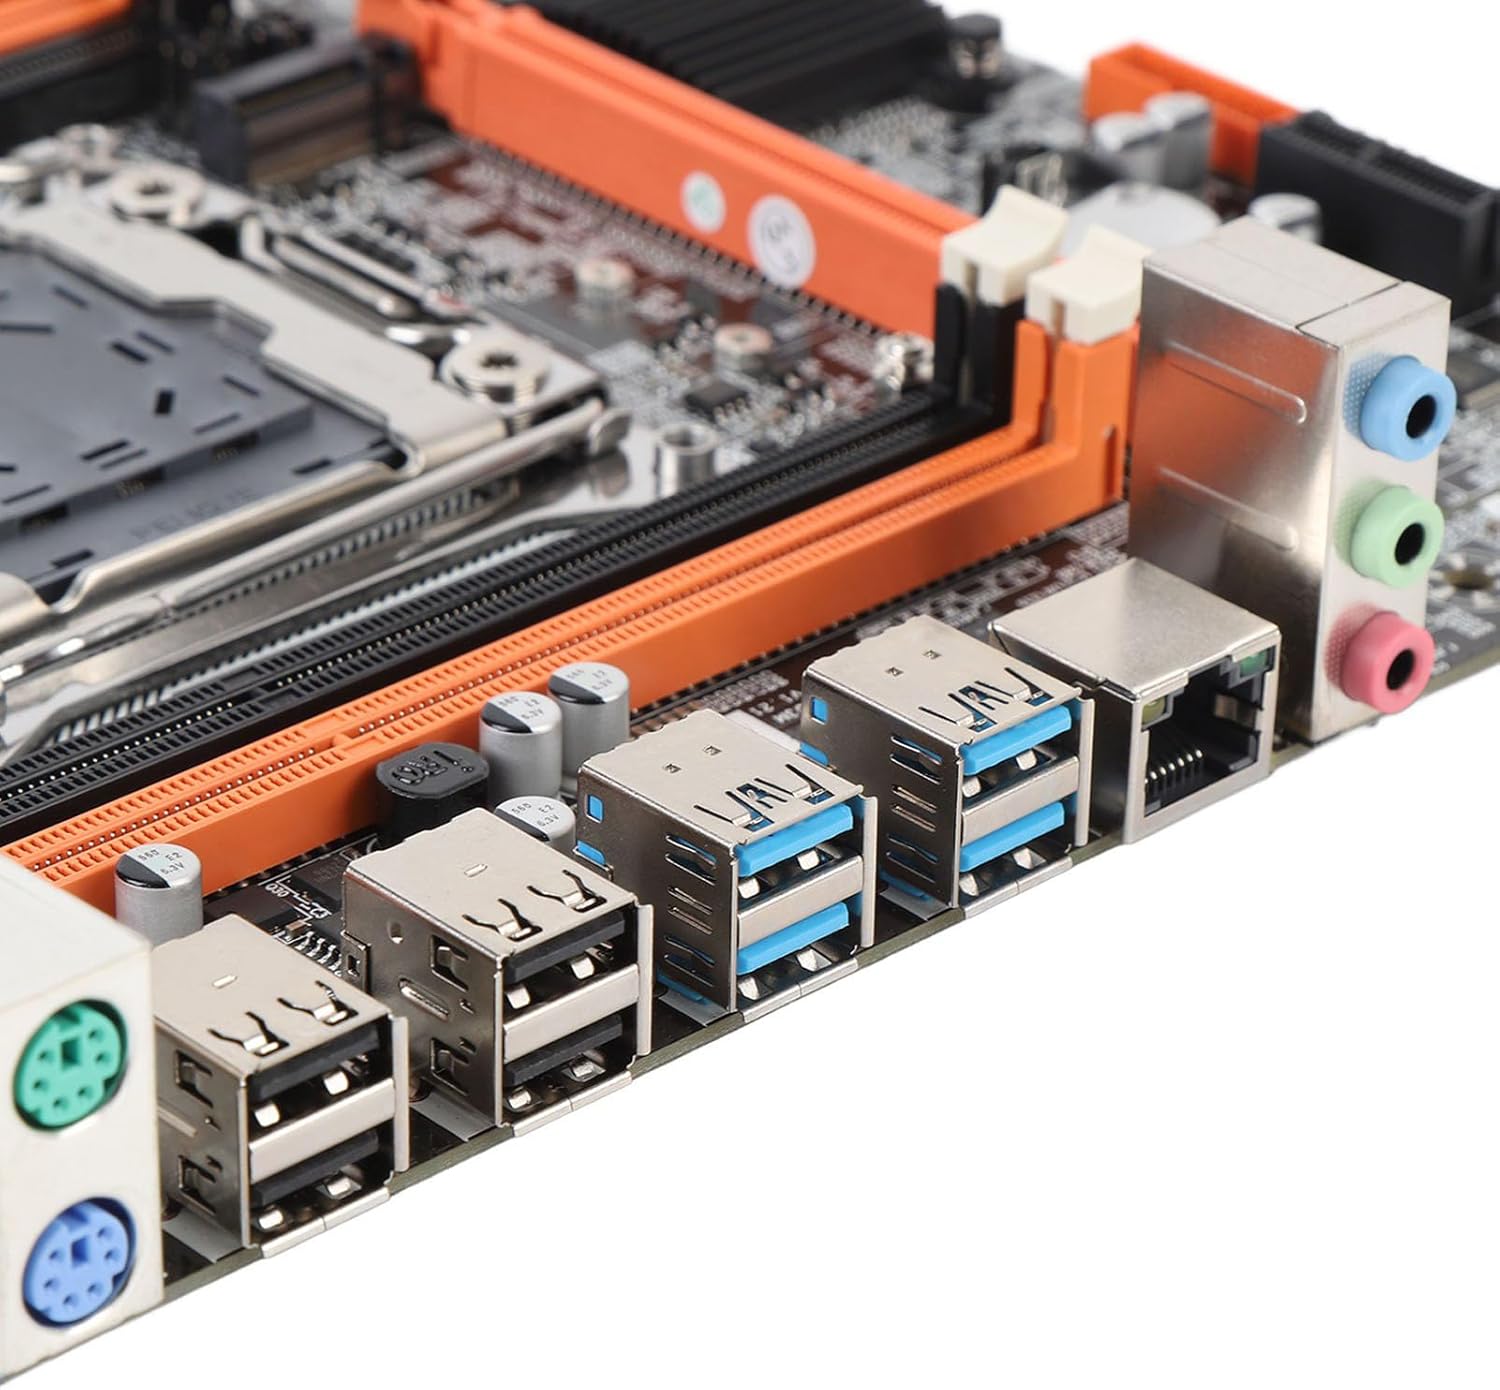
Image 4.4: Rear I/O ports including USB, LAN, and audio jacks. This image shows the external connectivity options available on the motherboard.
5. Інструкція з експлуатації
5.1. Початкове завантаження
- After completing all hardware installations, connect your monitor, keyboard, and mouse.
- Power on your system. The system should display the BIOS/UEFI splash screen.
- Натисніть призначену клавішу (зазвичай DEL or F2) during boot to enter the BIOS/UEFI setup.
5.2. Конфігурація BIOS/UEFI
In the BIOS/UEFI, you can configure various system settings, including boot order, date/time, and hardware parameters. Ensure your boot device (e.g., SSD with OS) is prioritized in the boot sequence.
5.3. Встановлення драйвера
After installing your operating system, install the necessary drivers for the motherboard chipset, network, audio, and any other integrated components. These drivers are typically provided on a CD/DVD or can be downloaded from the manufacturer's webсайт.
6. Технічні характеристики
| Тип елемента | Материнська плата |
| Motherboard Architecture | M ATX |
| Чіпсет | X99H |
| Supported CPU Types | for LGA 2011-3 (E5 V3/V4, i7 58xx/68xx) |
| Тип пам'яті | DDR4 2666, 2400, 2133MHz |
| слоти пам'яті | 4 × DDR4 DIMM (Max 128GB) |
| Onboard Network Card | так |
| Graphics Card Standard | PCI Express 16X |
| USB порти | 4x USB 2.0, 4x USB 3.0 |
| Serial ATA Ports | 4 x Serial ATA 2.0 |
| Вбудований акумулятор | CR2032 x 1 (240mAh) |
| Слоти розширення | 1 x PCIE x16, 1 x PCIE X1, 1 x NVME M.2 Interface |
| Порти введення/виведення | PS/2, 1 x RJ45, USB 2.0, USB 3.0, Audio |
| Розміри продукту | 10.24 x 7.87 x 1.97 дюймів |
| Вага товару | 1.46 фунта |
| Номер моделі | Denashckge97d20i |
7. Вирішення проблем
- Немає живлення: Ensure all power cables (24-pin ATX, 8-pin CPU) are securely connected to the motherboard and power supply. Verify the power supply switch is on.
- Немає дисплея: Check that the monitor is connected to the graphics card (not the motherboard's I/O if a dedicated GPU is installed). Reseat the graphics card and RAM modules.
- Нестабільність/збої системи: This can be caused by incompatible RAM, insufficient power, or overheating. Verify RAM compatibility and seating. Check CPU cooler installation and fan operation.
- Периферійний пристрій не виявлено: Ensure USB devices are properly connected. Try different USB ports. Check for necessary drivers.
- Скидання BIOS: If system settings become unstable, you can clear the CMOS by removing the CR2032 battery for a few minutes or using the CMOS clear jumper (refer to motherboard diagram for location).
8. Технічне обслуговування
- Прибирання: Регулярно очищайте материнську плату та компоненти від пилу за допомогою стисненого повітря. Перед чищенням переконайтеся, що система вимкнена та відключена від мережі.
- Оновлення BIOS/UEFI: Періодично перевіряйте дані виробника webсайт для оновлень BIOS/UEFI. Оновлення можуть покращити стабільність, сумісність та продуктивність. Уважно дотримуйтесь інструкцій з оновлення, щоб уникнути пошкодження материнської плати.
- Управління кабелем: Переконайтеся, що кабелі акуратно прокладені, щоб покращити потік повітря та запобігти перешкодам.

Image 8.1: Close-up of solid-state capacitors. These components contribute to the motherboard's stable performance and longevity.
9. Гарантія та підтримка
For warranty information and technical support, please refer to the documentation provided with your purchase or visit the official Denash webсайт. Зберігайте чек про покупку для гарантійних претензій.