
1. Вступ
This manual provides detailed instructions for the installation, operation, and maintenance of your SOGTICPS BL912-60A-02US MPPT Solar Charge Controller. This device is designed to manage power flow from your solar panels to your battery bank, ensuring efficient charging and protecting your batteries from overcharge and over-discharge.
Примітка: This controller utilizes MPPT technology to detect the maximum charging current, which can increase efficiency by 10%-30% compared to standard controllers. It is important to note that this is a compatible MPPT charge controller with PWM intelligent features, not a "true MPPT" controller with a large transformer coil inside.
Ключові характеристики:
- Автоматична система 12V/24V volumetagе визнання.
- Advanced MPPT (Maximum Power Point Tracking) technology for optimized charging.
- Multi-function LCD display for system status monitoring.
- Dual USB ports (DC 5V 2A output) for charging external devices.
- Comprehensive protection features: over-charging, over-discharging, reverse polarity, short circuit, and open circuit protection.
- Temperature compensation for accurate charging.

малюнок 1: Фронт view of the SOGTICPS BL912-60A-02US MPPT Solar Charge Controller, showing the LCD display, control buttons, and dual USB ports.
2. Налаштування та встановлення
Правильне встановлення є вирішальним для безпечної та ефективної роботи вашого контролера сонячного заряду. Будь ласка, уважно виконайте ці кроки.
2.1 Порядок підключення
Важливо: Always connect components in the following sequence to prevent damage to the controller or other system components.
- Підключіть батарею: First, connect the battery to the charge controller. Ensure the battery has sufficient voltage for the controller to recognize the correct battery type (12V or 24V).
- Підключіть сонячну панель: Next, connect the solar panel(s) to the charge controller.
- Підключення навантаження (необов'язково): Finally, connect your DC load to the charge controller's load terminals.
Порядок розбирання: When disconnecting, reverse the order: first disconnect the solar panel, then the battery, and finally the load.
2.2 Схема підключення
Refer to the diagrams below for correct wiring connections.

малюнок 2: Labeled components of the SOGTICPS BL912-60A-02US controller, indicating LCD display, control buttons (Menu, Page Up, Page Down/Manual), and dual USB ports. Connection terminals for solar panel, battery, and load are also shown.

малюнок 3: Basic wiring diagram showing connections from a solar panel to the controller and from the controller to a DC load. Note the positive (+) and negative (-) terminals.
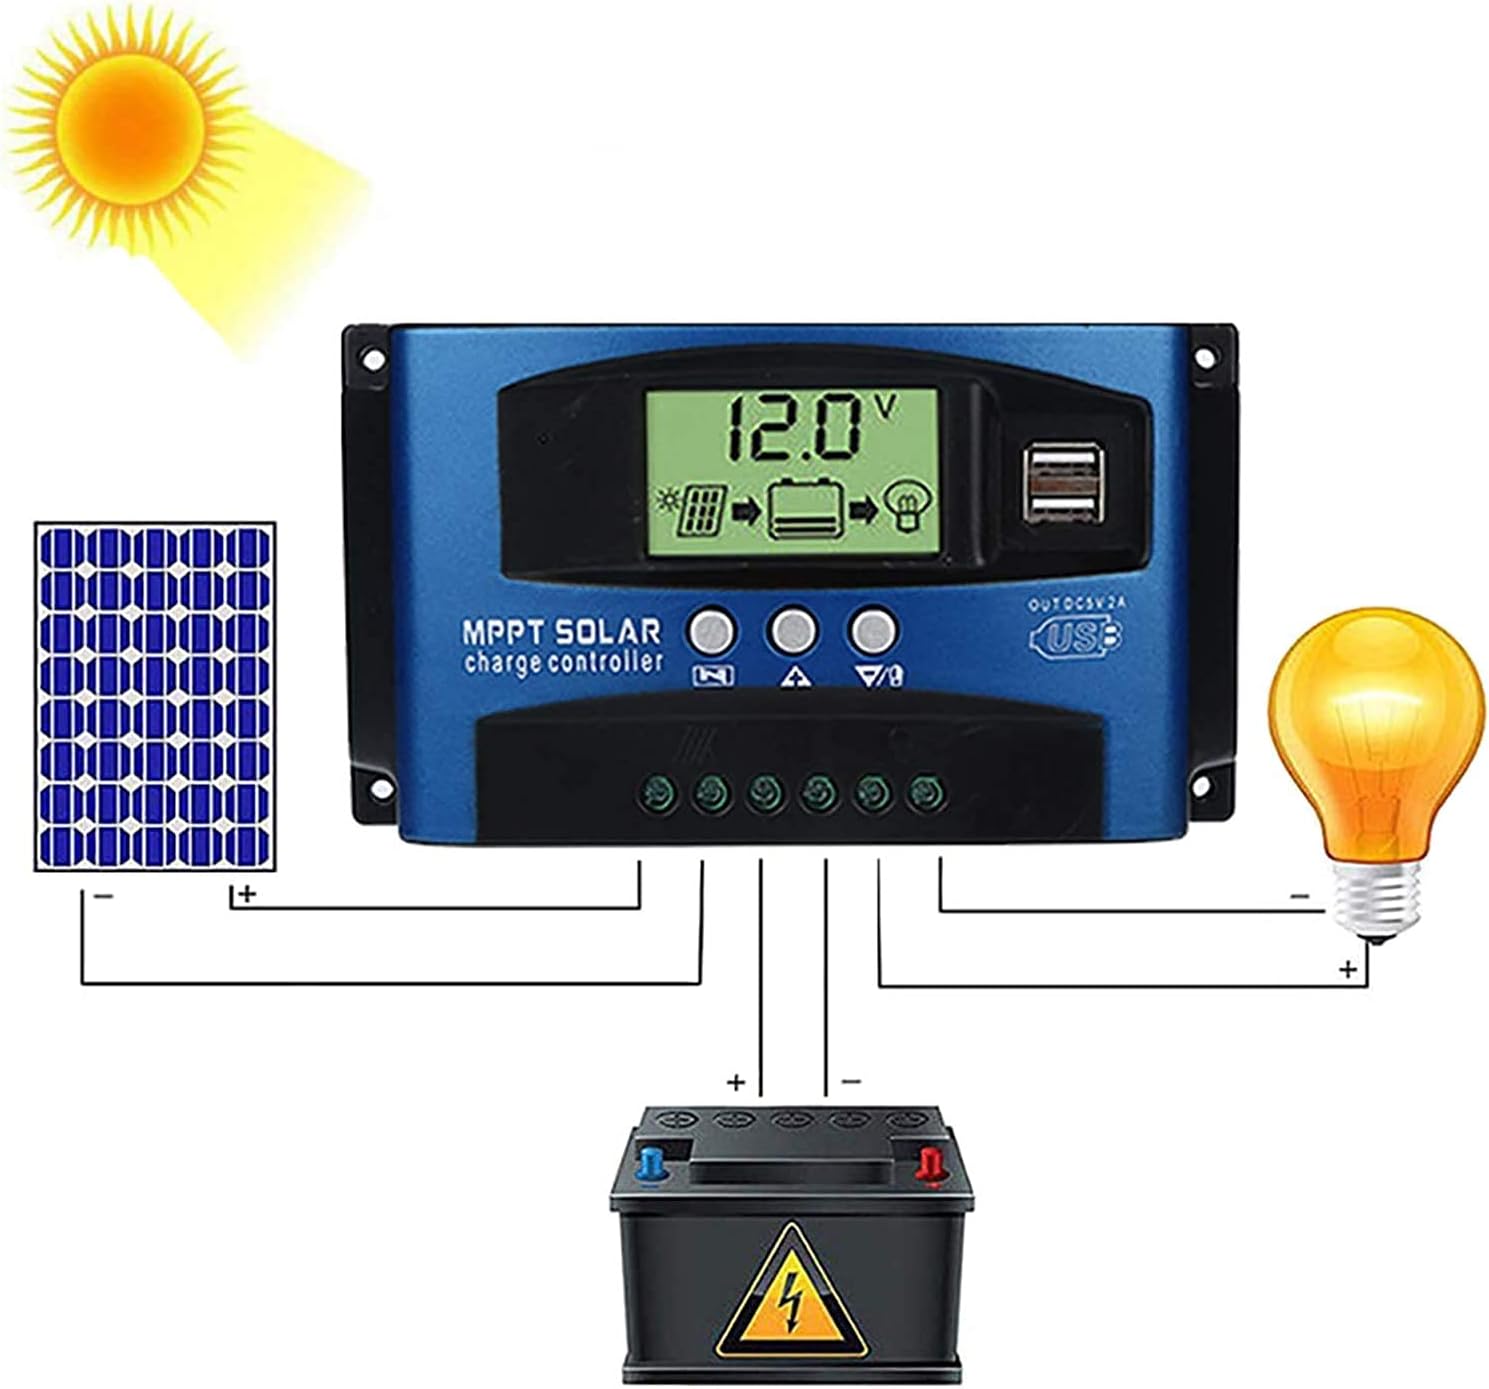
малюнок 4: Comprehensive wiring diagram illustrating the connection of a solar panel, the SOGTICPS charge controller, a battery, and a DC load. This diagram shows the correct sequence and polarity for all connections.
2.3 Solar Panel and Battery Voltage Сумісність
- For a 12V battery system, the working voltage (Voc) of the solar panel should be between 17V and 23V.
- For a 24V battery system, the working voltage (Voc) of the solar panel should be between 36V and 46V.
- Переконайтеся, що сонячна панель voltage is within these ranges to prevent damage to the controller.
2.4 Підключення інвертора
If using an inverter, connect it directly to the battery terminals, not to the load terminals of the charge controller.
3. Операція
3.1 РК-дисплей та кнопки
The LCD display provides real-time information about your system's status. The three buttons below the display are used for navigation and settings adjustment.
- Кнопка меню: Press to cycle through display screens and enter/exit settings menus.
- Кнопка Page Up: Використовується для збільшення значень або навігації вгору в меню.
- Кнопка «Сторінка вниз/Вручну»: Used to decrease values, navigate downwards in menus, or manually control the load output.
3.2 Battery Type Recognition
The controller automatically detects 12V or 24V battery systems. Ensure the battery is connected first and has sufficient voltage for proper detection.
3.3 USB вихід
The dual USB ports provide a DC 5V 2A output for charging compatible electronic devices.
4. Технічне обслуговування
Регулярне технічне обслуговування забезпечує довговічність та оптимальну роботу вашого контролера сонячного заряду.
- Прибирання: Тримайте контролер чистим та без пилу та сміття. Використовуйте суху тканину для очищення.
- Підключення: Періодично перевіряйте всі з'єднання проводів, щоб переконатися в їх надійності та відсутності корозії.
- Вентиляція: Переконайтеся, що контролер встановлено в добре провітрюваному приміщенні, щоб запобігти перегріву.
- Умови навколишнього середовища: Avoid exposing the controller to direct sunlight, rain, or excessive humidity.
5. Вирішення проблем
У цьому розділі розглядаються поширені запитання та проблеми, з якими ви можете зіткнутися.
- Q: How many watts of solar panels can be connected?
A: For a 12V battery system, the maximum recommended solar panel wattage is 720W. For a 24V battery system, the maximum recommended wattage становить 1440 Вт.
- Q: Does this controller support lithium batteries?
A: Yes, the controller is compatible with both lead-acid and lithium batteries.
- Q: My solar panel is 36V 200W, can I charge a 12V battery?
A: To charge a 12V battery, the solar panel's working voltage (Voc) should be between 17V and 23V. For a 24V battery, the Voc should be between 36V and 46V. If your 36V panel is used with a 12V battery, the voltage is too high and could damage the controller. Ensure your panel's voltage matches the battery system voltage вимоги.
- Q: Can an inverter be connected to the load side of the controller?
A: No, please connect the inverter directly to the battery terminals, not to the load terminals of the controller.
- Q: Does the controller have a requirement for battery capacity?
A: While there's no strict minimum, it's recommended that the battery capacity corresponds to the solar panel current. For example, if your solar panel current is 5A, a 50AH battery is preferable. Using a very large solar panel with a very small battery can be dangerous.
- Q: The controller is not turning on or displaying anything.
A: Ensure the battery is connected first and has sufficient voltage. Check all battery connections for proper polarity and secure contact. If the battery voltage is too low, the controller may not power on.
6. Технічні характеристики
| Особливість | Специфікація |
|---|---|
| Номер моделі | BL912-60A-02US |
| Бренд | SOGTICPS |
| System Voltage | 12В / 24В Авто |
| Максимальний струм заряду | 60А |
| Max Solar Panel Wattage (12 В) | 720 Вт |
| Max Solar Panel Wattage (24 В) | 1440 Вт |
| Solar Panel Working Voltage (система 12 В) | 17V-23V (Voc) |
| Solar Panel Working Voltage (система 24 В) | 36V-46V (Voc) |
| Тип дисплея | ЖК |
| Вихід USB | Dual DC 5V 2A |
| Розміри продукту | 6.69 x 3.94 x 1.97 дюйми (17 x 10 x 5 см) |
| Вага товару | 10.6 унцій (0.3 кг) |
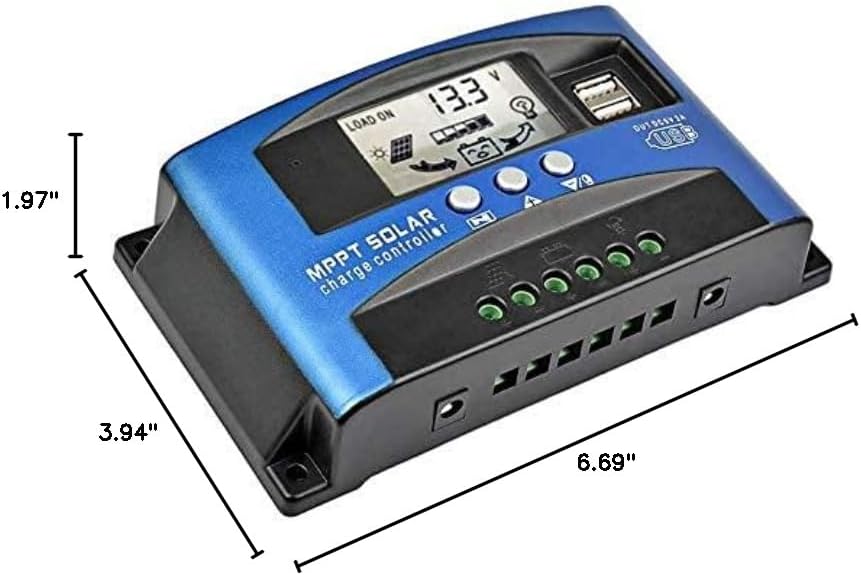
малюнок 5: Dimensional drawing of the SOGTICPS BL912-60A-02US solar charge controller, showing its length (6.69"), width (3.94"), and height (1.97").

малюнок 6: Examples of typical applications for the solar charge controller, including residential solar systems, garden lighting, street lighting, and integration with wind power systems.
7. Гарантія та підтримка
7.1 Інформація про гарантію
This SOGTICPS product comes with a 30-денна гарантія повернення грошей і а Гарантія 12 місяців for quality-related issues. Please retain your proof of purchase for warranty claims.
7.2 Підтримка клієнтів
For any questions, technical assistance, or warranty claims, please contact SOGTICPS customer support. Our professional technicians are available to assist you.
Contact information is typically found on the product packaging or the seller's official webсайт.