
1. Продукт закінчивсяview
The Fuers H.265+ 8-Channel Security DVR Recorder (Model A1008CH) is a versatile surveillance solution designed for home and business security. This DVR supports various camera types including HD-CVBS, TVI, CVI, XVI, AHD, and IP analog cameras, allowing for flexible system expansion. It features H.265+ video compression for efficient storage and comes with a pre-installed 1TB hard drive for 24/7 recording.
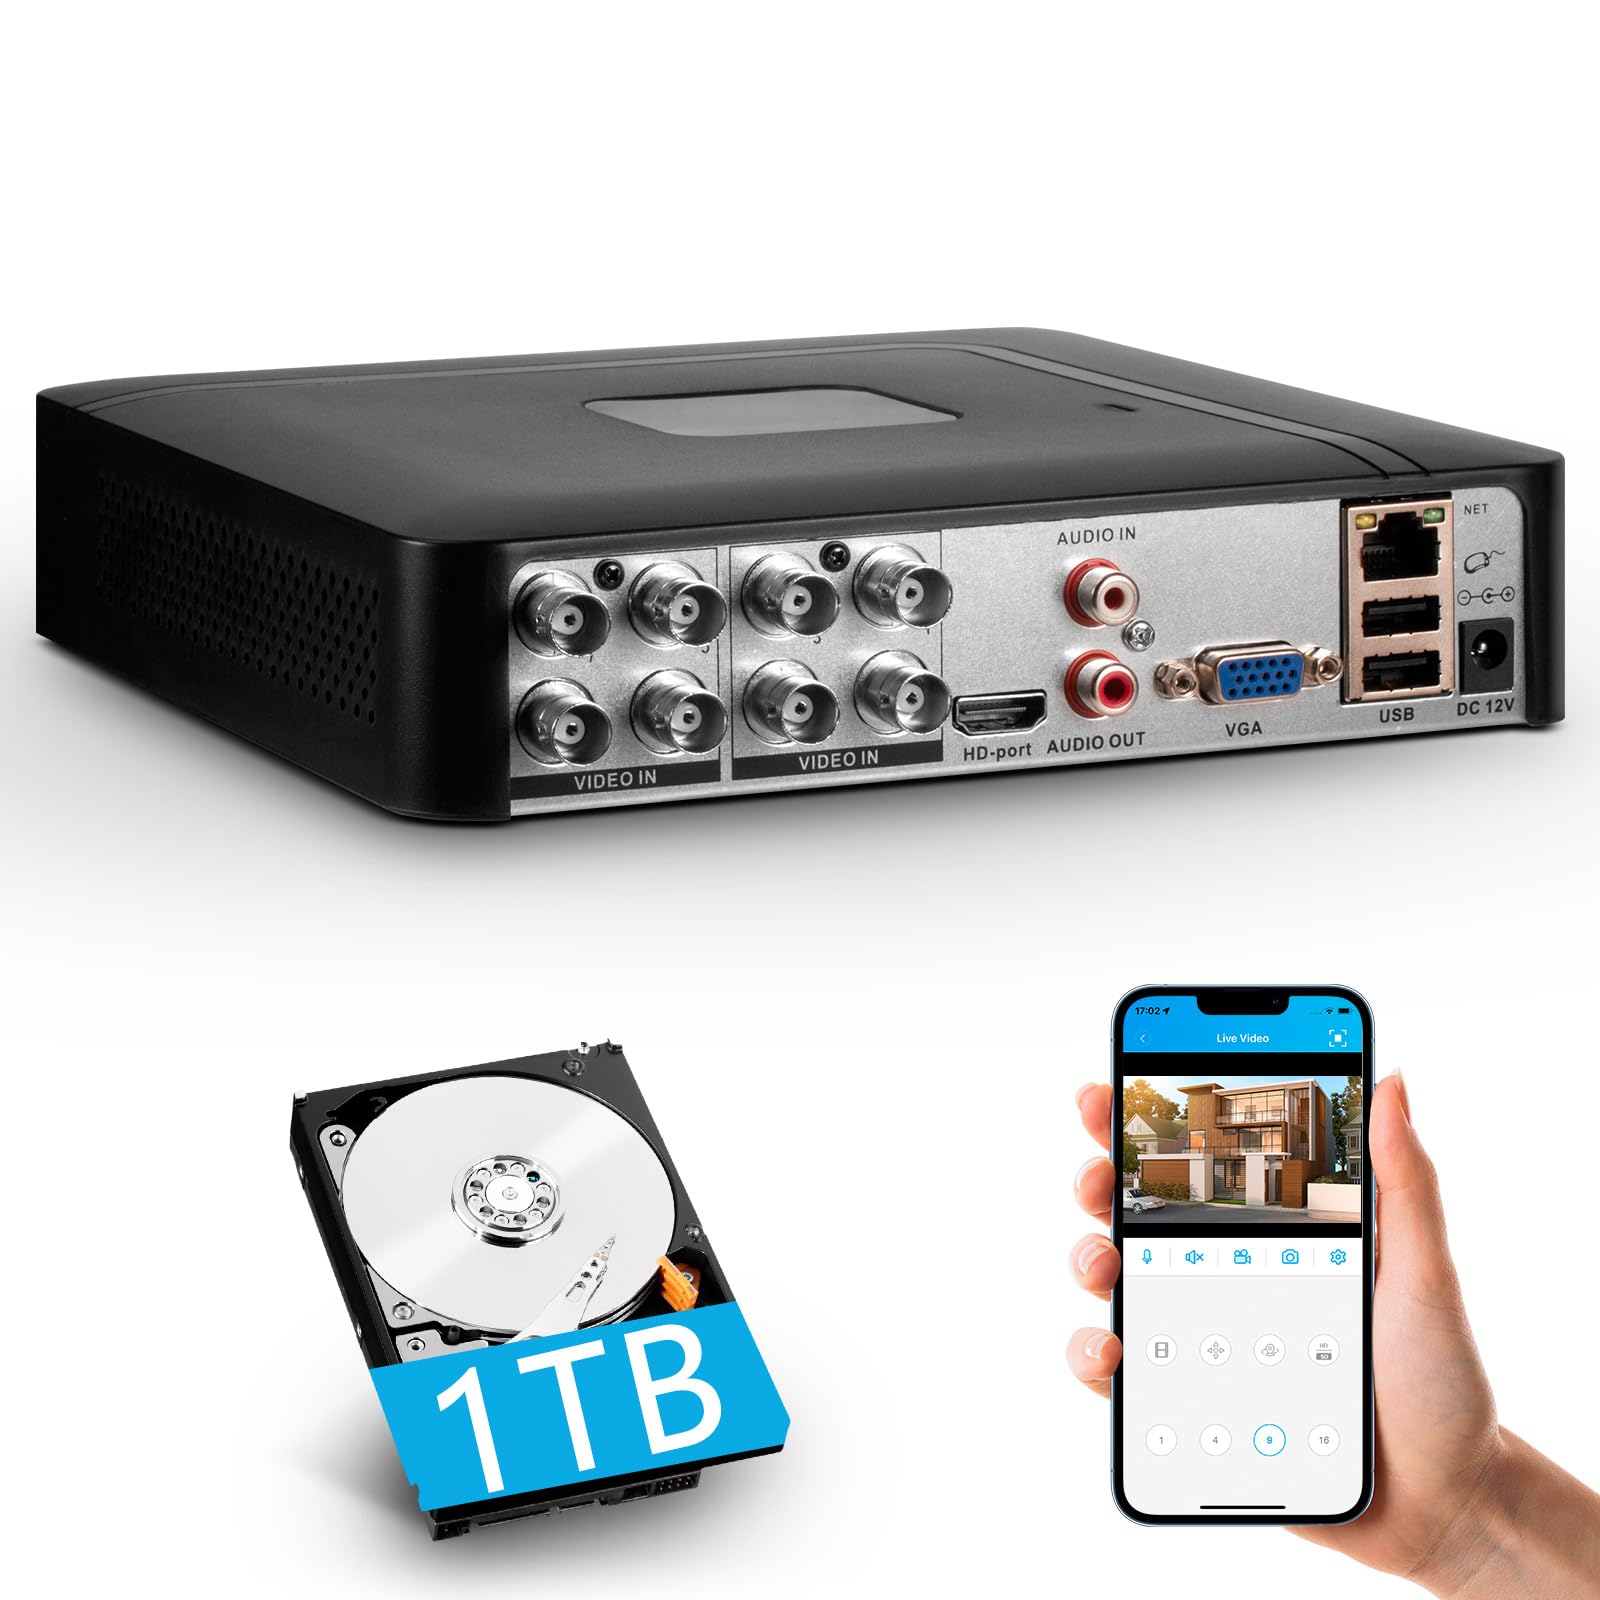
Image 1.1: Fuers H.265+ 8-Channel Security DVR Recorder.
Ключові характеристики:
- 8-канальна система: Supports up to 8 cameras simultaneously, compatible with HD-TVI, CVBS, CVI, XVI, AHD, and IP cameras.
- Стиснення відео H.265+: Offers extended recording time and saves up to 50% storage space compared to H.265 systems.
- Попередньо встановлений жорсткий диск на 1 ТБ: Security-grade hard drive for continuous surveillance recording. Expandable up to 14TB via SATA port.
- Віддалений доступ: View and manage your system remotely using the free iCSee App (iOS/Android) or VMS Client (Windows/Mac).
- Інтелектуальне виявлення руху: Receive mobile push notifications for detected motion types, including person and face detection.
- Налаштування Plug & Play: Easy connection with simultaneous VGA/HDMI output.
2. Налаштування та встановлення
2.1 Що в коробці
Перш ніж почати, переконайтеся, що всі компоненти присутні:
- 1x A1008 8-канальний відеореєстратор
- 1x 1TB HDD (Pre-installed on DVR)
- 1x DVR Power Adapter
- 1x USB миша
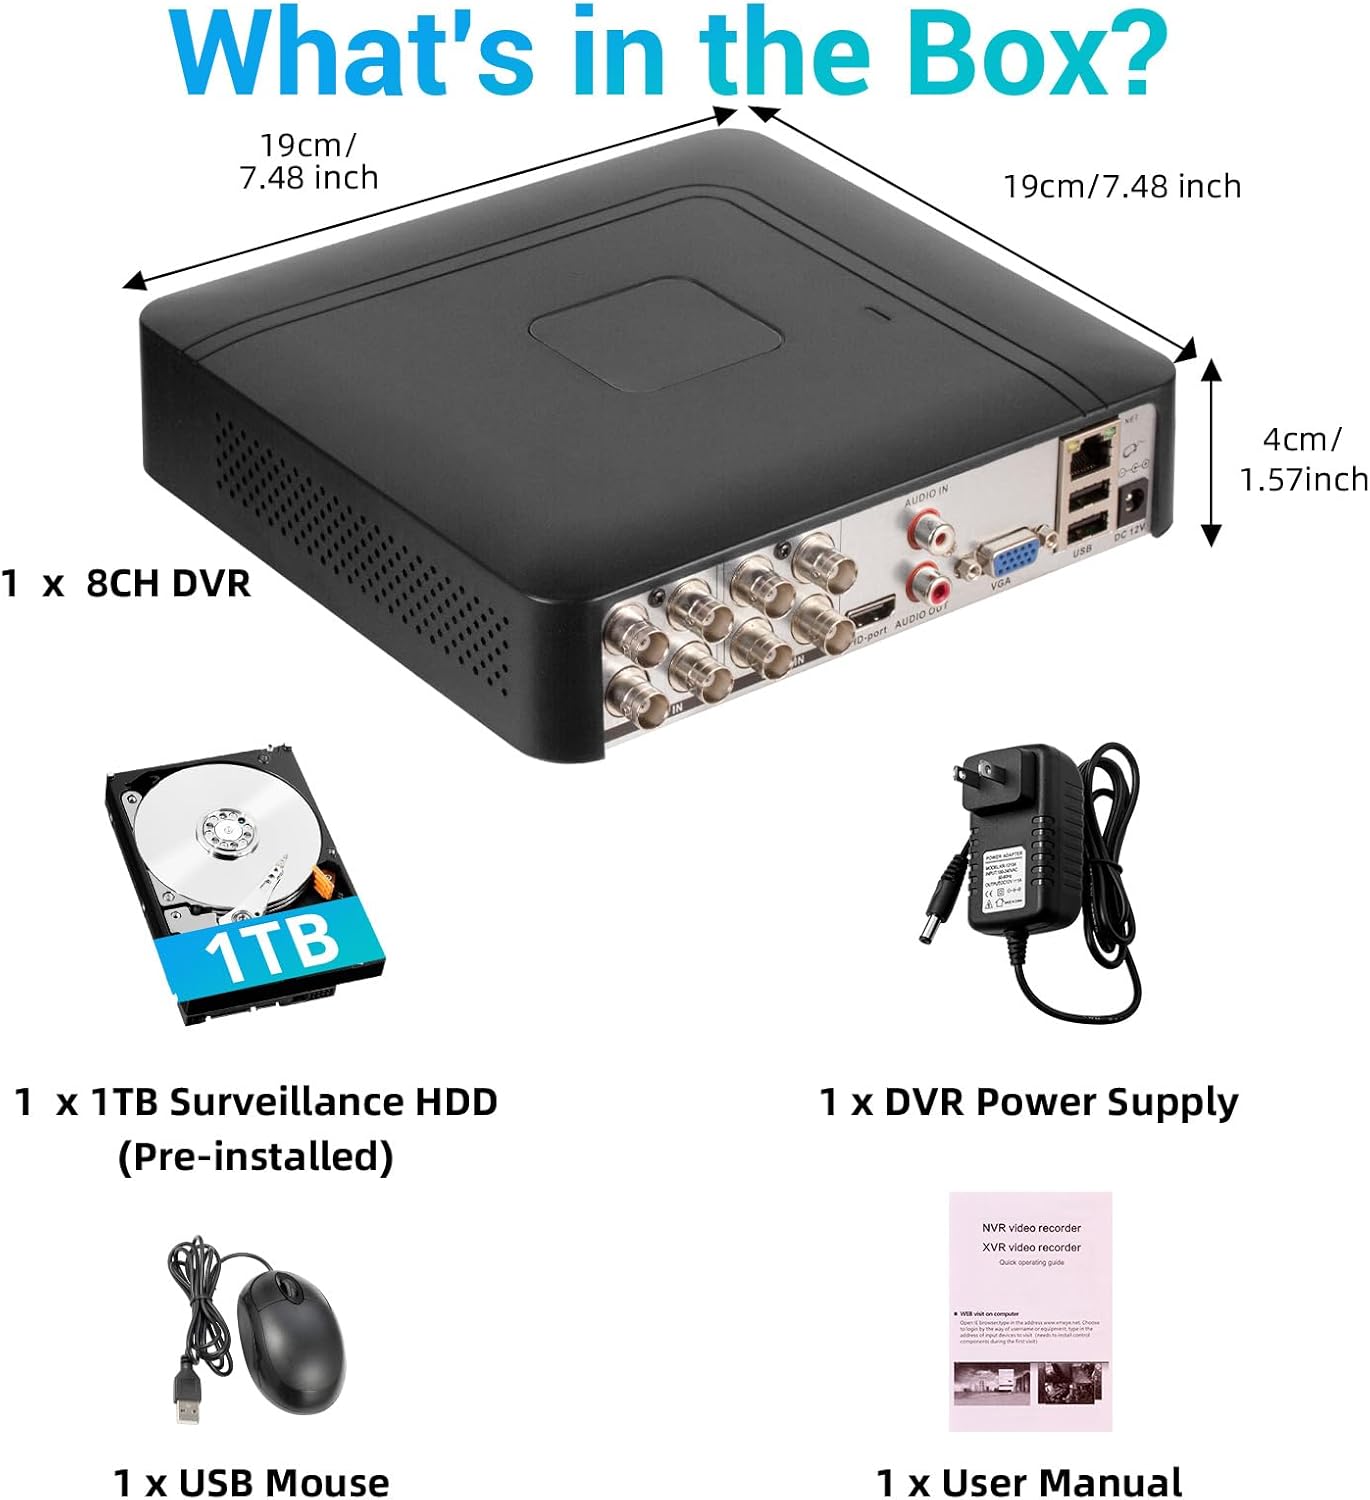
Зображення 2.1: Вміст упаковки продукту.
2.2 Hard Drive Installation (if not pre-installed or for upgrade)
The DVR comes with a pre-installed 1TB HDD. If you need to replace or upgrade the hard drive (up to 14TB), follow these steps:
- Unscrew the bottom cover of the DVR unit.
- Обережно відкрийте casing.
- Connect the SATA data cable and power cable from the DVR to the new hard drive.
- Secure the hard drive within the casing using the provided screws.
- Close the DVR casing and secure it with screws.

Image 2.2: Hard drive installation and expansion options.
2.3 Connecting the DVR System
Виконайте такі кроки, щоб підключити систему відеореєстратора:
- Підключення камер: Connect your security cameras to the 'VIDEO IN' ports on the back of the DVR using BNC cables.
- Підключення монітора: Підключіть монітор до відеореєстратора за допомогою порту HDMI або VGA.
- Підключення USB-миші: Підключіть USB-мишу, що входить до комплекту, до одного з USB-портів відеореєстратора.
- Connect Network (Optional for Remote Access): Для дистанційного viewing and notifications, connect an Ethernet cable from your router to the 'NET' port on the DVR.
- Увімкнення: Connect the DVR power adapter to the 'DC 12V' port and then plug it into a power outlet.

Image 2.3: Connecting cameras and network to the DVR.
2.4 Initial Setup and Channel Type Selection
Upon first power-on, the system may prompt for initial setup. You may need to select the appropriate channel type for your cameras.
- Right-click on the screen to access the Main Menu.
- Перейдіть до система > цифровий > ChannelType.
- Select the configuration that matches your camera setup:
- First row: Supports 8 XVI, CVBS, AHD, TVI, CVI coaxial cameras.
- Second row: Supports 8 XVI, CVBS, AHD, TVI, CVI coaxial + 4 IP cameras.
- Third row: Supports 16 1080P IP cameras.
- Fourth row: Supports 16 5MP IP cameras.
- Натисніть OK to apply changes. The system may restart.

Image 2.4: DVR Channel Type selection screen.
3. Інструкція з експлуатації
3.1 Живий View і Запис
Once the DVR is powered on and cameras are connected, you should see the live feed on your connected monitor. The system is configured for 24/7 recording to the pre-installed 1TB hard drive.

Зображення 3.1: Живий ефір view of multiple camera feeds.
3.2 Remote Access via Mobile App
To access your DVR remotely, download the free iCSee App (for iOS/Android) or VMS Client (for Windows/Mac).
- Download the iCSee App from your device's app store.
- Open the app and register an account if you don't have one.
- In the DVR's main menu, navigate to Інформація > Версія to find the DVR's QR code.
- Use the iCSee app to scan the QR code to add your device.
- Після додавання ви можете view live feeds, playback recordings, and receive alerts from anywhere with an internet connection.

Image 3.2: Steps for remote access via mobile app.
3.3 Playback Recorded Footage
Повторноview записане відео:
- Right-click on the screen to access the Main Menu.
- Виберіть запис > Відтворення.
- Choose the desired channel(s) and date/time range for playback.
- Натисніть Почніть відтворення до view footage.

Image 3.3: Playback interface with timeline.
3.4 Сповіщення про виявлення руху
The DVR supports intelligent motion detection, including person and face detection. When motion is detected, you can receive instant mobile push notifications.
- Configure motion detection settings in the DVR's сигналізація меню.
- Ensure your mobile app is properly linked and notifications are enabled.

Image 3.4: Human and face detection in action.
4. Технічне обслуговування
4.1 Керування жорсткими дисками
The pre-installed 1TB hard drive provides ample storage. Due to H.265+ compression, storage is optimized. If more storage is needed, you can replace the internal HDD with a larger one (up to 14TB). Regularly check the hard drive status in the DVR's system settings to ensure optimal performance.
4.2 Загальний догляд
- Keep the DVR in a cool, dry, and well-ventilated area.
- Avoid exposing the unit to direct sunlight, extreme temperatures, or moisture.
- Clean the exterior of the DVR with a soft, dry cloth. Do not use liquid cleaners.
- Переконайтеся, що всі кабельні з’єднання надійні.
5. Вирішення проблем
5.1 Немає відеовиходу на моніторі
- Check if the DVR is powered on and the power adapter is securely connected.
- Verify the HDMI or VGA cable connection between the DVR and the monitor.
- Ensure the monitor is set to the correct input source (HDMI/VGA).
5.2 Камери не відображають зображення
- Check all camera power and video cable connections.
- Verify that the camera type (AHD, TVI, CVI, etc.) is compatible with the DVR.
- Ensure the correct channel type is selected in the DVR settings (refer to Section 2.4).
- Test cameras individually if possible to isolate the issue.
5.3 Remote Access Not Working
- Confirm the DVR is connected to the internet via an Ethernet cable.
- Перевірте підключення вашого маршрутизатора до Інтернету.
- Ensure the iCSee app is updated to the latest version.
- Verify that the DVR was added correctly to the app by scanning the QR code.
- For some networks, you might need to adjust router settings (e.g., port forwarding), consult your network administrator or ISP.
6. Технічні характеристики
| Особливість | Деталь |
|---|---|
| Бренд | Палива |
| Номер моделі | A1008CH |
| Кількість каналів | 8 |
| Технологія підключення | HDMI, USB, VGA |
| Сумісні пристрої | Desktop, Tablet, Camera, Smartphone |
| Розміри продукту | 7.48 см (Д) x 7.48 см (Ш) x 1.57 см (В) |
| Ємність пам'яті | 1 TB (Pre-installed) |
| Hard-Drive Size | 1 TB (Expandable up to 14 TB) |
| Media Format Digital Video | H.265 + |
| Відео вхід | AHD, CVI, HDMI, HDTVI, IP Input, VGA |
| UPC | 765142240850 |
7. Гарантія та підтримка
7.1 Гарантія на виріб
This Fuers DVR Recorder is covered by a standard manufacturer's warranty. Please refer to the warranty card included with your product or visit the official Fuers webДетальні умови гарантії див. на сайті. Зберігайте чек про покупку як підтвердження покупки для гарантійних претензій.
7.2 Технічна підтримка
For technical assistance, troubleshooting, or any questions regarding your Fuers DVR, please contact Fuers customer support. Contact information can typically be found on the product packaging, the official Fuers webсайті або через вашого продавця.
Інтернет-ресурси:
- Відвідайте Магазин Fuers на Amazon для отримання інформації про продукт та оновлень.