1. Вступ
This manual provides detailed instructions for the installation, operation, and maintenance of your Denash X79SE Plus LGA 2011 Motherboard. This motherboard is designed to support Xeon E5 V1 V2 series processors and DDR3 memory, offering robust performance for various computing needs. Please read this manual thoroughly before installation and use to ensure proper setup and functionality.
2. Ключові характеристики
- NVME M.2 Interface: Equipped with an NVME M.2 hard drive interface, providing theoretical bandwidth up to 4 Gbit/s for high-speed storage.
- Роз'єм LGA 2011: Supports Xeon E5 V1 V2 series processors.
- Слот PCIe 3.0 x16: Features a dedicated slot for graphics cards, ensuring high-performance visual output.
- Гігабітний Ethernet: Integrated RTL8111H Gigabit LAN for stable and fast network connectivity.
- Підтримка пам'яті DDR3: Four DDR3 memory slots supporting up to 128GB (1066/1333/1600 MHz).
- 8-Layer PCB Design: Constructed with an 8-layer printed circuit board for enhanced stability and reliability.
- High-Capacity Power Supply: Utilizes a robust 1x8 and 1x24 pin power supply design for stable performance.
- Порти USB 2.0: Includes six USB 2.0 ports for peripheral connectivity.

Figure 2.1: M.2 NVME/NGFF Slot for high-speed storage.

Figure 2.2: Gigabit Ethernet port for reliable network connection.

Figure 2.3: Solid capacitors ensuring stable power delivery and extended motherboard life.

Figure 2.4: Illustration of the durable 8-layer PCB material.
3. Налаштування та встановлення
3.1 Вміст упаковки
Перевірте наявність усіх предметів у вашій упаковці:
- 1 x Denash X79SE Plus Motherboard
- 1 x I/O Backplate
- 1 x SATA кабель для передачі даних

Figure 3.1: Motherboard, I/O backplate, and SATA cable included in the package.
3.2 Розташування материнської плати
Ознайомтеся з різними компонентами та роз'ємами на материнській платі.
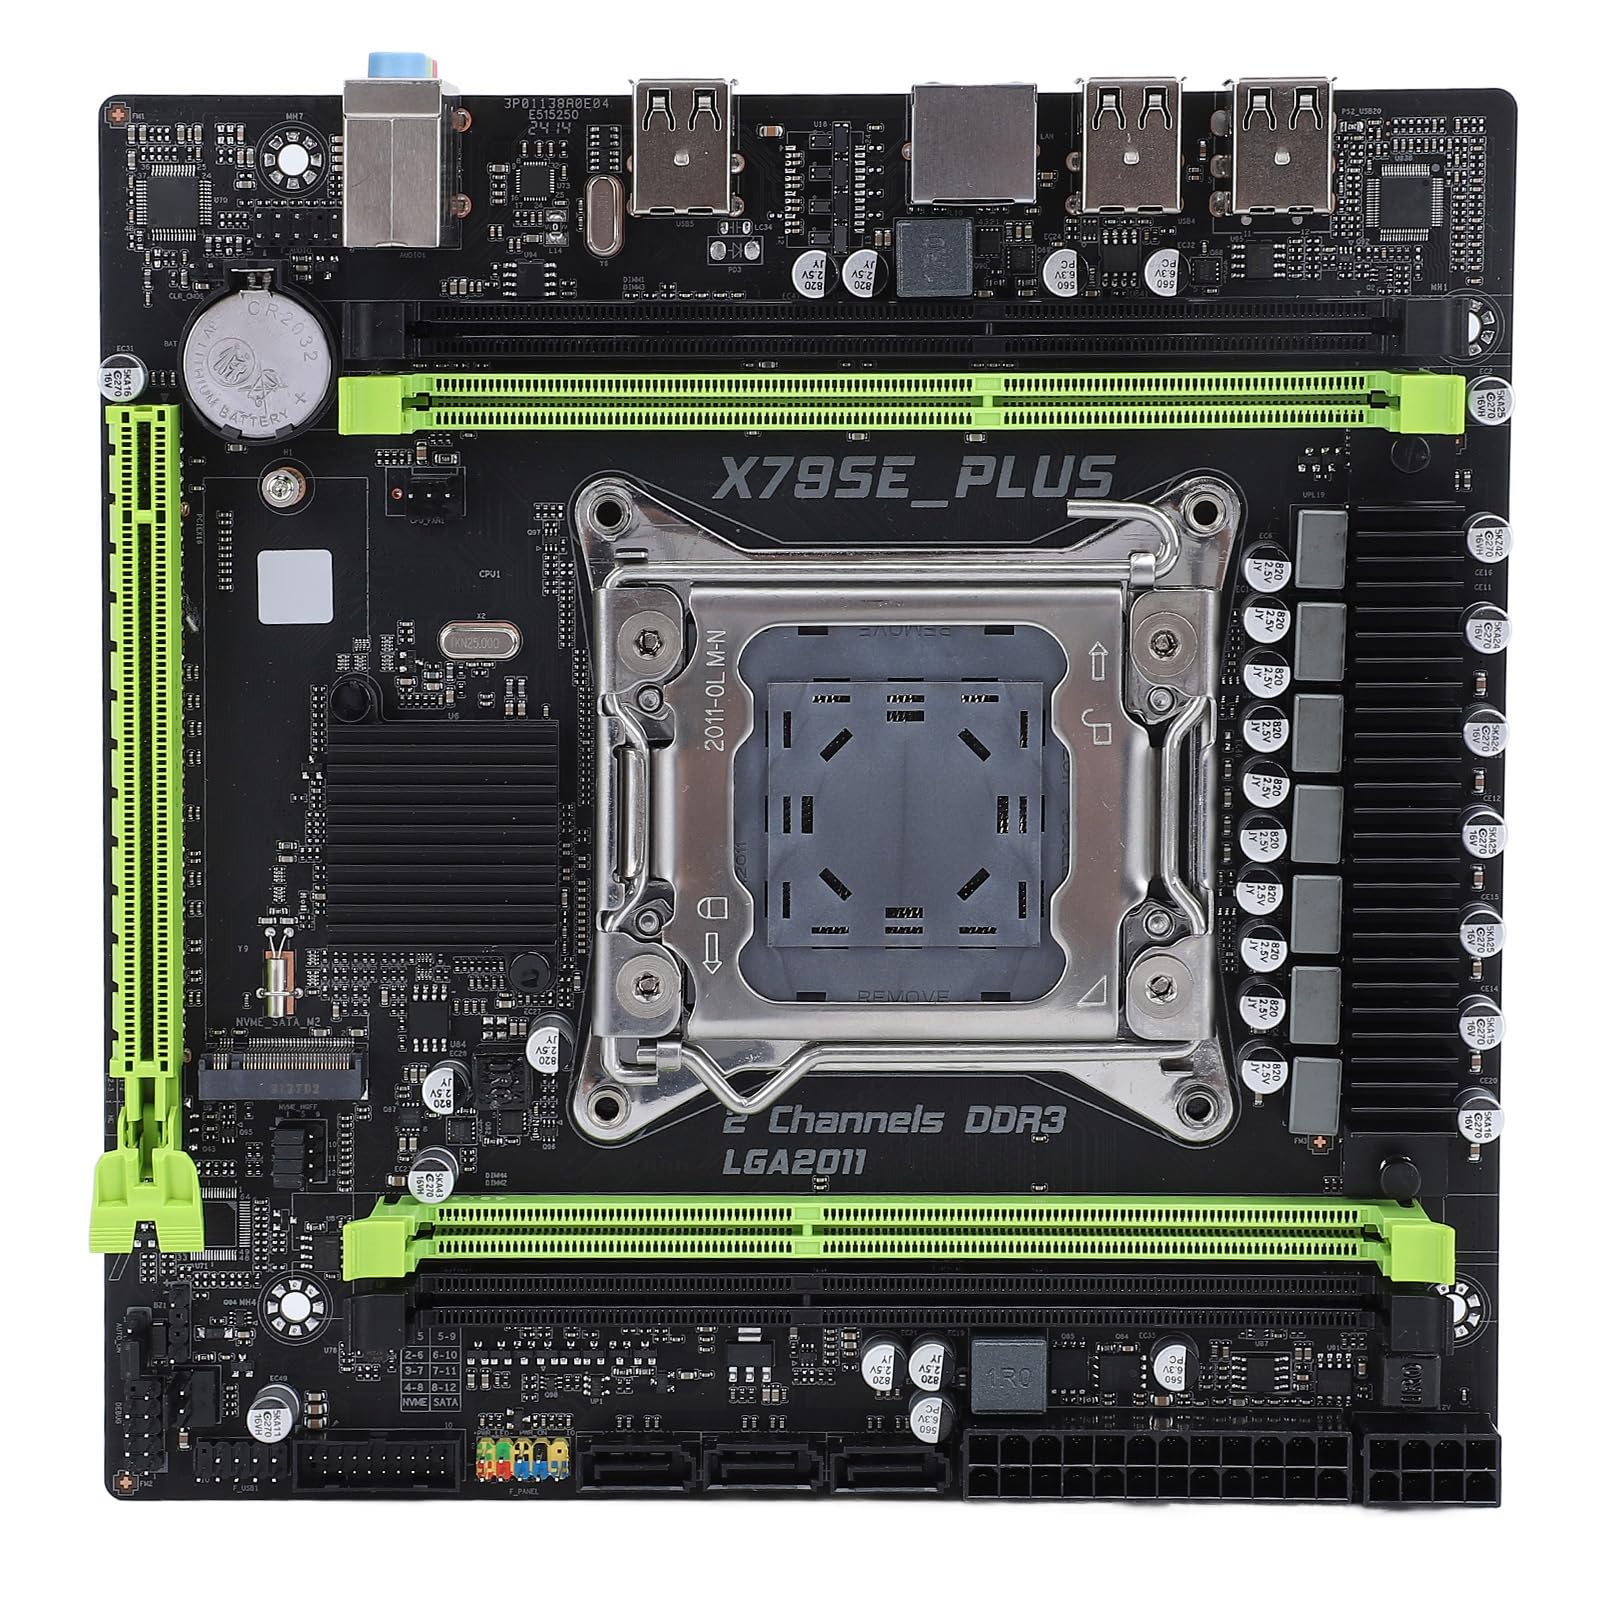
Малюнок 3.2: Закінченоview of the Denash X79SE Plus motherboard.
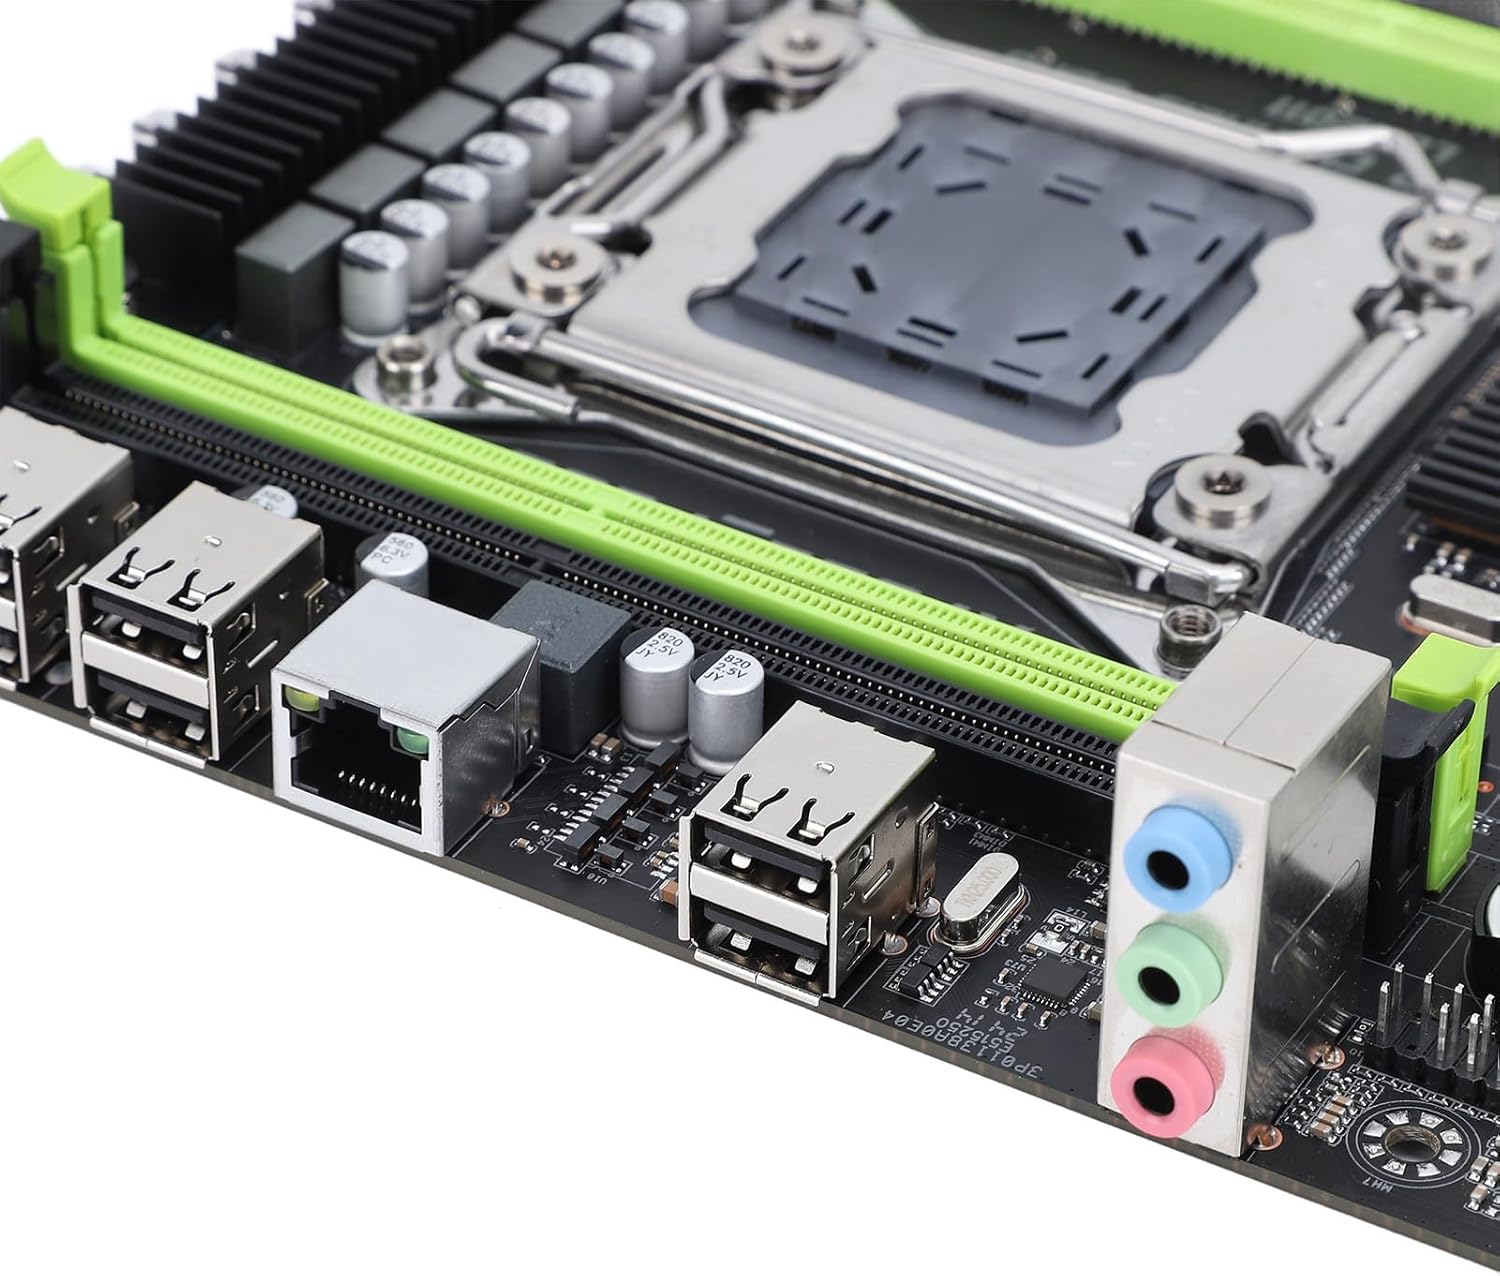
Figure 3.3: Rear I/O panel with USB, Ethernet, and audio ports.

Figure 3.4: SATA 2.0 ports and DDR3 memory slots.
3.3 Component Installation Guide
Follow these steps to install essential components onto your motherboard:
- Встановлення ЦП:
- Обережно відкрийте важіль роз'єму процесора LGA 2011.
- Align the CPU (Xeon E5 V1/V2 series) with the socket, ensuring the triangular mark on the CPU matches the mark on the socket.
- Обережно, не докладаючи зусиль, вставте процесор у роз'єм.
- Закрийте важіль роз'єму, щоб закріпити процесор.
- Нанесіть термопасту та встановіть кулер процесора.
- Memory (DDR3) Installation:
- Відкрийте затискачі з обох кінців слотів пам'яті DDR3.
- Align the memory module's notch with the slot's key.
- Міцно натисніть на обидва кінці модуля пам’яті, доки затискачі не зафіксуються на місці.
- Встановлення пристрою зберігання даних:
- M.2 NVME SSD: Insert the M.2 SSD into the M.2 slot at an angle, then push it down and secure it with a screw.
- Накопичувачі SATA: Connect SATA data cables from your storage drives (HDD/SSD) to the SATA 2.0 ports on the motherboard. Connect SATA power cables from your power supply to the drives.
- Graphics Card (PCIe 3.0 x16) Installation:
- Відкрийте фіксатор на слоті PCIe 3.0 x16.
- Вирівняйте відеокарту зі слотом і міцно натисніть, доки вона повністю не встане на місце, а фіксатор не зафіксується.
- Закріпіть відеокарту на корпусі ПК за допомогою гвинта.
- Підключення до джерела живлення:
- Підключіть 24-контактний роз'єм живлення ATX від блока живлення до основного роз'єму живлення на материнській платі.
- Connect the 8-pin CPU power connector to the corresponding socket near the CPU.
- Connect any additional power cables required for your graphics card or other components.
- Роз'єми передньої панелі:
- Connect the front panel headers (power button, reset button, HDD LED, power LED, USB 2.0, audio) from your PC case to the corresponding pins on the motherboard. Refer to your PC case manual for specific pin assignments.
4. Інструкція з експлуатації
4.1 Перше ввімкнення
After assembling all components and connecting power, press the power button on your PC case. The system should power on, and you should see a display on your monitor.
4.2 Налаштування BIOS
To enter the BIOS/UEFI setup utility, press the designated key (usually DEL or F2) during the initial boot sequence. In the BIOS, you can configure boot order, system time, CPU settings, and other hardware parameters.
4.3 Встановлення операційної системи
Once the BIOS is configured, you can proceed with installing your preferred operating system (e.g., Windows, Linux). Boot from your OS installation media (USB drive or DVD) and follow the on-screen instructions.
5. Технічне обслуговування
5.1 Очищення
Regularly clean your computer's interior to prevent dust buildup, which can lead to overheating and reduced performance. Use compressed air to remove dust from fans, heatsinks, and other components. Ensure the system is powered off and unplugged before cleaning.
5.2 Оновлення BIOS
BIOS updates can provide improved compatibility, stability, and new features. Check the manufacturer's website for the latest BIOS versions and follow their instructions carefully. Incorrect BIOS updates can damage your motherboard.
6. Вирішення проблем
6.1 Загальні проблеми
- Немає живлення:
- Перевірте всі підключення живлення (24-контактний ATX, 8-контактний процесор, графічний процесор).
- Переконайтеся, що вимикач живлення знаходиться в положенні «УВІМК.».
- Перевірте підключення кнопки живлення на передній панелі до материнської плати.
- Немає дисплея:
- Переконайтеся, що монітор підключено до відеокарти (не до вбудованої відеокарти материнської плати, якщо така є).
- Перевстановіть відеокарту та модулі пам'яті.
- Перевірте з іншим монітором або кабелем дисплея.
- Нестабільність/збої системи:
- Перевірте температуру процесора та графічного процесора.
- Ensure all components are properly seated.
- Запустіть інструменти діагностики пам'яті.
- Update drivers for all components.
- Завантажувальний пристрій не знайдено:
- Перевірте підключення кабелів SATA/M.2 до накопичувачів.
- Перевірте порядок завантаження в BIOS.
- Переконайтеся, що операційна система правильно встановлена на диску.
7. Технічні характеристики
| Особливість | Специфікація |
|---|---|
| Бренд | Денаш |
| Назва моделі | X79SE Plus |
| Номер моделі | Denashsh8g1qz45g |
| Гніздо ЦП | LGA 2011 (Supports Xeon E5 26XXV1/V2) |
| слоти пам'яті | 4 x DDR3 (Max 128GB, 1066/1333/1600 MHz) |
| Інтерфейс SATA | 3 x SATA 2.0 |
| Слоти M.2 | 1 x M.2 2280 NVMe 3.0x4, 1 x M.2 2280 NGFF SATA 2.0 Protocol Port SSD |
| Graphics Card Slot | 1 x PCIe 3.0 x16 |
| Аудіо чіп | HD 5.1 Channel Sound Chip |
| Мережева карта | 1 x Gigabit Ethernet (RTL8111H) |
| USB порти | 6 x USB 2.0 |
| Форм-фактор | Micro ATX |
| Вбудована батарея | CR2032x1 240 mAh |
| Гарантія | 2 років виробника |
8. Гарантія та підтримка
The Denash X79SE Plus LGA 2011 Motherboard is covered by a 2-річна гарантія виробника from the date of purchase. This warranty covers defects in materials and workmanship under normal use. For warranty claims or technical support, please contact your retailer or the manufacturer directly. Keep your proof of purchase for warranty validation.