
1. Вступ
This manual provides detailed instructions for the installation, operation, and maintenance of your ChongXiao Universal Brushless Controller. This controller is designed for electric scooters and e-bikes, offering versatile voltage compatibility and robust performance. Please read this manual thoroughly before installation and use to ensure proper function and safety.
2. Особливості продукту
- Brushless Design: Ensures stable operation and extended service life for brushless motors.
- Універсальне застосування: Suitable for electric bicycle scooters, controlling rotational speed and direction.
- Широка сумісність: Designed to be compatible with various brands and models of electric bicycle scooters.
- Передові технології: Incorporates advanced technology for excellent performance, durability, safety, and stability.
- Просте підключення: Features complete functions and straightforward wiring. Users can connect only the necessary functions, leaving unused wires unwired.
3. Технічні характеристики
| Особливість | Деталь |
|---|---|
| Назва продукту | Intelligent Dual-Mode Brushless Controller |
| томtage Дальність | 36V-84V (Automatic Identification) |
| Обмеження струму | 40А |
| Вихідна потужність | 1000 Вт/1500 Вт/2000 Вт |
| MOS Tube | 15mos |
| Фазовий кут | Автоматична ідентифікація (60°/120°) |
| Тип гальма | Low Brake / High Brake |
| матеріал | Алюміній |
| Розміри (Д x Ш x В) | 9.17 x 5 x 2.05 дюйма (приблизно 233 x 127 x 52 мм) |
| вага | 0.7 кілограма |
| Включені компоненти | Контролер |
4. Компонент Завершеноview and Wiring Identification
The ChongXiao Universal Brushless Controller features a robust aluminum casing for heat dissipation and a comprehensive wiring harness for various connections. Below are images illustrating the controller and its labeled wires.

Image: The ChongXiao Universal Brushless Controller, showcasing its main body and the array of colored wires extending from it, ready for connection.

Зображення: Крупний план view of the product label on the controller, detailing specifications such as battery voltage, current limit, brake type, and phase angle.
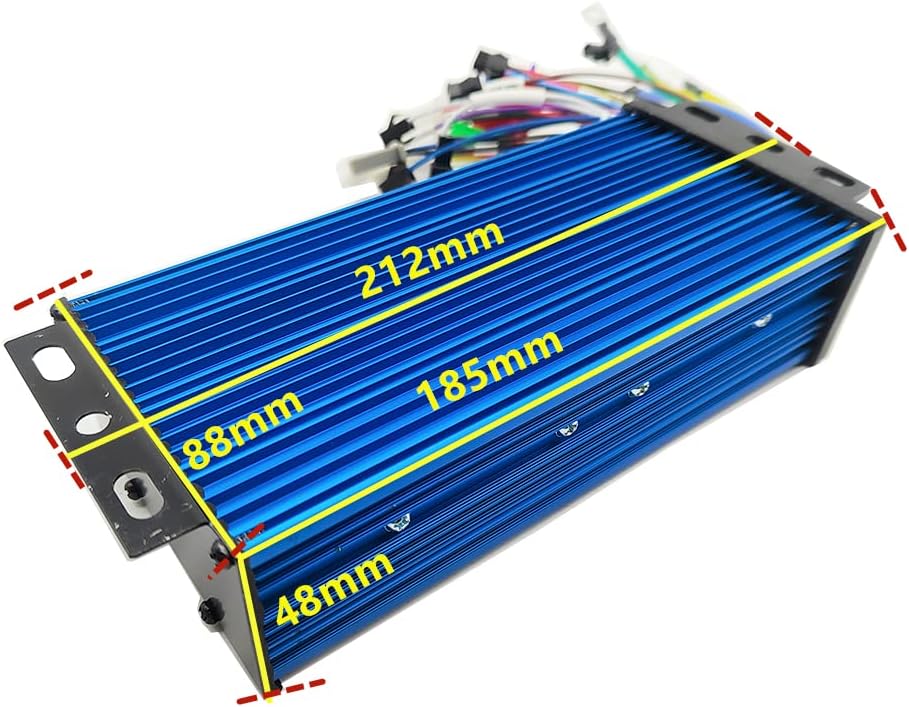
Image: The controller with overlaid measurements indicating its length (212mm), width (88mm), and height (48mm), providing a clear understanding of its physical size.

Image: A detailed diagram showing the controller's wiring harness with each wire and connector clearly numbered and labeled for identification and connection purposes.
For a visual guide to the controller and its wiring, please refer to the video below:
Video: This video provides an unboxing and detailed display of the controller's packaging and its various labeled wires, offering a clear visual reference for component identification.
Wiring List:
- Hall Sensor Wires
- Cruise Function Wire
- Hall Meter Wire
- Intelligent Recognition (Self-Learning) Wires
- High Level Brake Wire
- Phase Meter Wire
- PAS (Pedal Assist System) Wire
- Reverse Function Wire
- Multiple Data Meter Wire
- Low Level Brake Wire
- Speed Control Handle (Throttle) Wires
- Electric Door Lock Wire
- Three Speed Control Wires
- Anti-Theft Alarm Signal Wire
- Anti-Theft Alarm Power Wire
- Motor Phase Lines (3 wires)
- Battery Power Lines (Red: Battery+, Black: Battery-)
5. Посібник із встановлення
Follow these steps carefully to connect your brushless controller. Ensure all power is disconnected before beginning installation.
- Connect Motor Phase Lines: Connect the three motor phase lines from the controller to the corresponding motor phase lines. Ensure color-to-color matching (e.g., blue to blue, green to green, yellow to yellow).
- Connect Battery Lines: Connect the main battery power lines. The red wire from the controller connects to the battery positive (+) terminal, and the black wire connects to the battery negative (-) terminal.
- Connect Throttle and Electric Door Lock: Connect the controller's throttle wires to the throttle unit, ensuring color-to-color matching. Connect the controller's electric door lock wire to the throttle's electric door lock wire. If your throttle does not have an electric door lock, ensure the controller's electric door lock wires are connected (e.g., looped or connected to a power source as required by the specific setup).
- Підключення проводів датчика Холла: Connect the Hall sensor wires from the controller to the motor's Hall sensor wires. If your motor does not have Hall sensor wires, this connection is not required.
- Perform Self-Learning (Intelligent Recognition): Connect the two self-learning wires (often labeled for intelligent recognition). The wheel will either move forward or reverse.
- If the wheel moves forward correctly, disconnect the self-learning wires.
- If the wheel moves in reverse, disconnect the self-learning wires, then reconnect them again. The wheel should now move forward. Once it moves forward, disconnect the self-learning wires.
- Підключення інших функцій: Connect other functional wires as needed, such as brake wires (low or high level), PAS (pedal assist), cruise, three-speed, anti-theft alarm, and meter connections. Functions not in use do not need to be wired.
For a visual demonstration of connecting a controller, please watch the video below:
Video: This video demonstrates the process of connecting an electric bike controller to a motor and battery, providing a practical guide for installation.
6. Інструкція з експлуатації
Once the controller is correctly installed and all connections are secure, you can operate your electric scooter or e-bike. The controller manages power delivery to the motor based on your input from the throttle and other connected accessories.
- Увімкнення: Ensure the battery is charged and connected. Turn on the electric door lock or main power switch.
- Керування дросельною заслінкою: Gently twist the speed control handle (throttle) to accelerate. The controller will regulate motor speed accordingly.
- Гальмування: Apply the brakes. The controller supports both low and high-level brake signals, which will cut power to the motor when activated.
- PAS (Pedal Assist): If connected, the pedal assist system will provide motor power when you pedal, enhancing your riding experience.
- Three-Speed Function: If connected, use the three-speed switch to select different speed modes (e.g., low, medium, high) for varied riding conditions.
- Функція круїзу: If connected, activate the cruise function to maintain a constant speed without continuous throttle input.
7. Технічне обслуговування
Правильне обслуговування забезпечує довговічність та оптимальну роботу вашого контролера.
- Зберігати сухим: Protect the controller from water and excessive moisture. While the aluminum casing offers some protection, it is not fully waterproof.
- Чистити регулярно: Periodically clean the exterior of the controller to prevent dust and dirt buildup, which can affect heat dissipation. Use a dry, soft cloth.
- Перевірте підключення: Regularly inspect all wire connections to ensure they are secure and free from corrosion or damage. Loose connections can lead to intermittent operation or component failure.
- Уникайте перегріву: Ensure the controller has adequate airflow, especially during prolonged use or high-power demands. The ribbed aluminum design aids in heat dissipation.
- Обережно поводьтеся: Avoid dropping or subjecting the controller to strong impacts, which can damage internal components.
8. Вирішення проблем
If you encounter issues with your controller, consider the following common troubleshooting steps:
- Немає живлення: Check battery connections and ensure the electric door lock/power switch is engaged. Verify battery voltage знаходиться в межах робочого діапазону контролера.
- Двигун не реагує: Ensure all motor phase lines and Hall sensor wires (if applicable) are correctly connected. Re-perform the self-learning procedure. Check throttle connections.
- Переривчаста робота: Inspect all wiring for loose connections, frayed wires, or corrosion. Ensure the controller is not overheating.
- Incorrect Wheel Direction: If the wheel spins in the wrong direction, re-perform the self-learning procedure as described in the installation guide.
- Гальма не працюють: Verify brake lever connections and ensure the brake signal wires are properly connected to the controller.
If problems persist after attempting these steps, consult a qualified technician.
9. Гарантія та підтримка
This product does not come with a manufacturer's warranty. For any technical inquiries or support, please refer to the retailer or platform where the product was purchased.