
1. Вступ
This manual provides detailed instructions for the setup, operation, maintenance, and troubleshooting of your Volcora 80mm Thermal Receipt Printer. This printer is designed for Point-of-Sale (POS) applications, offering fast and efficient thermal printing with an auto-cutter. It supports USB and Ethernet connectivity and is compatible with Android, Windows, and Linux operating systems.
2. Інформація про безпеку
- Переконайтеся, що принтер підключено до заземленої розетки.
- Не піддавайте принтер впливу води або надмірної вологості.
- Уникайте розміщення принтера під прямими сонячними променями або поблизу джерел тепла.
- Use only the power adapter provided with the printer.
- Тримайте принтер подалі від дітей.
- Не намагайтеся розбирати або ремонтувати принтер самостійно. Зверніться до служби підтримки клієнтів для отримання допомоги.
3. Вміст упаковки
Перевірте наявність усіх елементів в упаковці:
- Volcora 80mm Thermal Receipt Printer
- Шнур живлення
- USB кабель
- Test Paper Roll
- Інсталяційний компакт-диск

Figure 3.1: Package Contents. The image displays the Volcora Thermal Receipt Printer along with its accessories: a power cord, a USB cable, a roll of test paper, and an installation CD.
4. Продукт закінчивсяview
4.1. Порти та кнопки
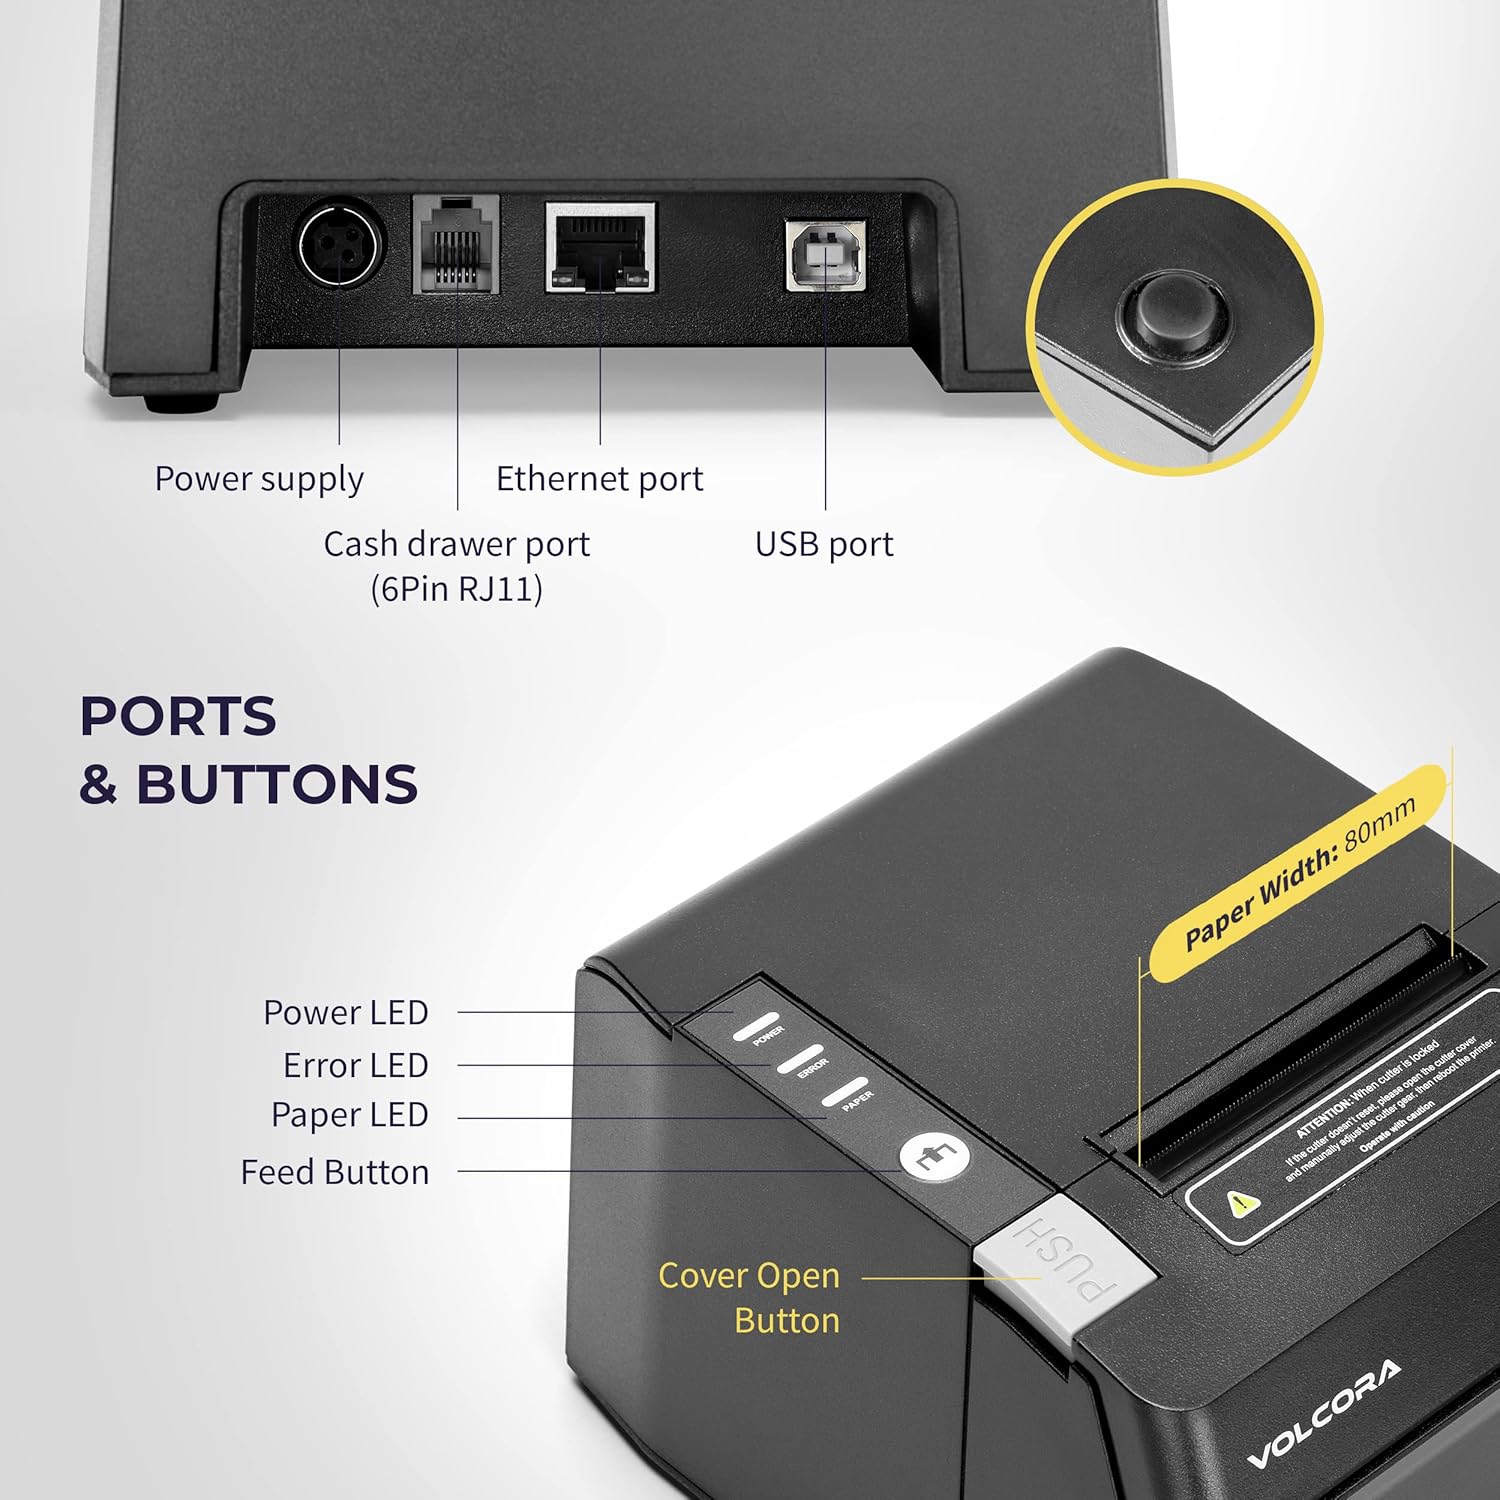
Figure 4.1: Printer Ports and Buttons. This image illustrates the rear ports including Power Supply, Ethernet Port, Cash Drawer Port (6Pin RJ11), and USB Port. It also shows the front panel with Power LED, Error LED, Paper LED, Feed Button, and Cover Open Button.
- Порт живлення: Підключається до адаптера живлення.
- Порт Ethernet: For network connectivity (LAN).
- Cash Drawer Port (6Pin RJ11): Connects to a cash drawer.
- Порт USB: Для прямого підключення до комп'ютера.
- Світлодіод живлення: Вказує на стан живлення.
- Світлодіод помилки: Indicates printer errors.
- Paper LED: Indicates paper status (e.g., low paper).
- Кнопка подачі: Manually feeds paper.
- Cover Open Button: Releases the printer cover to access the paper roll.

Рисунок 4.2: Множинні views of the Volcora Thermal Receipt Printer, showing its compact design and various connection points.
5. Налаштування
5.1. Unboxing and Connecting
- Розпакуйте принтер і видаліть усі пакувальні матеріали.
- Підключіть адаптер живлення до принтера, а потім до розетки.
- Connect the printer to your Windows PC using the provided USB cable.
Video 5.1: Getting Started with Volcora Thermal Receipt Printer. This video demonstrates the unboxing, connecting the printer to power and a Windows PC via USB, and performing a self-test.
5.2. Встановлення рулону паперу
- Press the Cover Open Button to open the printer cover.
- Insert the thermal paper roll with the printing side facing up.
- Pull a small length of paper out past the cutter.
- Щільно закрийте кришку принтера, доки вона не зафіксується на місці.
5.3. Driver Installation (Windows)
- Download the latest driver for Windows from the Volcora support webсайт: volcora.com/support.
- Розархівуйте завантажене file і запустіть інсталятор драйвера.
- Follow the on-screen prompts, agreeing to the license and selecting your printer model (e.g., 500108).
- Ensure the printer is connected via USB during installation.
- After successful installation, the printer should be recognized in your computer's "Printers & scanners" settings.

Figure 5.2: Easy Installation Steps. This diagram outlines the four main steps: Download drivers, Install drivers, Connect the printer, and Test print.
5.4. Network Configuration (Ethernet)
If you are using the Ethernet connection, you may need to configure the printer's IP address to match your network's subnet. This can be done using the Setting Tool software.
- First, identify your PC's IP address and subnet mask.
- Perform a printer self-test (see Section 6.2) to get the printer's current IP address.
- If the printer's IP is not in the same subnet as your PC, you will need to adjust either the PC's IP or the printer's IP.
- Open the Setting Tool software (available from volcora.com/support).
- Select the printer model and choose 'NET' for the port type.
- Enter the printer's current IP address and click 'Get Param' to retrieve its network settings.
- Modify the IP address, subnet mask, and gateway to align with your network configuration.
- Click 'Set' to apply the new settings to the printer.
- Perform another self-test to confirm the IP address has been updated.
Video 5.2: How to Modify LAN IP Address of Volcora Receipt Printer. This video guides you through identifying current IP addresses, changing PC host IP, and using the Setting Tool to configure the printer's IP address for Ethernet connectivity.
5.5. Варіанти розміщення

Figure 5.3: Multiple Use & Placement. The printer can be wall-mounted for kitchen use or placed on a counter for receipt printing.
6. Інструкція з експлуатації
6.1. Базовий друк
Once the printer is connected and drivers are installed, you can print receipts from your POS software or any application that supports printing. The printer features a 203 dpi resolution for clear prints and an auto-cutter for efficient receipt handling.

Figure 6.1: Efficient Printing. This image highlights the printer's fast print speed, low noise operation, and clear 203 dpi output, showing a receipt with a QR code and a barcode.
The printer supports various barcode types including UPC-A, UPC-E, EAN13, EAN8, CODE39, ITF25, CODABAR, CODE93, CODE128, QRCODE, PDF417, and Data matrix.
6.2. Printer Self-Test
A self-test prints the printer's configuration, including its IP address (if connected via Ethernet), and confirms basic functionality.
- Переконайтеся, що принтер вимкнено.
- Press and hold the "Feed" button.
- While holding the "Feed" button, power on the printer.
- Continue holding the "Feed" button for approximately 5 seconds until the self-test page begins to print.
6.3. Сумісність
The Volcora Thermal Receipt Printer is compatible with various POS systems and operating environments. It supports ESC/POS commands.

Figure 6.2: Printer Compatibility. This chart lists compatible POS systems such as Loyverse, SumUp, Gloria Food, FoodZaps, TabShop POS, POSAPP.vn POS, Olsera POS, and KaHero POS. It also lists systems that are not compatible, including Square, Toast, Ubereats, Grubhub, Doordash, Postmates, Clover, and Shopify.
Сумісні операційні системи: Android, Windows, Linux. (Note: A software development kit (SDK) is required for custom application development on Ethernet-supported systems, including Windows, Linux, and MAC.)
Не сумісний з: Delivery platforms or POS applications such as Ubereats, Grubhub, Doordash, Postmates, Square, Clover, or Shopify. Does not offer Bluetooth or WiFi printing options.

Figure 6.3: Detailed Compatibility Table. This table shows compatibility for USB and Serial connections across various operating systems (Windows, Mac OS, Linux, Android, iOS) and notes about SDK and ESC/POS commands.
7. Технічне обслуговування
7.1. прибирання
- Регулярно очищуйте зовнішню частину принтера м’якою губкоюamp тканина.
- To clean the thermal print head, use an alcohol swab. Ensure the printer is off and cool before cleaning.
- Remove any paper dust or debris from the paper path.
8. Вирішення проблем
8.1. Поширені проблеми та їх вирішення
| проблема | Можлива причина | Рішення |
|---|---|---|
| Принтер не відповідає | Power issue, loose cable, driver not installed. | Check power connection. Ensure USB/Ethernet cable is securely connected. Verify driver installation (Section 5.3). |
| Blank pages or faint print | Thermal paper loaded incorrectly, print head dirty. | Reload paper with the thermal side facing up. Clean the thermal print head (Section 7.1). |
| Зминання паперу | Incorrect paper loading, foreign object. | Open the cover, remove jammed paper, and ensure proper loading. Remove any obstructions. |
| Проблеми з підключенням до Ethernet | Incorrect IP address configuration. | Perform a self-test to check the printer's IP. Use the Setting Tool to configure the IP address to match your network (Section 5.4). |
| Printer not compatible with POS software | Software not supported. | Refer to the compatibility list (Section 6.3). Contact your POS software provider for compatibility information. |
For further assistance, refer to the Volcora support center or contact customer service.
9. Технічні характеристики
| Особливість | Деталь |
|---|---|
| Бренд | Волкора |
| Номер моделі | 500108 |
| Технологія друку | Теплові |
| Швидкість друку | До 220 мм/с |
| Роздільна здатність друку | 203 dpi |
| Ширина паперу | 80 мм (3 1/8 дюйма) |
| Ширина друку | 72 мм |
| Інтерфейс | USB, Ethernet (LAN), Cash Drawer (RJ11) |
| Термін служби автоматичного різака | 1.5 мільйона скорочень |
| Вхідна потужність | Змінний струм 110 В/240 В, 50-60 Гц |
| Вихідна потужність | Постійний струм 24 В/2 А |
| Розміри продукту | 7"D x 6"W x 4.5"H (approx. 16 x 4 x 16 inches as per some specs) |
| Вага товару | 3.76 фунта |
| Підтримувані штрих-коди | UPC-A, UPC-E, EAN13, EAN8, CODE39, ITF25, CODABAR, CODE93, CODE128, QRCODE, PDF417, Data matrix |
| Команда принтера | ESC/POS |
10. Гарантія
This Volcora Thermal Receipt Printer comes with a Обмежена гарантія. Please refer to the warranty card included in your package or visit the Volcora support webсайт для детальних умов.
11. Підтримка клієнтів
For additional assistance, troubleshooting, or to download drivers and tools, please use the following resources:
- Volcora Help Portal: https://help.volcora.com
- Download Support Center: https://volcora.com/support
- Електронна адреса служби підтримки клієнтів: support@volcora.com
Our U.S. based customer support team is available to assist with any integration issues.