
Kaleinavi 03
Kaleinavi 6-Channel Industrial Wireless Remote Control System
Model: 03 - User Instruction Manual
вступ
This manual provides detailed instructions for the installation, operation, and maintenance of your Kaleinavi 6-channel industrial wireless remote control system. This system is designed for reliable wireless control of various electrical devices, such as lights, electric doors, motors, and other industrial equipment, operating on DC12V, 24V, or 36V.
The system consists of a receiver unit and a remote control transmitter. It utilizes RF technology for stable signal transmission over distances up to 300 meters in open environments.

Зображення: Оверview of the Kaleinavi 6-Channel Industrial Wireless Remote Control System, featuring the green receiver board with its antenna and the yellow handheld remote control unit.
Вміст упаковки
- 1 x Receiver Unit (with protective cover)
- 1 x Remote Control Transmitter (with pre-installed battery)
Технічні характеристики
| Особливість | опис |
|---|---|
| Робочий випtage | Постійний струм 12 В - 36 В |
| Струм спокою | Менше 10 мА |
| Робочий струм | 30mA (per relay) |
| Робоча температура | від -40°C до +80°C |
| Чутливість прийому | Більше -105 дБм |
| Робоча частота | 433 МГц |
| Максимальне навантаження | 10A Relay (Resistive load less than 8A, Inductive load less than 3A) |
| Розмір друкованої плати | 87 мм x 92.6 мм x 16.4 мм |
| Розмір корпусу | 90 мм x 115 мм x 40 мм |
| Віддалена відстань | Up to 300m (in open field) |
| Кількість каналів | 6 каналів |
Налаштування та підключення
Before connecting the receiver, ensure that the power supply is disconnected to prevent electrical shock or damage to the device. The receiver supports a wide voltage input from DC12V to 36V.

Зображення: Детальне view of the receiver's circuit board, highlighting the six blue relays and various electronic components.
Схема підключення
The receiver provides dry contact relay outputs (NO, NC, COM) for each channel. Connect your devices according to the desired functionality. Below is a general wiring diagram for connecting loads.

Image: A schematic diagram illustrating how to connect DC 12-36V power and six independent loads to the receiver's terminal blocks.
Важливо: If you are unsure about the wiring process, it is recommended to consult a qualified electrician or contact customer support for assistance.
Режими роботи
The receiver supports multiple working modes, which determine how the relays respond to remote control button presses. These modes can be set during the learning process.
- Миттєвий режим:
Press and hold a transmitter button (e.g., A), the corresponding receiver relay (A) turns ON. Release the button, and the relay (A) turns OFF. This applies to all channels (B, C, D, etc.).
- Режим перемикання:
Press a transmitter button (e.g., A) once, the corresponding receiver relay (A) turns ON. Press the same button (A) again, and the relay (A) turns OFF. This applies to all channels (B, C, D, etc.).
- Режим фіксації:
Press a transmitter button (e.g., A), the corresponding receiver relay (A) turns ON, and all other relays (B, C, D, etc.) turn OFF. Press another transmitter button (e.g., D), the receiver relay (D) turns ON, and relays A, B, C turn OFF. Only one relay can be ON at a time.
Combined Working Modes
The system also supports combined working modes, allowing different behaviors for different sets of channels:
- 1-6CH Momentary
- 1-6CH Latched
- 1-6CH Toggle
- 1-3CH Momentary, 4-6CH Toggle
- 1-3CH Momentary, 4-6CH Latched
- 1-3CH Latched, 4-6CH Toggle
Programming (Learning Way and Steps)
To pair the remote control with the receiver and set the desired working mode, follow these steps:
- Увійти в режим навчання: Press the "Learning Button" on the receiver board. The buzzer will start beeping continuously, indicating that the receiver has entered learning mode.
- Виберіть режим роботи: On the remote control, press the button corresponding to the desired working mode (e.g., "1" for 1-6CH Momentary, "2" for 1-6CH Latched, "3" for 1-6CH Toggle, etc.).
- Підтвердити навчання: The buzzer on the receiver will emit three "Be Be Be" sounds, indicating successful learning. After this, you can press the transmitter button, and you should hear the relay actuate. The receiver will automatically exit learning mode if no action is taken within 32 seconds.
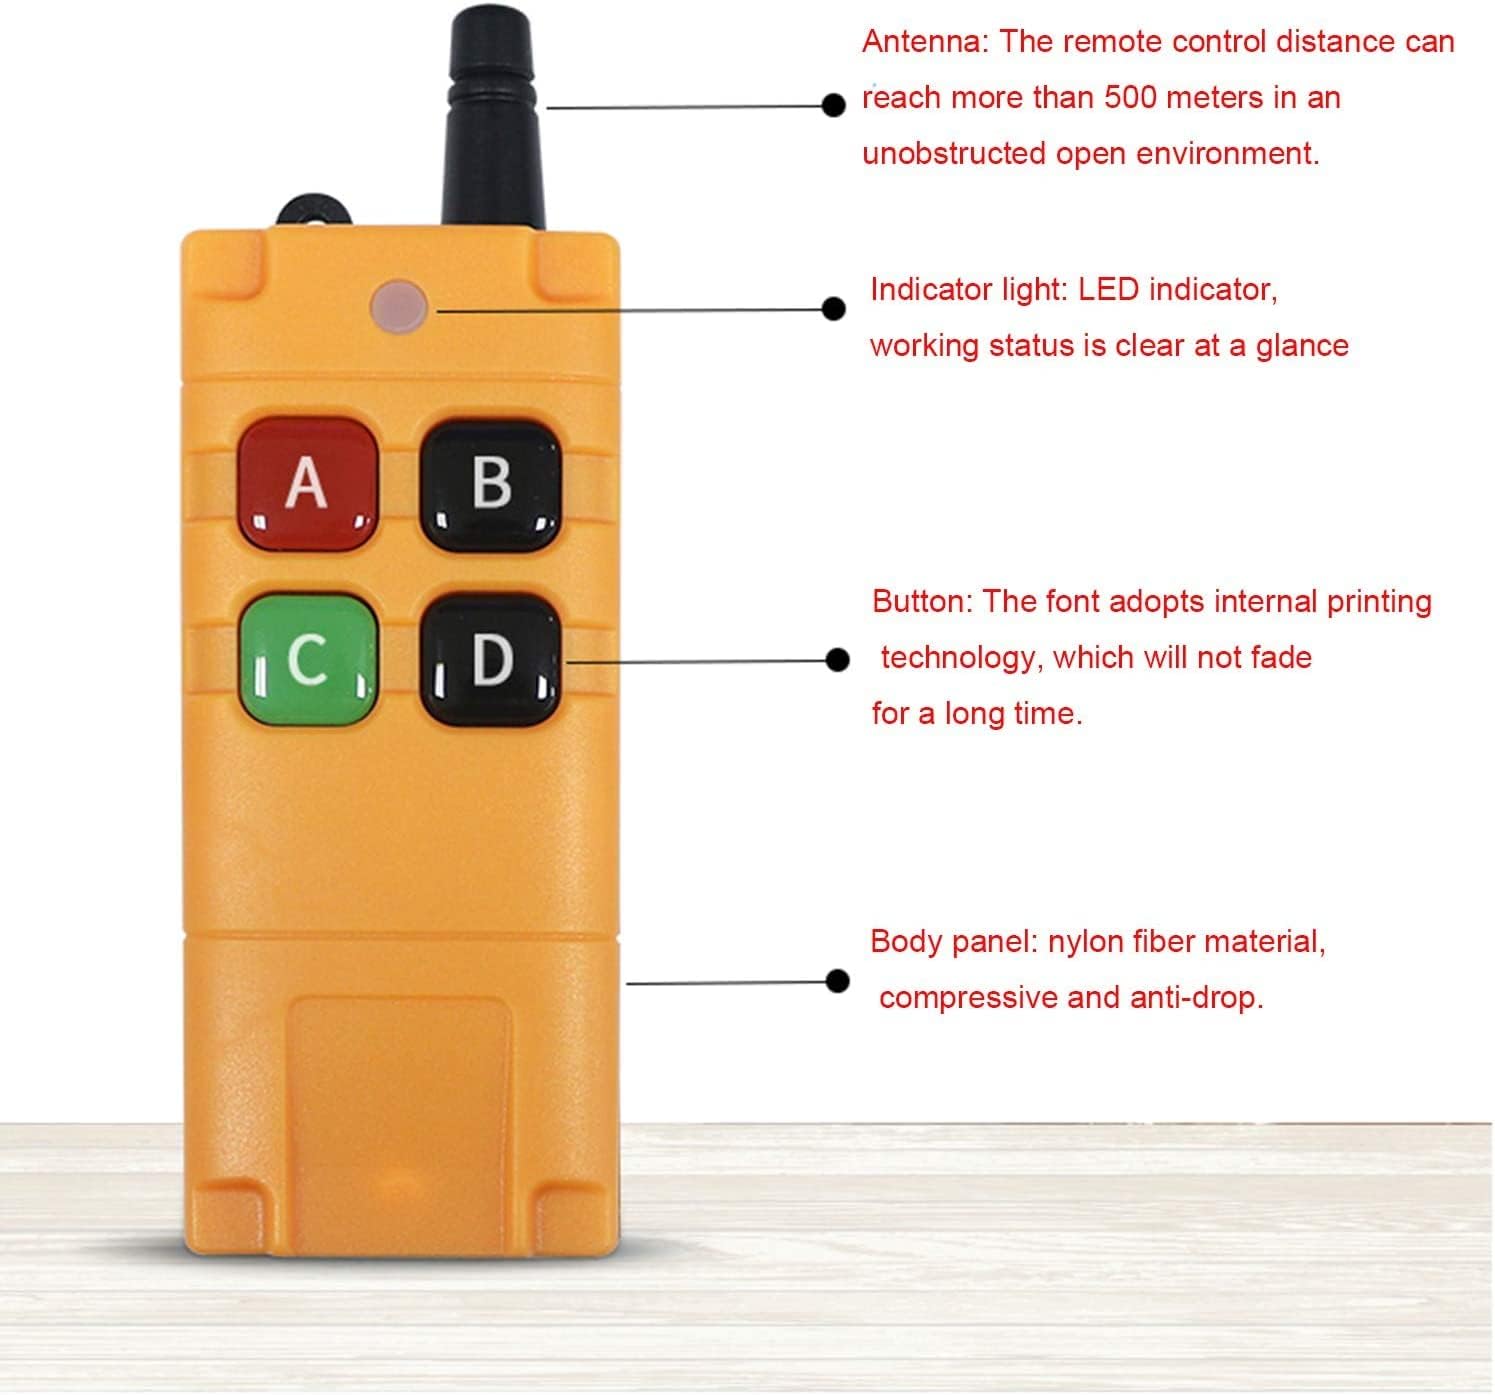
Image: Features of the remote control, including the antenna for extended range, an indicator light for operational status, and durable buttons with internal printing.
Delete Memory Message (Clear Codes)
It is necessary to clear existing codes before learning a new working mode or pairing with a different remote control. To delete all stored memory messages from the receiver:
- Initiate Deletion: Press and hold the "Learning Button" on the receiver.
- Confirm Deletion: The buzzer will beep continuously. Continue holding the button until the buzzer emits a "Be Be Be Be" sound (four beeps). Release the button immediately after these four beeps. Do not wait for six beeps.
- Перевірка: All previously learned remote control codes are now deleted. The receiver is ready to learn new codes.
Технічне обслуговування
To ensure the longevity and optimal performance of your Kaleinavi remote control system, follow these maintenance guidelines:
- Прибирання: Use a soft, dry cloth to clean the receiver and remote control. Avoid using harsh chemicals or abrasive cleaners.
- Середовище: Store and operate the device in a dry environment, away from extreme temperatures, direct sunlight, and excessive dust.
- Заміна батарейки (пульт дистанційного керування): The remote control uses a 9V battery. When the indicator light dims or the range decreases, replace the battery.

Зображення: Внутрішнє view of the remote control's battery compartment, illustrating the placement of the 9V battery and the sealing ring for dust and water resistance.
- Timeout Protection (Remote Control): The remote control features a timeout protection function. If there is no operation for 10 minutes, the remote will automatically turn off to conserve battery life. To turn it on, press and hold any two buttons (e.g., A and B) for 0.5 seconds.
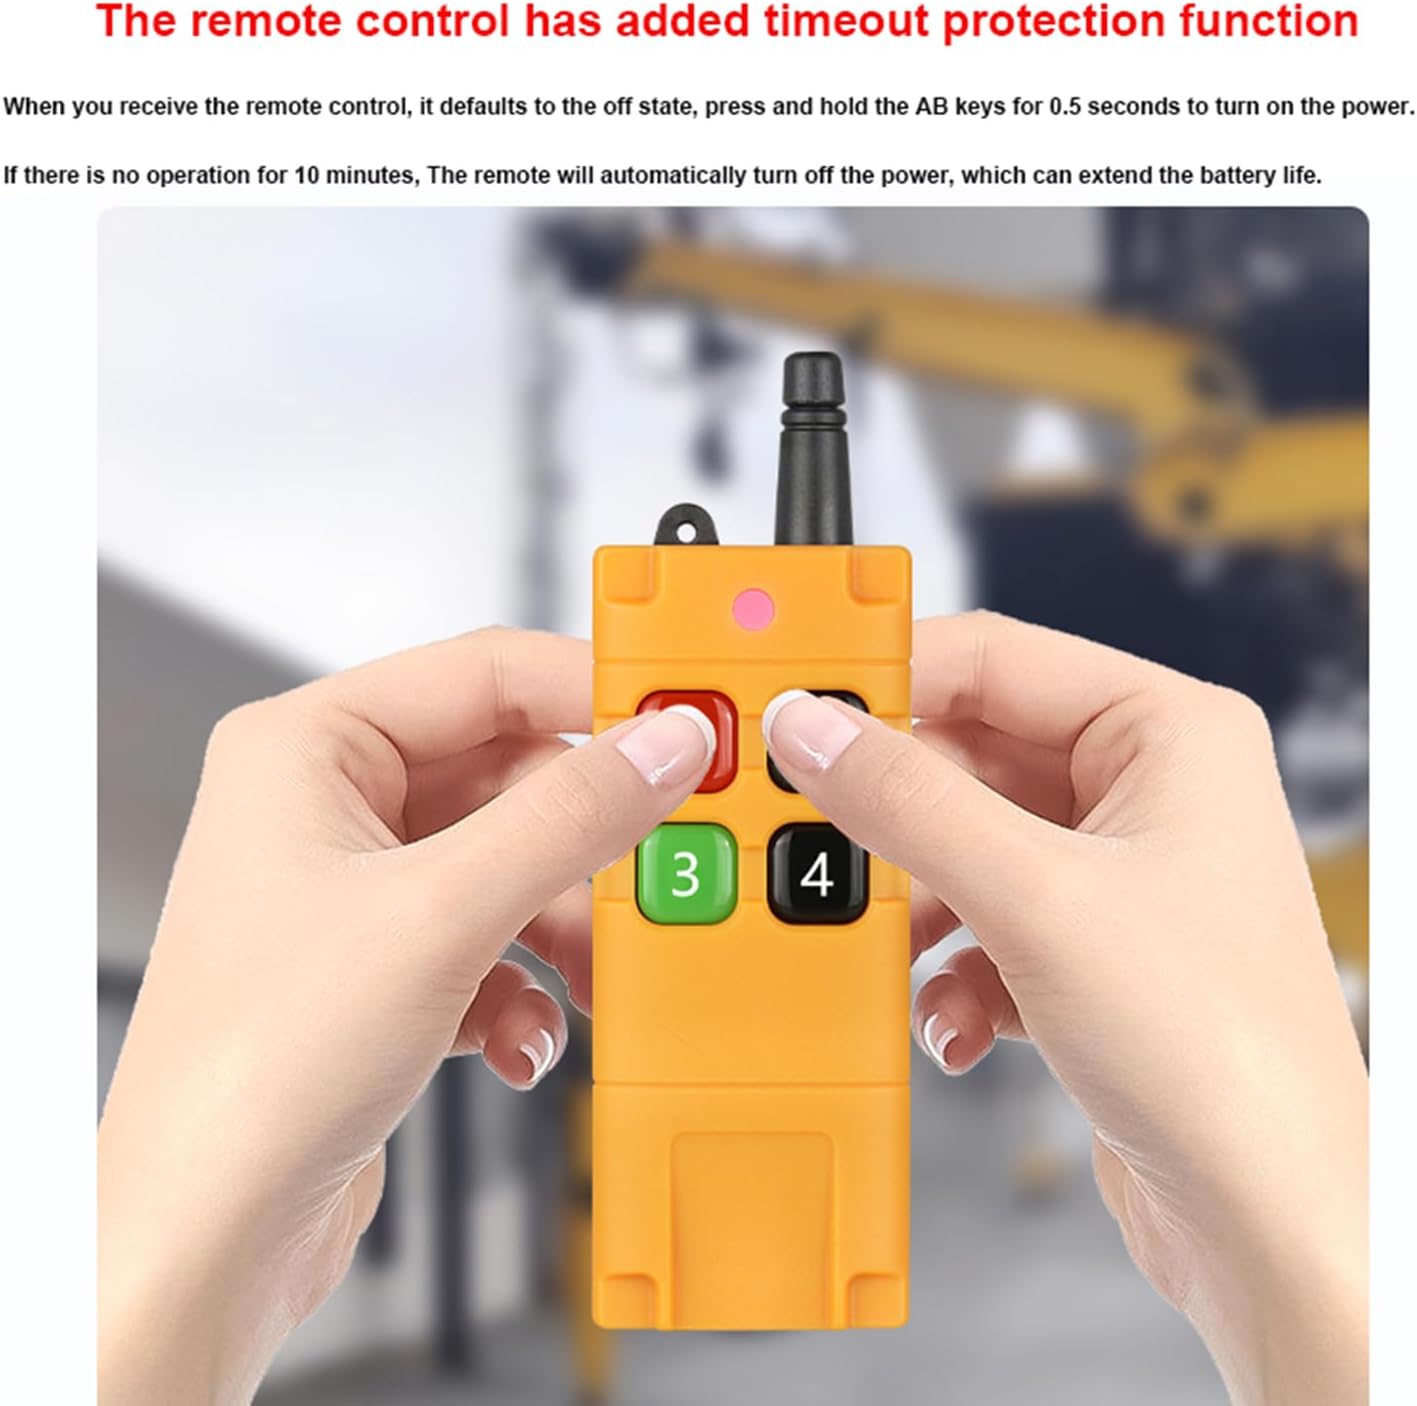
Image: A user's hands holding the remote control, illustrating the timeout protection feature which helps extend battery life by automatically powering off after 10 minutes of inactivity.
Усунення несправностей
If you encounter issues with your remote control system, refer to the following common problems and solutions:
- Система не відповідає:
- Check if the receiver is powered correctly (DC12V-36V).
- Переконайтеся, що батарейка пульта дистанційного керування не розряджена. За потреби замініть її.
- Verify that the remote control is turned on (if it has timed out, press and hold two buttons for 0.5 seconds).
- Confirm that the remote control is properly paired with the receiver. If not, follow the "Programming" steps.
- Зменшений радіус дії пульта дистанційного керування:
- Перевірте батарейку пульта дистанційного керування.
- Ensure there are no significant obstacles (thick walls, metal structures) between the remote and the receiver.
- Уникайте джерел сильних електромагнітних перешкод.
- Ensure the receiver's antenna is properly connected and positioned.
- Relays Not Actuating Correctly:
- Verify the wiring connections to the relays (NO, NC, COM).
- Check the load connected to the relay; ensure it does not exceed the maximum load specifications (10A, resistive load < 8A, inductive load < 3A).
- Confirm the working mode is set as desired (Momentary, Toggle, Latched). If unsure, clear codes and reprogram.
- Cannot Program New Remote:
- Ensure you have cleared all previous codes before attempting to learn new ones.
- Follow the "Programming" steps precisely, paying attention to the buzzer sounds.
Гарантія та підтримка
This product comes with a one-year warranty from the date of purchase. The warranty covers defects in materials and workmanship under normal use.
For technical assistance, troubleshooting, or warranty claims, please contact Kaleinavi customer support. When contacting support, please have your product model number (03) and purchase details available.
Контактна інформація: Please refer to your purchase documentation or the seller's contact details on the platform where you purchased the product.
Ask a question about this manual
Ask about setup, troubleshooting, compatibility, parts, safety, or missing instructions. Manuals+ will review the question and use this page’s manual context to help answer it.