
вступ
This manual provides detailed instructions for the setup, operation, and maintenance of your Dcorn DMR-07 7-inch HDMI Digital Microscope. Designed for a wide range of applications, from coin inspection to circuit board repair, this microscope offers up to 1300X magnification and a 16MP camera for clear, detailed viewing. Please read this manual thoroughly before using the device to ensure proper functionality and longevity.
Вміст упаковки
Перевірте, чи всі перелічені нижче предмети входять до вашої упаковки:
- 7-inch LCD Display Microscope
- Металева основа
- Металева підставка
- 3 Guidebooks (e.g., A Guide to Coin Collection, How to Solder)
- Бездротовий пульт дистанційного керування
- Кабель HDMI
- 32 Гб картки TF
- Світловий бар'єр
- Подарункова коробка
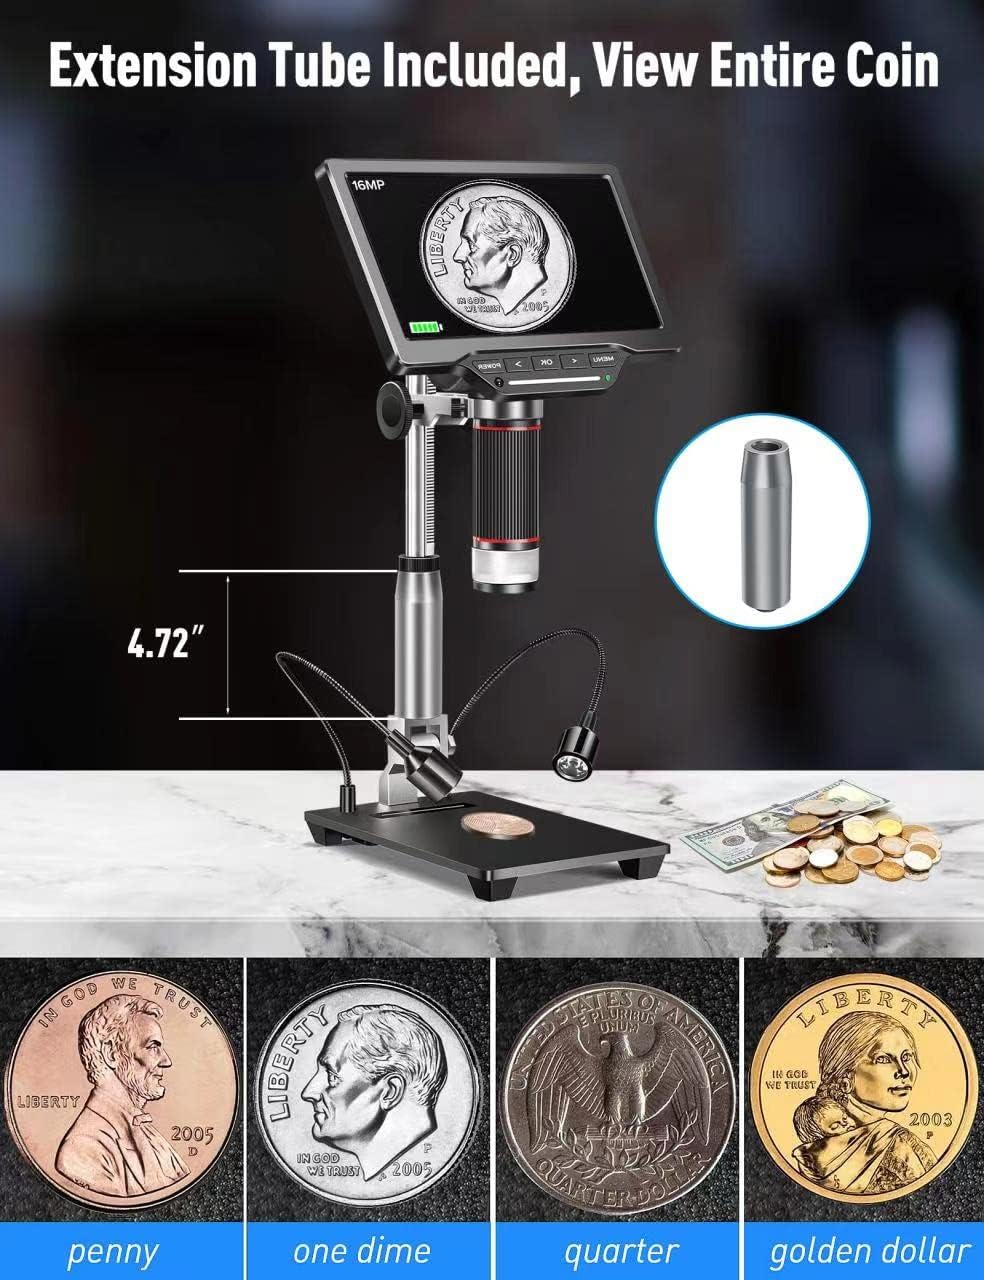
- Extension Tube (4.7 inches)
- Зарядний пристрій
- Посібник користувача (цей документ)

Налаштування
1. Assembling the Stand and Microscope
- Attach the metal stand to the metal base. Secure it firmly using the provided knob.
- Mount the microscope unit onto the adjustable bracket on the metal stand. Ensure it is securely fastened.
- If extended working distance is required, insert the 4.7-inch extension tube between the microscope lens and the main body. This allows for a wider field of view, ideal for observing entire coins.
2. Connecting External LED Lights
The two external LED lights provide additional illumination for your specimens. Connect the Type-C end of the light cables to the USB output ports on the microscope base.
3. Увімкнення
Connect the power adapter to the microscope and a power outlet. Press the 'POWER' button on the microscope to turn it on. The 7-inch LCD display will illuminate.
4. Video: How to Install
Відео 1: A step-by-step guide demonstrating the physical assembly of the Dcorn DMR-07 Digital Microscope, including attaching the stand, microscope unit, and optional extension tube.
Інструкція з експлуатації
1. Базовий Viewі фокусування
- Place the specimen on the observation platform.
- Adjust the height of the microscope unit using the knob on the stand until the specimen appears on the screen.
- Rotate the focus wheel on the microscope body to achieve a clear and sharp image.

2. Регулювання світлодіодних ламп
The microscope features built-in LEDs and two adjustable side lights. The side lights are controlled via touch-sensitive areas on the base.
- Вбудовані світлодіоди: These provide primary illumination.
- Бокові вогні: Touch the designated areas on the base to turn the side lights on/off and adjust their brightness. These are useful for reducing glare and enhancing contrast on reflective surfaces.
3. Video: 10 LEDs - Touch Control
Відео 2: Demonstration of the touch-controlled 10 LED lighting system on the Dcorn DMR-07 Digital Microscope.
4. Зйомка фотографій і відео
The microscope supports capturing still images and recording video footagбезпосередньо на карту пам'яті TF на 32 ГБ, що входить до комплекту.
- Use the 'OK' button on the microscope or the corresponding button on the wireless remote control to capture a photo or start/stop video recording.
- Navigate through the menu using the arrow buttons to select photo/video mode and adjust settings like resolution.


5. Connecting to PC and TV
The microscope offers HDMI and USB output for viewing on larger screens.
- Вихід HDMI: Connect the provided HDMI cable from the microscope's HD port to an HDMI input on a TV or monitor. This provides a direct, high-quality display.
- Вихід USB: Connect the provided USB cable from the microscope's USB port to a computer. The microscope can function as a UVC (USB Video Class) device, allowing you to view the live feed using standard camera software on your computer (Windows/Mac compatible).

6. Video: How to Connect to a PC
Відео 3: A guide demonstrating how to connect the Dcorn DMR-07 Digital Microscope to a PC and view живий корм.
Технічне обслуговування
- Очищення лінзи: Use the provided cleaning cloth or a soft, lint-free cloth to gently wipe the lens. For stubborn smudges, use a lens cleaning solution designed for optical devices.
- Очищення екрану: Протирайте РК-екран м’якою сухою тканиною. Уникайте використання абразивних засобів для чищення або розчинників.
- Загальний догляд: Keep the microscope in a clean, dry environment. Avoid exposing it to extreme temperatures, humidity, or direct sunlight. When not in use, store it in its original packaging or a protective case.
Усунення несправностей
- Немає живлення: Ensure the power adapter is securely connected to both the microscope and a working power outlet. Check if the power button is pressed.
- Розмите зображення: Adjust the focus wheel on the microscope body. Ensure the specimen is within the working distance of the lens. Clean the lens if necessary.
- No Image on External Display (HDMI/USB): Verify that the cables are correctly connected. For USB connection, ensure appropriate camera software is running on your computer and the microscope is selected as the input device.
- Світло не працює: Check the connections of the external LED lights to the base. For touch-controlled lights, ensure you are touching the correct activation area.
- Не вдається зробити фото/відео: Ensure the 32GB TF card is properly inserted and has sufficient free space. Check the menu settings to confirm the correct mode is selected.
Технічні характеристики
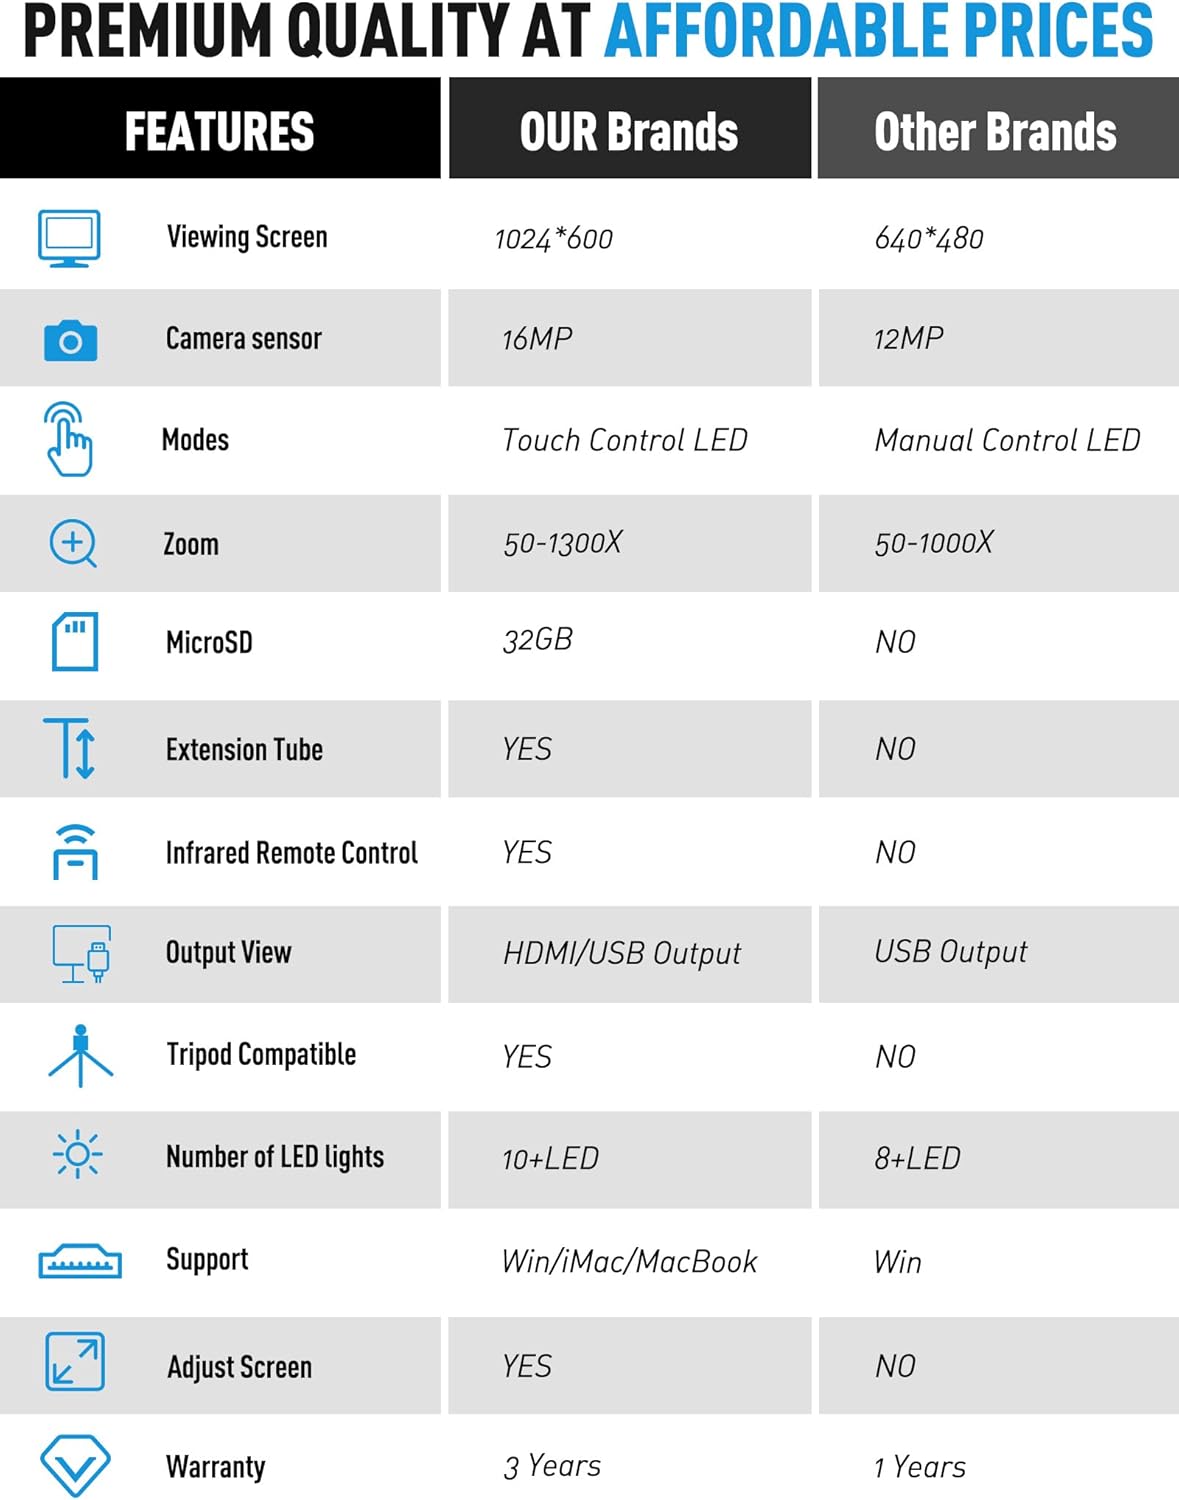
| Особливість | Специфікація |
|---|---|
| Модель | ДМР-07 |
| Розмір дисплея | 7-дюймовий РК-дисплей |
| Датчик камери | 16 МП |
| Збільшення | До 1300 разів |
| Джерело світла | LED (Built-in & Touch Control Side Lights) |
| Вихід | HDMI, USB |
| Зберігання | MicroSD (32GB TF card included) |
| Подовжувальна трубка | 4.7-inch included |
| Пульт дистанційного керування | Wireless Infrared Remote Control |
| Сумісні пристрої | Laptop, Personal Computer, Television |
| Підтримка операційної системи | Windows, Mac |
| Колір | Срібло |
| Вага товару | 4.46 фунта |
| Розміри упаковки | 11.18 x 10.94 x 3.86 дюймів |
Інформація про гарантію
The Dcorn DMR-07 Digital Microscope comes with a Гарантія 3 рік from the date of purchase. This warranty covers manufacturing defects and ensures the product meets its specified performance standards. Please retain your proof of purchase for warranty claims.
Підтримка клієнтів
For any questions, technical assistance, or support regarding your Dcorn DMR-07 Digital Microscope, please contact our customer support team:
Електронна пошта: support@dcornus.com