
PowMr ML2440
Інструкція користувача контролера сонячного заряду PowMr 40A MPPT
Модель: ML2440
1. Вступ
This manual provides essential information for the safe and efficient operation of your PowMr 40A MPPT Solar Charge Controller, model ML2440. Please read this manual thoroughly before installation and use to ensure optimal performance and longevity of the product.
2. Техніка безпеки
- Ensure all wiring is correctly connected and secured to prevent short circuits or damage.
- Always connect the battery to the charge controller first, then the solar panels, and finally the load. Disconnect in the reverse order.
- Не намагайтеся самостійно ремонтувати або модифікувати контролер. Зверніться до кваліфікованого персоналу для обслуговування.
- Встановіть контролер у добре провітрюваному приміщенні, подалі від легкозаймистих матеріалів та прямих сонячних променів.
- Використовуйте відповідні засоби індивідуального захисту (ЗІЗ) під час роботи з електричними системами.
- Переконайтеся, що система voltage matches the controller's specifications (12V/24V auto-detection).
3. Продукт закінчивсяview
The PowMr 40A MPPT Solar Charge Controller is designed to efficiently manage power from your solar panels to charge various battery types, including Lithium, Sealed, Gel, and Flooded batteries. It features Maximum Power Point Tracking (MPPT) technology for optimized solar energy harvesting, automatic 12V/24V system voltage detection, and a clear LCD display for monitoring system status.
малюнок 3.1: Фронт view of the PowMr 40A MPPT Solar Charge Controller.
This image shows the main unit of the PowMr 40A MPPT Solar Charge Controller, highlighting its compact design and integrated LCD screen.
The controller supports a maximum solar input voltage of 100V and a maximum input power of 1100W for a 24V system (550W for 12V). It also includes temperature compensation for accurate charging across varying environmental conditions.

малюнок 3.2: Temperature compensation feature.
This image illustrates the temperature compensation capability of the controller, ensuring optimal battery charging performance in both hot and cold environments.
4. Установка та підключення
Правильне встановлення є вирішальним для безпечної та ефективної роботи вашого контролера сонячного заряду. Уважно виконайте ці кроки.
4.1 Схема підключення

малюнок 4.1: Wiring diagram for the PowMr MPPT Solar Charge Controller.
This diagram illustrates the correct connection order for the battery, solar panels, DC load, and optional inverter. A temperature sensor is also shown.
4.2 Етапи підключення
- Спочатку підключіть акумулятор: Connect the battery to the charge controller's battery terminals. Ensure correct polarity. The controller will auto-detect 12V or 24V system voltage.
- Підключення сонячних панелей: Connect the solar panels to the PV input terminals. Ensure correct polarity. The controller will begin charging if sufficient sunlight is available.
- Підключення навантаження постійного струму (необов'язково): Якщо використовується навантаження постійного струму безпосередньо від контролера, підключіть його до клем навантаження.
- Connect Inverter (Optional): If using an inverter, connect it to the battery terminals (not directly to the load terminals of the controller).
- Підключення датчика температури: For accurate temperature compensation, connect the provided temperature sensor to the designated port on the controller and place the sensor near the battery.
Disconnection Order: To disconnect the system, always follow the reverse order: Disconnect load, then solar panels, then battery.
5. Інструкція з експлуатації
This section details how to monitor and configure your charge controller using its integrated LCD display and the optional Bluetooth mobile application.
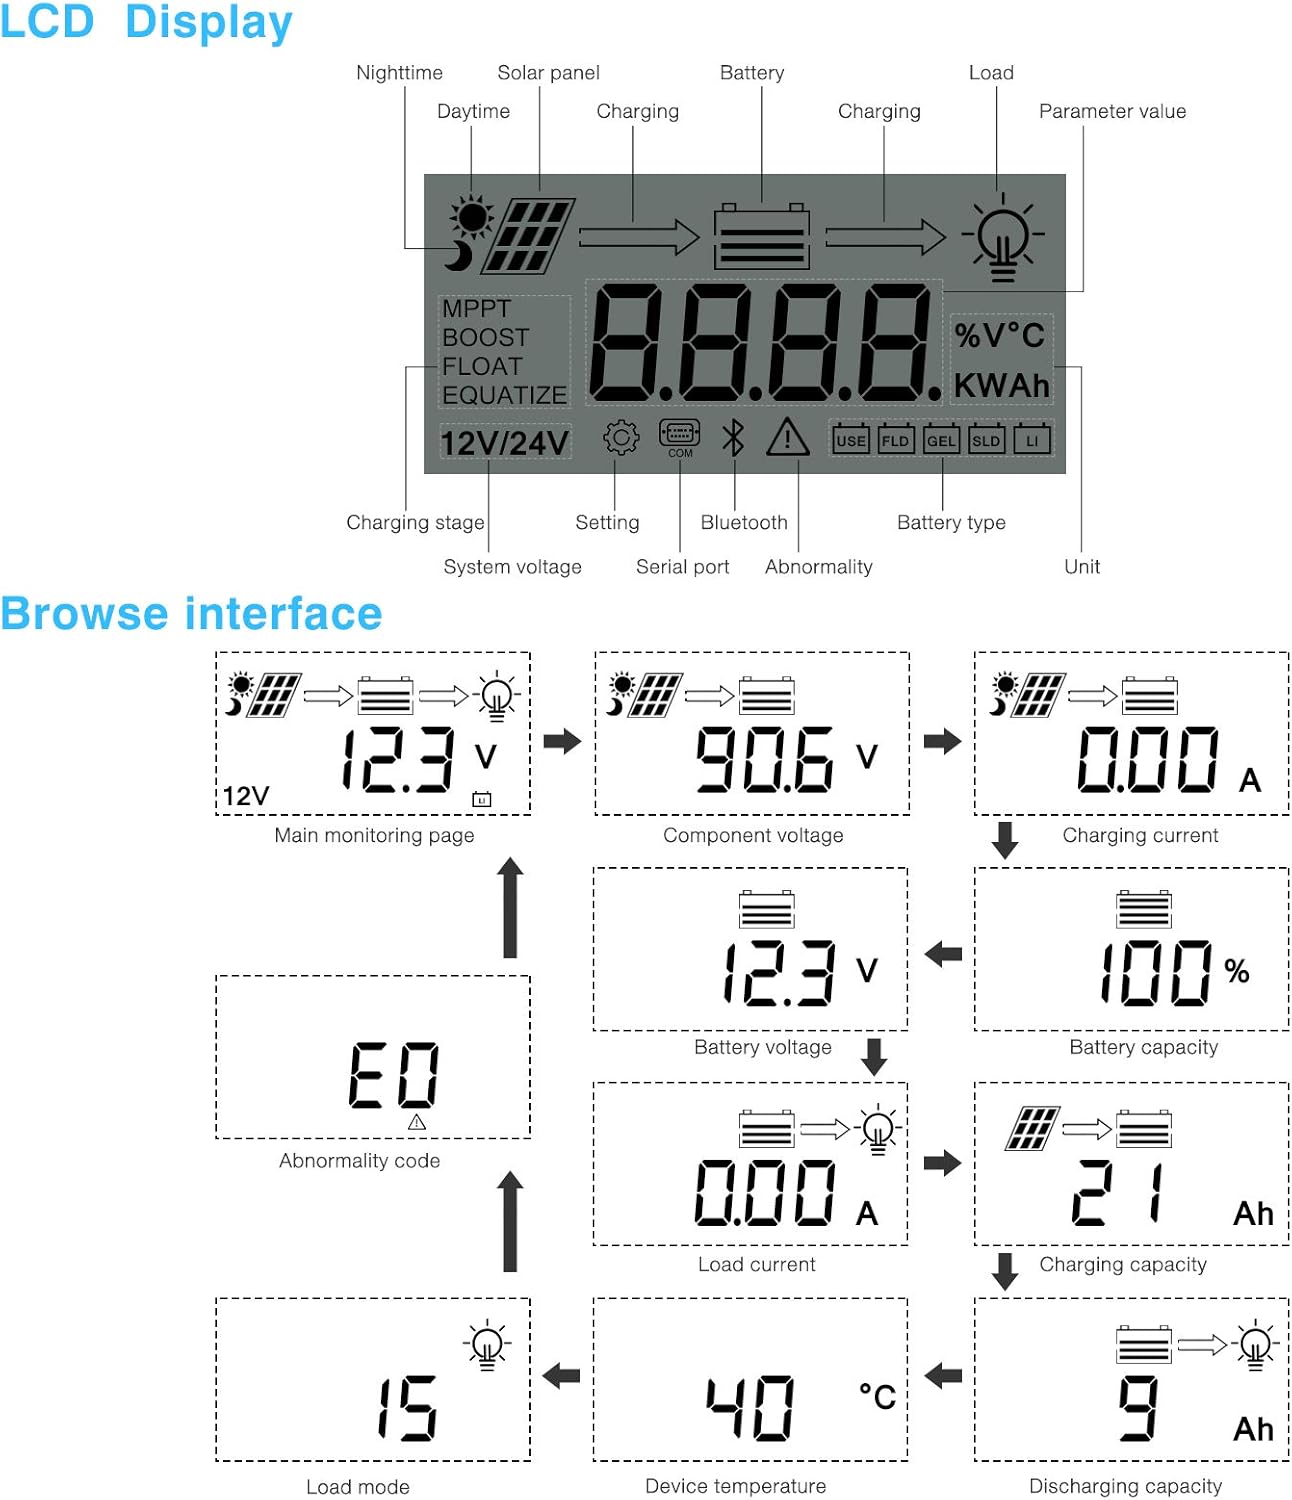
5.1 РК-дисплейview

малюнок 5.1: LCD Display and Browse Interface.
This image shows the various icons and parameters displayed on the LCD screen, along with the navigation flow through different monitoring pages.
The LCD provides real-time information about your solar system. Key indicators include:
- Зарядка Сtage: MPPT, Boost, Float, Equalize.
- System Voltage: 12V/24V auto-detected.
- Тип батареї: Icons for Lithium (Li), Sealed (SLD), Gel (GEL), Flooded (FLD).
- Індикатори стану: Solar panel activity, battery charging, load status, abnormality.
- Значення параметра: Відображає обtage, current, capacity, temperature, etc.
Use the buttons below the LCD to navigate through different screens to view parameters such as main monitoring page, component voltage, зарядний струм, об’єм батареїtage, battery capacity, load current, charging capacity, device temperature, discharging capacity, abnormality codes, and load mode.
5.2 Bluetooth Mobile Application
The controller supports an optional Bluetooth module (BT-1) for remote monitoring and parameter adjustment via a mobile application (available for Apple iOS and Android devices). The Bluetooth module connects to the RS232 port on the controller.

малюнок 5.2: Controller with optional Bluetooth module.
This image displays the PowMr MPPT Solar Charge Controller alongside its optional BT-1 Bluetooth communication module and connecting cable.

малюнок 5.3: BT-1 Bluetooth module.
Детальний view of the BT-1 Bluetooth module, which enables wireless communication with the solar charge controller for remote monitoring and settings adjustments.

малюнок 5.4: Bluetooth Mobile Interface Display.
This image shows various screens from the mobile application, including real-time monitoring, data records, energy records, and parameter settings.
The mobile application allows you to:
- Monitor real-time system data (voltage, current, power, temperature).
- View historical data and energy records.
- Adjust various charging parameters and battery settings.
- Відновити заводські налаштування за замовчуванням.
6. Технічне обслуговування
Регулярне технічне обслуговування забезпечує довговічність та оптимальну роботу вашого контролера заряду.
- Прибирання: Періодично очищуйте зовнішню частину контролера сухою ганчіркою, щоб видалити пил та сміття. Переконайтеся, що вентиляційні отвори чисті.
- Підключення: Щорічно перевіряйте всі з'єднання проводів на міцність та наявність корозії. Нещільні з'єднання можуть призвести до перегріву та погіршення роботи.
- Середовище: Переконайтеся, що середовище встановлення залишається в межах зазначеного робочого діапазону температур і не містить надмірної вологи або пилу.
7. Вирішення проблем
This section provides guidance for common issues. Refer to the LCD display for abnormality codes.
- Немає дисплея/немає живлення:
- Перевірте з'єднання акумулятора та переконайтеся, що акумулятор зарядженийtage знаходиться в робочому діапазоні.
- Verify that the battery fuse (if installed) is intact.
- Без зарядки:
- Переконайтеся, що сонячні панелі підключені правильно та отримують достатньо сонячного світла.
- Перевірте сонячну панель voltagе і струм.
- Verify that the battery is not fully charged or in a protection state.
- Навантаження не працює:
- Check load connections and ensure the load current does not exceed the controller's rating.
- Переконайтеся, що об’єм батареїtage вище низької гучностіtage disconnect (LVD) setting.
- Check for any abnormality codes on the LCD related to load output.
- Abnormality Codes (e.g., "E0"):
- Refer to the specific abnormality code displayed on the LCD. Consult the full product manual or manufacturer's support for detailed explanations and solutions for each code.
8. Технічні характеристики
Technical specifications for the PowMr 40A MPPT Solar Charge Controller (Model ML2440).

малюнок 8.1: Таблиця специфікацій продукту.
This table provides detailed technical parameters for the ML2420, ML2430, and ML2440 models. The ML2440 column is relevant for this 40A controller.
| Параметр | Value (ML2440) |
|---|---|
| Модель | ML2440 |
| Система випtage | 12В / 24В Авто |
| Втрати без навантаження | Від 0.7 до 1.2 Вт |
| Акумулятор обtage | від 9 до 35 В |
| Макс. сонячного вхідного обtage | 100 В (25°C), 90 В (-25°C) |
| Макс. потужність точки обtagе діапазон | Акумулятор обtage від +2 до 75 В |
| Номінальний струм зарядки | 40А |
| Номінальний струм навантаження | 20А |
| Макс. ємнісна вантажопідйомність | 10000 мкФ |
| Макс. вхідна потужність фотоелектричної системи | 550W/ 12V, 1100W/ 24V |
| Ефективність перетворення | ≤ 98% |
| Ефективність відстеження MPPT | > 99% |
| Коефіцієнт температурної компенсації | -3.0mv/ °C/ 2V (default) |
| Робоча температура | від -35°C до +45°C |
| Ступінь захисту | IP32 |
| вага | 2 кг |
| Спосіб спілкування | RS232 |
| Висота | ≤ 3000м |
| Розміри виробу | 238*173*72.5 мм |
9. Гарантія та підтримка
For warranty information, please refer to the documentation included with your product packaging or visit the official PowMr website. If you encounter any issues not covered in this manual or require further assistance, please contact PowMr customer support.
PowMr Official Webсайт: Відвідайте магазин PowMr на Amazon
Ask a question about this manual
Ask about setup, troubleshooting, compatibility, parts, safety, or missing instructions. Manuals+ will review the question and use this page’s manual context to help answer it.