
1. Вступ
This manual provides detailed instructions for the installation, operation, and maintenance of your SECULINK 16-Channel 4K/8MP Network Video Recorder (NVR). This NVR is designed to provide a comprehensive security solution, supporting up to 16 channels of 4K (8MP) video recording from ONVIF-compliant IP cameras. It features advanced H.265+ compression, motion detection recording, and P2P remote access for convenient monitoring.
2. Продукт закінчивсяview
Ключові характеристики
- Ultra HD Video: Full 4K (3840x2160P) video viewing and recording on all 16 channels, supporting 8MP/5MP/4MP/3MP/1080p ONVIF IP cameras.
- Стиснення H.265+: Enhances bandwidth and storage efficiency, providing smaller file sizes, higher definition, and longer recording times. Supports simultaneous network transmission and playback.
- Запис виявлення руху: Configurable to record only when motion is detected, optimizing storage space.
- Легке налаштування: Requires a wired connection to your router for operation and manages all connected IP cameras on your network.
- Кілька варіантів зберігання: Supports up to 6TB internal SATA HDD (sold separately) and cloud storage service (sold separately). Backup options include USB flash disk, USB DVR writer, and network.
- P2P Remote Access: Cloud P2P function for remote viewing on smartphones, tablets, and PCs via the XMeye app.
Вміст упаковки
- 1x SECULINK 16-Channel Network Video Recorder (NVR1616PF-4K)
- 1x адаптер живлення
- 1x USB миша
3. Посібник із налаштування
3.1 Фізичні з'єднання
Before powering on the NVR, ensure all necessary connections are made.
- Підключення монітора: Використовуйте кабель HDMI або VGA для підключення відеореєстратора до монітора або телевізора.
- Підключення миші: Plug the included USB mouse into one of the USB ports on the NVR.
- Підключення до мережі: Connect the NVR's LAN port to your router using an Ethernet cable. This NVR requires a wired network connection.
- Підключення живлення: Connect the power adapter to the NVR's DC 12V input and then plug it into a power outlet.

Рисунок 3.1: Підключення задньої панелі відеореєстратора
3.2 Hard Drive Installation (HDD Not Included)
The NVR supports a single SATA hard drive up to 6TB for local storage. Follow these steps to install an HDD:
- Unscrew the top cover of the NVR chassis.
- Connect the SATA data and power cables from the NVR to the corresponding ports on the hard drive.
- Закріпіть жорсткий диск до шасі відеореєстратора за допомогою наданих гвинтів.
- Встановіть верхню кришку на місце та закріпіть її гвинтами.
After installation, the NVR will typically detect the new HDD. You may need to format the HDD through the NVR's system settings before recording can begin.
3.3 Конфігурація мережі
The NVR connects to your network via an Ethernet cable. Ensure your router is functioning correctly. The NVR will typically obtain an IP address automatically via DHCP. For remote access, ensure your network allows outbound connections for the NVR's P2P service.
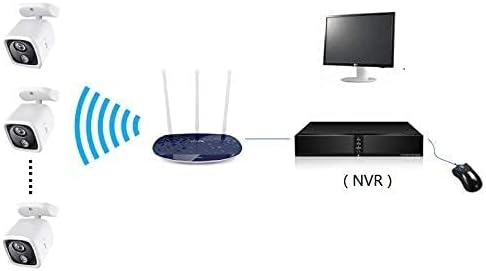
Figure 3.2: NVR Network Connection Diagram
3.4 Інтеграція камери
The NVR supports ONVIF-compliant IP cameras. To add cameras:
- Ensure your IP cameras are powered on and connected to the same network as the NVR.
- Access the NVR's main menu using the connected monitor and mouse.
- Navigate to the Camera Management or Channel Setup section.
- The NVR should automatically detect ONVIF cameras on the network. Select and add them, providing credentials if required.
4. Інструкція з експлуатації
4.1 Навігація в інтерфейсі користувача
Використовуйте підключену USB-мишу для навігації по графічному інтерфейсу користувача (GUI) відеореєстратора. Клацніть правою кнопкою миші, щоб відкрити головне меню, а лівою кнопкою миші — щоб вибрати опції або відкрити підменю.
4.2 Керування записами
The NVR offers flexible recording options:
- Безперервне записування: Records 24/7 without interruption.
- Запис виявлення руху: Records only when motion is detected by the cameras, saving storage space. Configure motion detection zones and sensitivity in the NVR settings.
- Запланований запис: Set specific times for recording to occur.
These modes can be configured per channel in the NVR's recording settings.

Рисунок 4.1: Режими запису
4.3 Remote Access (P2P)
до view your cameras remotely:
- Завантажити XMeye додаток на вашому смартфоні або планшеті.
- Зареєструйте обліковий запис і увійдіть.
- Add your NVR device by scanning the QR code displayed on the NVR's monitor (usually found in the P2P or Cloud settings) or by manually entering the device ID.
- Після додавання ви можете view прямі трансляції та відтворення записаної їжіtage з будь-якого місця, де є підключення до Інтернету.

Figure 4.2: P2P Remote Access
4.4 Video Playback and Backup
Повторноview записаний footage, access the Playback menu from the NVR's main interface. You can search by time, date, event, or channel. To back up footage, connect a USB flash drive to the NVR's USB port and use the backup function in the menu.
5. Технічне обслуговування
5.1 Керування жорсткими дисками
Regularly check the status of your hard drive through the NVR's system settings. Consider backing up critical footage periodically to an external device or cloud storage. If the HDD fails, replace it following the installation steps in Section 3.2.
5.2 Оновлення системи
Періодично перевіряйте дані виробника website for firmware updates. Keeping your NVR's firmware updated can improve performance, add new features, and enhance security. Follow the provided instructions carefully when performing firmware updates.
5.3 Очищення
Ensure the NVR unit is kept in a clean, dry, and well-ventilated area. Dust can accumulate and affect performance. Use a soft, dry cloth to clean the exterior of the NVR. Do not use liquid cleaners or aerosols.
6. Вирішення проблем
- Немає відеовиходу на монітор:
- Check HDMI/VGA cable connections to both NVR and monitor.
- Ensure the monitor is set to the correct input source.
- Verify the NVR is powered on (power indicator light should be active). - Немає мережевого підключення:
- Ensure the Ethernet cable is securely connected to both the NVR and the router.
- Check if your router is functioning correctly.
- Verify network settings in the NVR's menu (e.g., DHCP enabled). - Cameras Not Displaying/Recording:
- Confirm IP cameras are powered on and connected to the network.
- Check camera IP addresses and ensure they are discoverable by the NVR.
- Verify camera credentials (username/password) are correctly entered in the NVR's camera management.
- Ensure the HDD is installed and formatted correctly for recording. - Віддалений доступ не працює:
- Ensure the NVR has an active internet connection.
- Verify the P2P function is enabled in the NVR's network settings.
- Check your smartphone/tablet's internet connection.
- Ensure the correct device ID is entered in the XMeye app. - Погана якість відео:
- Ensure cameras are set to their highest resolution (e.g., 4K/8MP).
- Check network bandwidth if experiencing lag or pixelation, especially for remote viewінж.
7. Технічні характеристики
| Особливість | Специфікація |
|---|---|
| Номер моделі | NVR1616PF-4K |
| Кількість каналів | 16 |
| роздільна здатність | 16*4K 8MP |
| Відеовихід | 1x VGA, 1x HDMI |
| Аудіовихід | 1x RCA |
| Мережевий порт | 1x RJ45 10M/100M |
| порт USB | 2x USB2.0 |
| Streaming Specification | ONVIF |
| Режим запису | Manual > Alarm > Motion Detection > Timing |
| Пошук відео | Time, Date, Event, Channel Search |
| потужність | 12 В постійного струму |
| Розмір корпусу | 260 мм x 43 мм x 190 мм (10.24 дюйма Д x 7.48 дюйма Ш x 1.69 дюйма В) |
| Інтерфейс HDD | SATA (Max 6TB) |
| ДОДАТОК | XMeye |
| Технологія підключення | Ethernet, HDMI, USB, VGA |
| Аудіо вхід | мікрофон |
| Вага товару | 1.01 кілограма |
8. Гарантія та підтримка
For warranty information, please refer to the documentation provided with your purchase or contact SECULINK customer support directly. Technical support is available through the manufacturer's official channels. Please visit the SECULINK webсайт для отримання найактуальніших ресурсів підтримки, відповідей на поширені запитання та контактної інформації.