1. Вступ
Дякуємо за покупкуasing the XTUGA ES602 Professional DJ Mixer. This manual provides essential information for the safe and efficient operation of your mixer. Please read it thoroughly before use and retain it for future reference.
The XTUGA ES602 is a versatile 7-channel mixing console designed for stage audio, DJ applications, and music production. It features XLR and LINE inputs, +48V phantom power, a built-in digital effect processor, USB/MP3 playback, and Bluetooth connectivity.
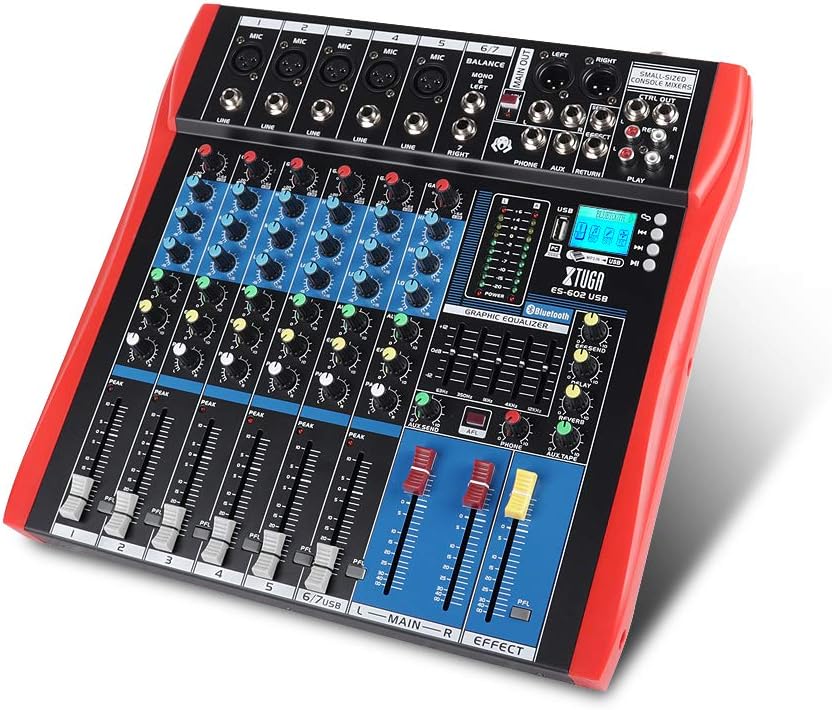
Figure 1: XTUGA ES602 Professional DJ Mixer overview. This image displays the top panel of the mixer, showing all input channels, control knobs, faders, and the master section with the USB/MP3/Bluetooth module.
2. Техніка безпеки
- Джерело живлення: Використовуйте лише зазначений адаптер живлення. Переконайтеся, що гучністьtage відповідає вашому місцевому джерелу живлення.
- Вода і вологість: Не піддавайте пристрій впливу дощу або вологи. Не ставте на пристрій предмети, наповнені рідинами.
- Вентиляція: Забезпечте належну вентиляцію. Не блокуйте вентиляційні отвори.
- Джерела тепла: Тримайте пристрій подалі від джерел тепла, таких як радіатори, обігрівачі, печі або інші прилади, що виробляють тепло.
- Прибирання: Clean only with a dry cloth. Avoid liquid cleaners.
- Обслуговування: Не намагайтеся обслуговувати цей пристрій самостійно. Зверніться до кваліфікованого сервісного персоналу з усіх питань обслуговування.
- Фантомне живлення: When using condenser microphones, ensure +48V phantom power is activated only after connecting the microphone and before connecting to other devices to prevent damage.
3. особливості
The XTUGA ES602 mixer offers a range of features for professional audio mixing:
- 7-канальний мікшерний пульт: Equipped with XLR and LINE inputs for versatile connectivity.
- Фантомне живлення +48 В: Available for condenser microphones.
- Індивідуальні елементи керування каналом: Each channel features GAIN, 3-band EQ (HIGH, MID, LOW), AUX, EFFECT, PAN control knobs, and a volume fader.
- PFL (Pre-Fader Listen) Switch: Allows monitoring of individual channels via headphones.
- Built-in Digital Effect Processor: Includes REPEAT, EFF SEND, DELAY, SEND, and RETURN controls for integrated effects.
- USB/MP3 Playback and Recording: Direct USB input for MP3 playback from U-disk and recording capabilities.
- Підключення Bluetooth: Seamlessly connect mobile phones, tablets, and other Bluetooth-enabled devices for audio playback.
- Основні результати: XLR (L/R) and 1/4" (L/R) stereo output jacks.
- Вихід REC: Dedicated REC (L/R) output for external recording devices.
- Інтерфейс гарнітури: Для моніторингу аудіо.
- Світлодіодні індикатори: Power and output level indicator lights for easy monitoring.
- Міцний дизайн: Ultra-thin, all-metal chassis for high density dust resistance and durability.
4. Елементи керування та функції
This section details the various controls and connections on your XTUGA ES602 mixer.
4.1 Вхідні канали (канали 1-7)
- Мікрофонний вхід (XLR): Connects balanced microphones.
- LINE Input (1/4" Jack): Connects line-level instruments or devices.
- +48V PHANTOM Power Switch: Активує фантомне живлення для конденсаторних мікрофонів на входах XLR.
- Ручка GAIN: Налаштовує вхідну чутливість для кожного каналу.
- HIGH, MID, LOW EQ Knobs: 3-band equalizer for adjusting the treble, midrange, and bass frequencies of each channel.
- Ручка AUX: Controls the send level to the auxiliary output.
- Ручка EFFECT: Controls the send level to the internal effect processor.
- Ручка PAN: Adjusts the stereo position (left/right) of the channel.
- PFL Switch: Engages Pre-Fader Listen for monitoring the channel's signal before the fader.
- Піковий світлодіод: Світиться, коли вхідний сигнал занадто високий, що вказує на потенційне кліпінгове з’єднання.
- Фейдер каналу: Регулює гучність вихідного сигналу окремого каналу.
4.2 Головна секція
- MAIN OUT (XLR & 1/4" Jacks): Balanced stereo main outputs for connecting to ampпідсилювачі або потужні динаміки.
- REC OUT (RCA Jacks): Stereo output for connecting to recording devices.
- PHONES Jack (1/4"): Stereo headphone output for monitoring.
- AUX SEND/RETURN Jacks: For connecting external effects processors or monitoring systems.
- MAIN Faders (L/R): Контролює загальну гучність вихідного сигналу мікшера.
- EFFECT Level Knob: Adjusts the overall level of the internal effects.
- REPEAT, DELAY Knobs: Controls parameters of the digital effect processor.
- LEVEL Meter: LED display showing the main output level.

Малюнок 2: Детально view of the XTUGA ES602 mixer's channel controls and LED level meters. This image highlights the individual channel knobs for GAIN, EQ, AUX, EFFECT, PAN, and the main output level indicators.
4.3 USB/MP3/Bluetooth Module
- Порт USB: For connecting a USB flash drive for MP3 playback or connecting to a computer for recording/playback.
- РК-дисплей: Shows current mode, track information, and Bluetooth status.
- Кнопки управління: Play/Pause, Stop, Previous/Next Track, Mode selection (USB/Bluetooth/PC).
- Індикатор Bluetooth: Показує стан з’єднання Bluetooth.

Figure 3: Close-up of the Bluetooth and MP3 connection section on the XTUGA ES602 mixer. This image shows the USB port, LCD display, and control buttons for media playback and Bluetooth pairing.
5. Налаштування
Follow these steps to set up your XTUGA ES602 mixer.
5.1 Підключення живлення
- Переконайтеся, що вимикач живлення міксера знаходиться в положенні ВИМКНЕНО.
- Підключіть наданий адаптер живлення до входу живлення мікшера.
- Підключіть адаптер живлення до відповідної розетки змінного струму.
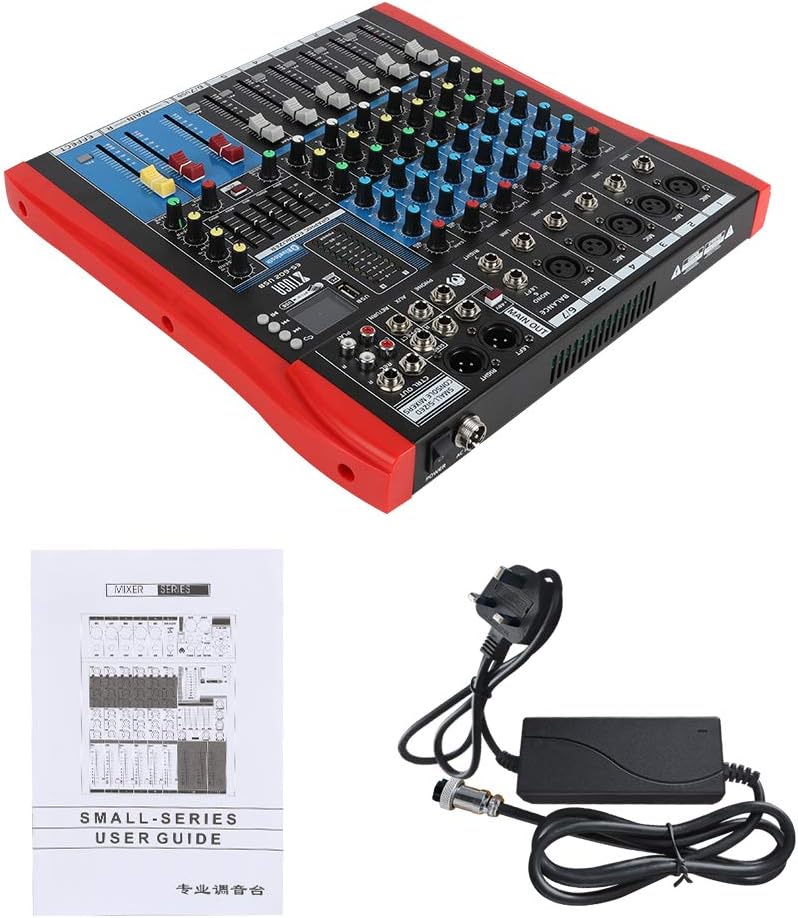
Figure 4: XTUGA ES602 mixer shown with its power adapter and user guide. This illustrates the components included for initial setup.
5.2 Підключення мікрофонів та інструментів
- Для мікрофонів підключіть кабелі XLR до Мікрофонний вхід jacks. If using condenser microphones, activate the +48V PHANTOM Power Switch for the respective channel.
- For line-level instruments (keyboards, guitars with preamps, etc.), connect 1/4" TS/TRS cables to the ЛІНІЯ Вхід домкратів.
- Ensure all channel GAIN knobs are set to their minimum position before connecting.
5.3 Підключення вихідних пристроїв
- Підключіть основні динаміки або ampліффер до MAIN OUT (XLR or 1/4") домкратів.
- For recording, connect an external recording device to the REC OUT (RCA) домкратів.
- Підключіть навушники до ТЕЛЕФОНИ jack for monitoring.
5.4 Connecting to a Computer for Recording
- Connect a USB cable from the mixer's порт USB на ваш комп'ютер.
- The mixer should be recognized as an audio device by your operating system.
- Select the mixer as the input device in your digital audio workstation (DAW) or recording software.
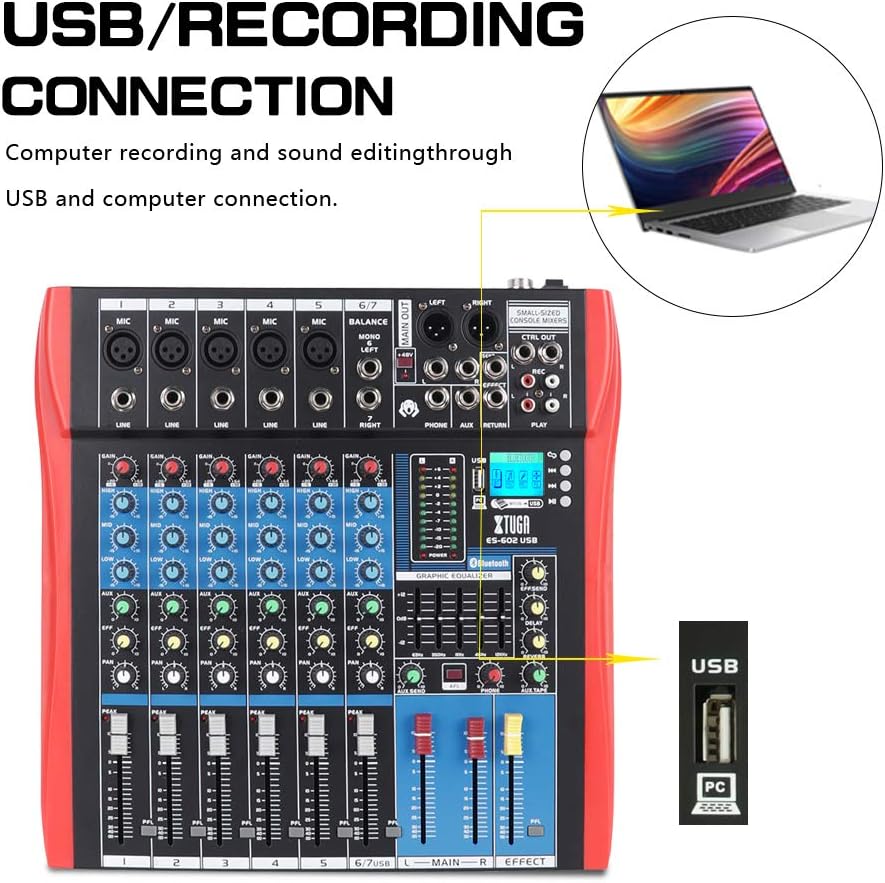
Figure 5: Illustration of the XTUGA ES602 mixer connected to a laptop via USB for recording and sound editing. This highlights the USB input port and its function.
6. Операційна
This section covers the basic operation of your XTUGA ES602 mixer.
6.1 Powering On and Initial Level Setting
- After all connections are made, turn on your mixer's power switch.
- Повільно піднімайте MAIN Faders на комфортний рівень прослуховування.
- For each active input channel, gradually increase the ручка GAIN доки PEAK LED flashes only occasionally during the loudest parts of the signal.
- Adjust individual Канальні фейдери to balance the mix.
6.2 Використання Bluetooth
- Натисніть кнопка MODE on the USB/MP3/Bluetooth module until "Bluetooth" appears on the LCD display. The Bluetooth indicator will flash.
- On your mobile device, search for Bluetooth devices and select "XTUGA MIXER" (or similar).
- Once paired, the Bluetooth indicator will become solid. You can now play audio from your device through the mixer.
- Use the module's control buttons for Play/Pause, Next/Previous track.
6.3 Відтворення з USB/MP3
- Вставте флеш-накопичувач USB, що містить аудіофайли у форматі MP3 files в порт USB.
- The mixer should automatically switch to USB mode and begin playback. If not, press the кнопка MODE щоб вибрати USB.
- Use the control buttons to navigate tracks and control playback.
6.4 Запис
- To USB Drive: In USB/MP3 mode, press the кнопка REC on the module to start recording the main mix to the connected USB drive. Press again to stop.
- До комп'ютера: Ensure the mixer is connected to your computer via USB. Open your recording software and select the mixer as the input device. Start recording within your software.
6.5 Використання ефектів
- Відрегулюйте EFFECT knob on individual channels to send a portion of that channel's signal to the internal effect processor.
- Використовуйте EFFECT Level knob in the master section to control the overall volume of the applied effect.
- Відрегулюйте ПОВТОР і ЗАТРИМКА knobs to fine-tune the characteristics of the digital effect.
7. Технічне обслуговування
Правильне обслуговування забезпечує довговічність та оптимальну роботу вашого змішувача.
- Прибирання: Використовуйте м’яку суху тканину для очищення зовнішньої частини міксера. Не використовуйте абразивні засоби для чищення, розчинники чи віск.
- Захист від пилу: Коли міксер не використовується, накривайте його, щоб захистити від пилу та сміття.
- Зберігання: Зберігайте міксер у прохолодному, сухому місці, подалі від прямих сонячних променів та екстремальних температур.
- Управління кабелем: Уникайте надмірного згинання або обтискання кабелів. Від’єднуйте кабелі, тягнучи за штекер, а не за сам кабель.
8. Вирішення проблем
If you encounter issues with your mixer, refer to the following common problems and solutions.
- Немає вихідного звуку:
- Перевірте, чи міксер увімкнено.
- Забезпечити все MAIN Faders and individual Канальні фейдери are raised.
- Verify that output cables are securely connected to your amplifier/динаміки.
- Перевірте гучність на своєму amplifier/динаміки.
- Немає вхідного сигналу:
- Ensure microphones/instruments are properly connected to the correct input jacks.
- Перевірте, чи ручка GAIN for the respective channel is sufficiently turned up.
- Якщо ви використовуєте конденсаторний мікрофон, переконайтеся Фантомне живлення +48 В активується.
- Test input sources (microphones, instruments) with another device to confirm they are working.
- Спотворений звук:
- Зменшити ручка GAIN for the offending channel if the PEAK LED постійно горить.
- Опустіть MAIN Faders if the output level meter is consistently in the red.
- Перевірте наявність пошкоджених кабелів.
- Проблеми з підключенням Bluetooth:
- Ensure the mixer is in Bluetooth mode (LCD shows "Bluetooth").
- Make sure your mobile device's Bluetooth is enabled and within range.
- Спробуйте розірвати пару та знову підключити пристрій.
- Не працює відтворення з USB:
- Ensure the USB drive is properly inserted and contains compatible MP3 files.
- Натисніть кнопка MODE to ensure the mixer is in USB mode.
- Спробуйте інший USB-накопичувач.
9. Технічні характеристики
| Особливість | Специфікація |
|---|---|
| Номер моделі | ES602 (also ES802/1202 series) |
| Кількість каналів | 7 |
| Технологія підключення | Допоміжний, Bluetooth, USB |
| Аудіо вхід | Auxiliary, USB, XLR |
| Тип вихідного роз'єму | Допоміжний, XLR |
| Джерело живлення | Провідний електричний |
| Вага товару | 3.59 кг |
| Розміри продукту | 46 х 46 х 14 см |
| Виробник | Xtuga |
| UPC | 784124158754 |
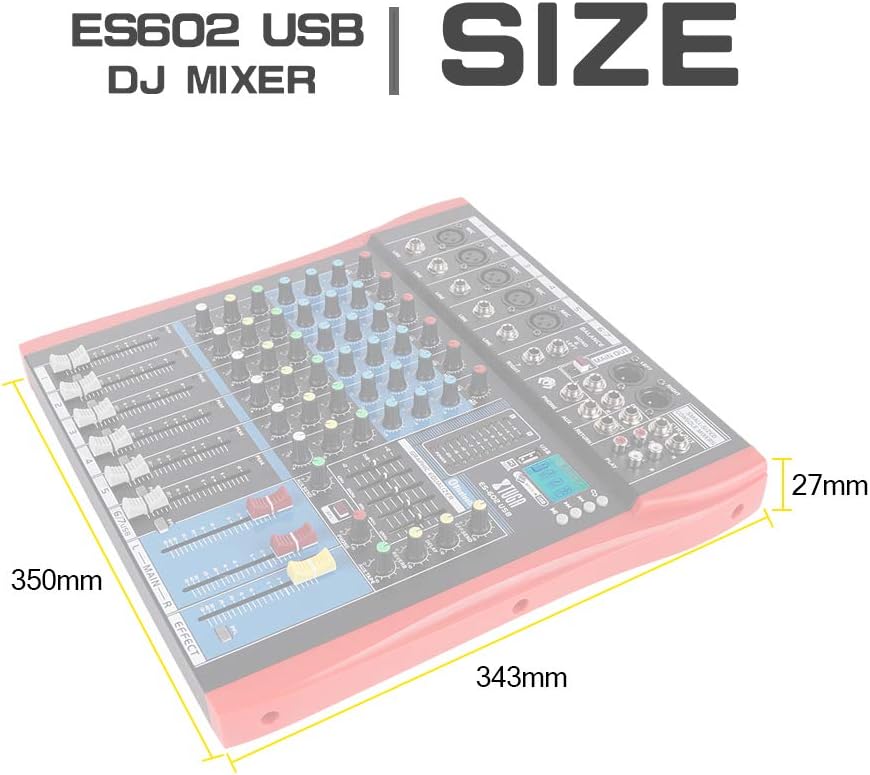
Figure 6: Dimensions of the XTUGA ES602 USB DJ Mixer, showing measurements of 350mm length, 343mm width, and 27mm height.
10. Гарантія та підтримка
XTUGA products are designed for reliability and performance. For warranty information and technical support, please refer to the warranty card included with your product or visit the official XTUGA webсайт. Зберігайте чек про покупку як підтвердження покупки для будь-яких гарантійних претензій.