
1. Вступ
This manual provides detailed instructions for the installation, operation, and maintenance of your OOYCYOO 100A MPPT Solar Charge Controller, model K100A. This device is designed to efficiently manage power flow from your solar panels to your battery bank, ensuring optimal charging and discharge cycles for various battery types including LiFePO4, lithium, AGM, gel, and lead-acid batteries. Please read this manual thoroughly before installation and operation to ensure safe and correct usage.
2. Техніка безпеки
- Підключення акумулятора спочатку: Always connect the battery to the controller first. Never connect the solar panel array to the controller without a battery connected.
- Inverter/Wind/Alternator/Charger: Never connect any inverter, wind turbine, alternator, or external charger directly into the charge controller.
- Акумулятор Voltage: Переконайтеся, що об’єм акумулятораtage is sufficient (greater than 9V) before connecting the controller.
- Max Input Power/Voltage: Do not exceed the maximum input power or voltage specified for your controller.
- Професійна установка: For complex setups, it is recommended to guide the installation under professionals.
- Вентиляція: Забезпечте належну вентиляцію навколо контролера, щоб запобігти перегріву.
- Вода та пил: Protect the controller from direct exposure to water, dust, and corrosive environments.
3. Особливості продукту
- Технологія MPPT: Advanced Maximum Power Point Tracking (MPPT) for 15%-25% higher charging efficiency compared to ordinary solar controllers.
- Сумісність з акумулятором: Compatible with LiFePO4, lithium, AGM, gel, and lead-acid batteries.
- Автоматична ідентифікація: Automatically identifies 12V/24V DC system nominal voltage.
- РК-дисплей: Clear LCD display showing real-time data for solar panel voltage/current, battery voltage/current, load status, and more.
- Комплексний захист: Includes overcharge, over-discharge, overload, overheat, reverse polarity, and lightning strike protection functions.
- Вихід USB: Features 2*USB 5V 2.4A outputs for charging small devices.
- Датчик температури: External temperature sensor for accurate battery temperature compensation.
- Комунікаційний порт RS485: For advanced monitoring and control (requires additional display/module).
4. Technical Specifications (Model K100A)
| Параметр | Значення |
|---|---|
| Номінальний струм заряду | 100А |
| Системний номінальний обсягtage | 12V/24VDC Auto Identifying |
| Макс. PV Open Circuit Voltage | 96 В постійного струму |
| 12V Battery System Max. PV Input Power | 1300W (Open Circuit Voltage ≤48V) |
| 24V Battery System Max. PV Input Power | 2600W (Open Circuit Voltage ≤96V) |
| Акумулятор Voltage Дальність | 12В/24В |
| Термінал живлення | 8AWG |
| Розміри продукту (Д x Ш x В) | 11.8 дюйма x 7.87 дюйма x 3.95 дюйма (30 см x 20 см x 10 см) |
| вага | 5.6 фунта (2.54 кг) |
| Тип дисплея | ЖК |
| Включені компоненти | USB |
5. Компоненти продуктуview

This image displays the OOYCYOO MPPT Solar Charge Controller K100A with key components clearly labeled. These include the LCD Display, 5S Reset button, Solar Panel Terminal, Battery Terminal, Load Terminal, 2*USB 5V 2.4A ports, COM (RS485 Communication Port), Remote Temp Sensor input, and mounting holes. The image also highlights the wire gauge compatibility (6 AWG - 10 AWG) for connections.

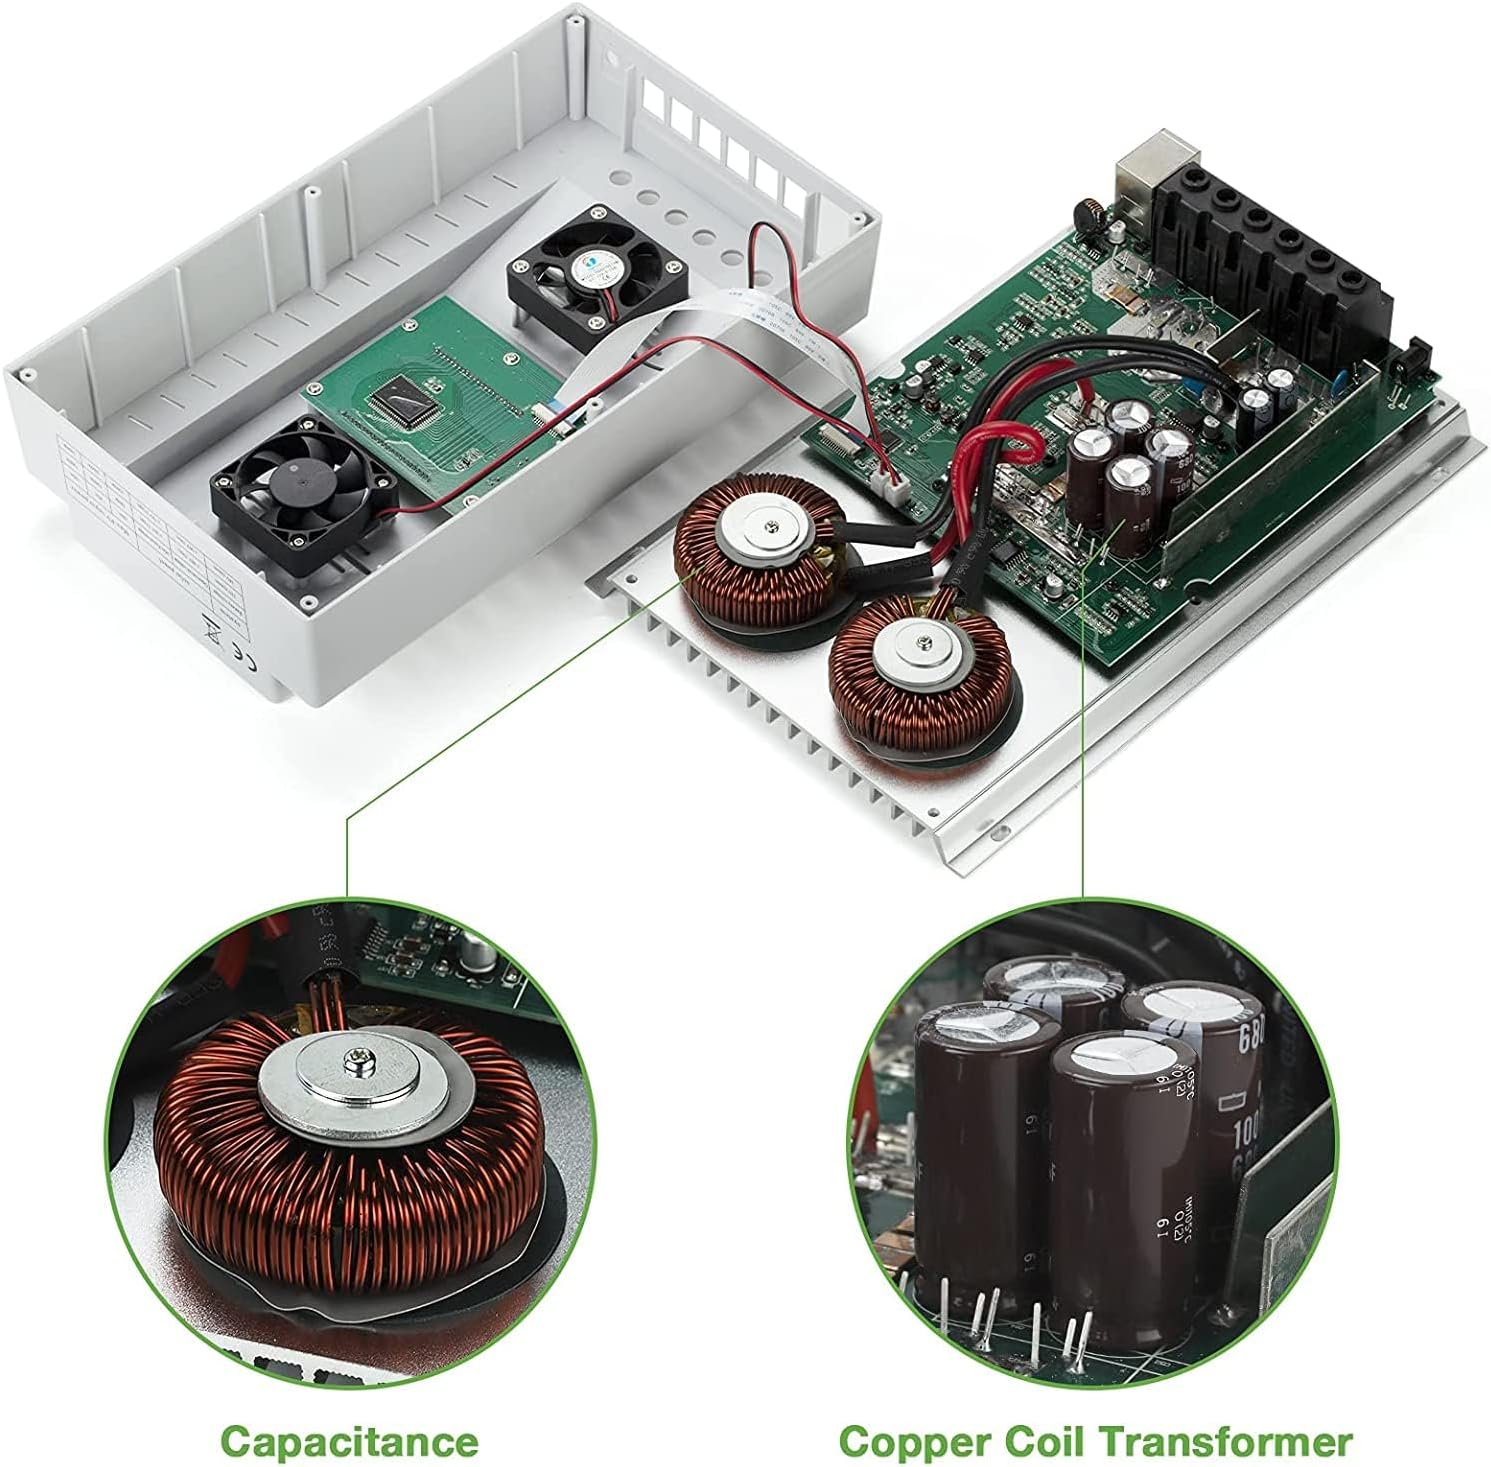
Це зображення надає view of the internal components of the OOYCYOO MPPT Solar Charge Controller K100A, showcasing the Capacitance and Copper Coil Transformer, which are crucial for the controller's efficient operation and power conversion.

This image illustrates the physical dimensions of the OOYCYOO MPPT Solar Charge Controller K100A, showing its length, width, and height, along with a close-up of the USB ports and RS485 communication port. The dimensions are approximately 11.8 inches (height), 7.4 inches (length), and 3.35 inches (width).
6. Налаштування та встановлення
Правильне встановлення є вирішальним для безпечної та ефективної роботи вашого контролера сонячного заряду. Уважно виконайте такі дії:
6.1 Послідовність підключення
- Підключіть батарею: First, connect the battery to the controller's battery terminals. Ensure correct polarity (+ to + and - to -). The controller will automatically detect the system voltage (12 В або 24 В).
- Підключіть сонячну панель: Next, connect the solar panel array to the controller's solar panel terminals. Again, ensure correct polarity.
- Підключення навантаження постійного струму: Finally, connect your DC load (e.g., lights, fan) to the controller's load terminals.
Важливо: Disconnect the system in the reverse order when uninstalling or performing maintenance: first the load, then the solar panel, and finally the battery.
This diagram illustrates the recommended wiring sequence for the OOYCYOO MPPT Solar Charge Controller K100A. It shows the connection from solar panels (PV Panel) through a breaker to the controller, then from the controller to the battery, and finally to DC loads and an inverter for AC loads. Supported battery types are also listed: Lead-acid (Sealed, Flooded, GEL) and User-defined.
6.2 Solar Panel Voltage Вимоги
- для a Система 12В: PV Open Circuit Voltage (Voc) should be between 18V and 96V.
- для a Система 24В: PV Open Circuit Voltage (Voc) should be between 36V and 96V.
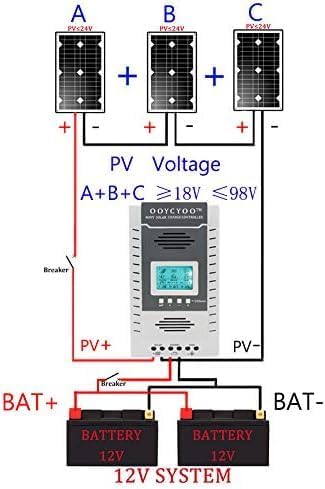
На цій схемі показано впрample setup for a 12V solar system using the OOYCYOO MPPT Solar Charge Controller K100A. It illustrates three solar panels (A, B, C) connected in series to achieve a PV voltage between 18V and 98V, which then connects to the controller and a 12V battery bank.

На цій схемі показано впрample setup for a 24V solar system using the OOYCYOO MPPT Solar Charge Controller K100A. It illustrates three solar panels (A, B, C) connected in series to achieve a PV voltage between 36V and 98V, which then connects to the controller and a 24V battery bank.
6.3 Монтаж
Mount the controller in a well-ventilated area, away from direct sunlight, high temperatures, and water. Ensure there is sufficient space around the controller for heat dissipation. Use the provided mounting holes to secure the controller to a stable surface.
7. Інструкція з експлуатації
The OOYCYOO MPPT Solar Charge Controller features an intuitive LCD display and control buttons for easy operation and monitoring.
7.1 РК-дисплейview

This image details the LCD display of the OOYCYOO MPPT Solar Charge Controller K100A, showing various real-time data points such as solar panel voltage (PV), об'єм батареїtage (BATT), load status (LOAD), charging/discharging faults, battery capacity, ambient temperature, and evening/dawn status. It also highlights the control buttons: Toggle Key, "plus", "minus", and Manual Load Switch. The Network Line Interface Indicator is also shown, with green light indicating battery status and yellow light indicating solar energy charging.
The LCD display provides comprehensive real-time data on one screen, making it convenient to check system status. It shows:
- Сонячна панель випtage (PV) and Current (Amp)
- Акумулятор Voltage (BATT) and Current (Amp)
- Завантажити Voltage (LOAD) and Current (Amp)
- Charging Fault and Discharging Fault indicators
- Battery Capacity and Ambient Temperature
- Evening Status, Interval, and Dawn Status
- Load Stop Working Hours, Float Charging Voltage, Low Voltage Відключити томtagе, та низький об'ємtage Повторно підключіть випtage.
7.2 Кнопки керування
- Клавіша перемикання: Used to cycle through different display screens or menu options.
- "Plus" (+) / "Minus" (-) Buttons: Used to adjust parameters or navigate menu options.
- Ручний перемикач навантаження: This button can be used to manually open or close the load. Long press this button for 5 seconds to restore factory settings.
- "X" Error/System Failure: If an "X" appears, click this button to troubleshoot or eliminate the error.
7.3 Вибір типу батареї
The controller supports various battery types. Refer to the manual's settings section (not detailed here, but typically accessed via the control buttons) to select the appropriate battery type for optimal charging profiles. Options usually include LiFePO4, lithium, AGM, gel, and lead-acid (flooded) batteries.
7.4 Video Demonstration of Operation
This video demonstrates the basic operation and connection of the OOYCYOO MPPT Solar Charge Controller. It shows how to connect the solar panels, battery, and load, and how to monitor the charging and discharging status on the LCD display. The video also illustrates the controller's ability to handle different battery types and its protective functions.
8. Технічне обслуговування
Регулярне технічне обслуговування забезпечує довговічність та оптимальну роботу вашого контролера сонячного заряду.
- Чистота: Тримайте контролер чистим та без пилу та сміття. Використовуйте суху тканину для очищення.
- Підключення: Періодично перевіряйте всі з'єднання проводів на міцність та наявність корозії. Нещільні з'єднання можуть призвести до перегріву та пошкодження.
- Вентиляція: Переконайтеся, що вентиляційні отвори не заблоковані, щоб забезпечити належний відвід тепла.
- Здоров'я акумулятора: Слідкуйте за станом та обсягом акумулятораtage regularly. Replace batteries if they show signs of degradation.
- Умови навколишнього середовища: Ensure the controller remains within its specified operating temperature and humidity ranges.
9. Вирішення проблем
This section provides solutions to common issues you might encounter with your OOYCYOO MPPT Solar Charge Controller.
9.1 Поширені проблеми та рішення
| проблема | Можлива причина | Рішення |
|---|---|---|
| Немає дисплея на LCD | Акумулятор не підключений або низький рівень зарядуtagе; зворотна полярність. | Спочатку переконайтеся, що акумулятор підключено та має достатній рівень зарядуtage (>9V). Check battery polarity. |
| Немає зарядки від сонячних панелей | Solar panels not connected; low solar panel voltage; reverse polarity; insufficient sunlight. | Check solar panel connections and polarity. Ensure PV Voc is within specified range (18-96V for 12V system, 36-96V for 24V system). Verify adequate sunlight. |
| Навантаження не працює | Load not connected; battery low voltage disconnect; overload protection; load switch off. | Перевірте підключення навантаження. Переконайтеся, що заряд акумулятораtage вище низького об'ємуtage disconnect setting. Reduce load if overloaded. Press manual load switch to turn on. |
| "X" error displayed | System fault (e.g., overcharge, over-discharge, overload, short circuit). | Identify the specific error code if available. Press the "X" button to clear the error. Check for system faults and rectify them. Consult professional if persistent. |
If you encounter issues not listed here or if troubleshooting steps do not resolve the problem, please contact customer support for assistance.
10. Гарантія та підтримка
The OOYCYOO 100A MPPT Solar Charge Controller (K100A) comes with a 180-денна гарантія без турбот. If you have any questions before or after installation, please email us. Our professional technical team is available to guide you through installation and provide support. We are committed to providing worry-free after-sales service.
For technical assistance or warranty claims, please refer to the contact information provided with your purchase or visit the official OOYCYOO store on Amazon.