1. Вступ
The XTUGA XCM012 is a professional wireless photographic and recording microphone system designed for various applications including photography, video recording, news interviews, and classroom lectures. This system offers stable signal transmission over distances up to 50 meters (164 feet) and is compatible with medium to high-end DSLR cameras, camcorders, and other audio recording devices. It features a UHF frequency response band, interference-free circuitry, and a noise value control system to ensure clear audio capture.
2. Вміст упаковки
Будь ласка, уважно перевірте упаковку, щоб переконатися в наявності всіх елементів:
- 2 х передавачі
- 1 х приймач
- 2 петличні мікрофони
- 1 x Camera Shoe Mount
- 2 x 3.5mm Cables (TRS to TRS for cameras, TRRS to TRS for smartphones)
- 2 x Bodypack Clips
- 1 х посібник користувача

Image: All components included in the XTUGA XCM012 wireless microphone system package, including two transmitters, one receiver, two lavalier microphones, cables, and mounting accessories.
3. Продукт закінчивсяview
The XTUGA XCM012 system consists of two transmitters and one receiver, designed for dual-channel audio capture.
3.1 Основні характеристики
- High-Definition Lavalier Microphones: Designed for clear sound capture with lapel clips for easy attachment.
- Бездротова передача UHF: Operates within the UHF 519-551MHz frequency range, offering 16 selectable channels to avoid interference.
- Long Working Range: Effective transmission distance of up to 50 meters (164 feet) in open environments.
- РК-дисплей: Transmitters feature an LCD screen to show battery status, selected channels, and other operational information.
- Універсальний підключення: The receiver includes a 3.5mm interface, compatible with DSLR cameras, camcorders, smartphones, laptops, PCs, amplifiers, and mixers using the provided 3.5mm cables.
- Кріплення для камери: Allows direct attachment of the receiver to DSLR cameras and other shooting equipment.
3.2 Компоненти

Зображення: Оверview of the XTUGA XCM012 system highlighting its features: 1-Trigger-2 functionality, 16 selectable channels, 164ft working distance, volume adjustment, UHF 519-551MHz, and information display.

Image: Close-up of the UHF wireless transmitter, showing the LCD display, antenna, lavalier microphone connection, and FM keys for channel selection. It emphasizes 16 frequency options.

Image: The receiver unit with its 3.5mm output interface and volume control. It illustrates connection to a lavalier microphone and mentions compatibility with various devices via the 3.5mm cable.
4. Налаштування
4.1 Встановлення батареї
Each transmitter and the receiver require two AA, 1.5V batteries for operation.
- Locate the battery compartment on the back of each transmitter and the receiver.
- Відкрийте кришку відсіку для батарей.
- Вставте дві батарейки типу АА, дотримуючись правильної полярності (+/-).
- Надійно закрийте кришку батарейного відсіку.
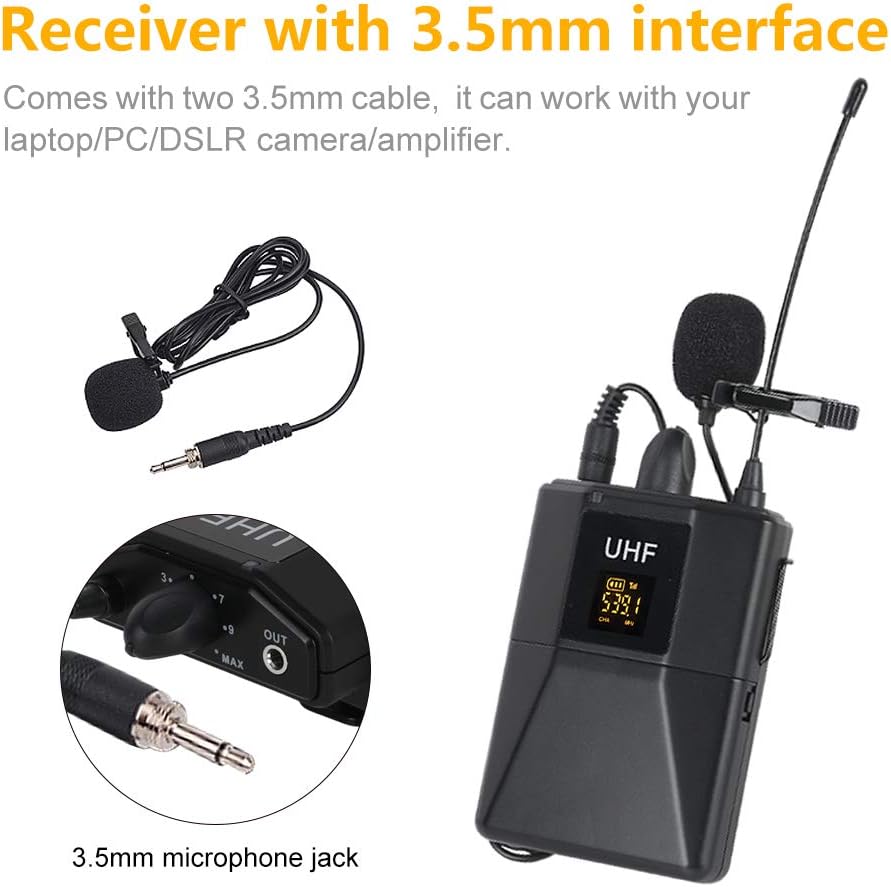
Image: Illustration of battery installation in the transmitter unit, showing the open battery compartment and the placement of two AA 1.5V batteries. The image also indicates an approximate working time of 5 hours.
4.2 Connecting the Lavalier Microphones
Connect each lavalier microphone to the 3.5mm mini jack input on the top of each transmitter. Ensure the connector is fully inserted.
4.3 Підключення приймача до вашого пристрою
Use the appropriate 3.5mm cable to connect the receiver's output to your recording device.
- For DSLR Cameras/Camcorders/Audio Recorders: Use the 3.5mm TRS to TRS cable. Connect one end to the receiver's "OUT" port and the other end to the microphone input of your camera or recorder.
- For Smartphones/Laptops: Use the 3.5mm TRRS to TRS cable (if provided, or ensure compatibility). Connect the TRS end to the receiver's "OUT" port and the TRRS end to your smartphone's headphone/microphone jack. Note: Some smartphones may require an additional adapter (not included).

Image: The XTUGA XCM012 receiver mounted on a DSLR camera via the hot shoe mount, with the audio cable connected to the camera's microphone input. Two transmitters are shown alongside.
4.4 Монтаж пристроїв
- Attach the bodypack clips to the transmitters and receiver for wearing on clothing or belts.
- Use the camera shoe mount to attach the receiver to the hot shoe of your DSLR camera or camcorder.
5. Інструкція з експлуатації
5.1 Увімкнення/вимкнення
Press and hold the power button on each transmitter and the receiver to turn them on or off. The LCD display on the transmitters will illuminate upon powering on.
5.2 Automatic Pairing and Channel Selection
The XCM012 system features automatic pairing. When powered on, the transmitters and receiver should automatically connect. If interference occurs or you wish to change channels:
- On the transmitter, press the "FM keys" button (or similar channel selection button) to cycle through the 16 available frequencies.
- Observe the LCD display to confirm the channel change.
- Ensure the receiver also adjusts to the new channel automatically. If not, manually adjust the receiver's channel to match the transmitter.
Image: Close-up of the UHF wireless transmitter, showing the LCD display, antenna, lavalier microphone connection, and FM keys for channel selection. It emphasizes 16 frequency options.
5.3 Регулювання гучності
Adjust the output volume from the receiver using the dedicated volume control knob. It is recommended to start with a lower volume setting on the receiver and your recording device, then gradually increase to avoid audio clipping or distortion.
5.4 Optimal Sound Quality
The XCM012 system is designed to deliver clear vocal audio. For best results, ensure the lavalier microphone is positioned correctly, typically clipped to clothing about 6-8 inches from the speaker's mouth.
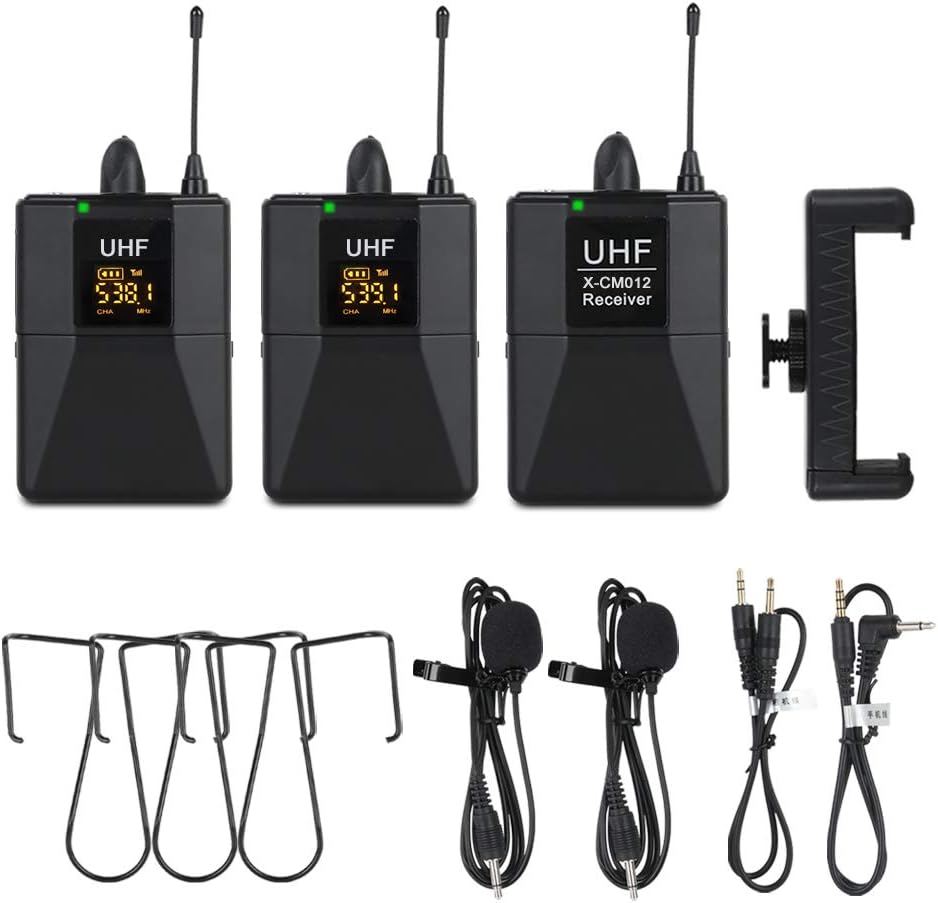
Image: A person giving a thumbs-up, with the XTUGA XCM012 receiver mounted on a DSLR camera in the foreground, illustrating the system's capability for pure and full vocal sound, suitable for interviews, outdoor recording, and teaching.

Image: Two XTUGA XCM012 transmitters shown with a graphic indicating a transmission distance of 50 meters in an open environment, highlighting the system's high-frequency ultra-long distance transmission capability.
6. Технічне обслуговування
- Прибирання: Use a soft, dry cloth to clean the units. Avoid using liquid cleaners or solvents.
- Зберігання: Store the microphone system in a dry, cool place away from direct sunlight and extreme temperatures.
- Догляд за акумулятором: Виймайте батарейки з пристроїв, якщо вони не використовуватимуться протягом тривалого часу, щоб запобігти витіканню.
- Догляд за кабелем: Обережно поводьтеся з кабелями. Уникайте різких вигинів або надмірного натягування, щоб запобігти пошкодженню.
7. Вирішення проблем
7.1 Немає звуку або низька гучність
- Перевірте батареї: Ensure all units have fresh batteries and are inserted with correct polarity.
- Увімкнення: Verify that both transmitters and the receiver are powered on.
- Кабельне підключення: Confirm that all 3.5mm cables are securely connected to the correct ports on the receiver and your recording device. Ensure you are using the correct cable type (TRS for cameras, TRRS for smartphones if applicable).
- Рівні гучності: Adjust the volume knob on the receiver and the input level on your recording device. Start low and increase gradually.
- Вхід пристрою: Ensure your camera or recording device's audio input is set to external microphone.
7.2 Перешкоди або погана якість звуку
- Змінити канал: If experiencing interference, try changing the operating channel on the transmitters using the "FM keys" button. Ensure the receiver syncs to the new channel.
- Відстань: Ensure the transmitters and receiver are within the effective operating range (up to 50 meters) and there are no major obstructions.
- Зовнішні пристрої: Keep the system away from other wireless devices, Wi-Fi routers, or strong electromagnetic fields that might cause interference.
- Якість кабелю: If experiencing persistent poor audio, consider testing with a different, high-quality 3.5mm audio cable.
7.3 Transmitters Not Pairing with Receiver
- Цикл живлення: Turn off all units, then power them back on, starting with the receiver, then the transmitters, to allow them to re-establish connection.
- Manual Channel Sync: If automatic pairing fails, manually cycle through channels on the transmitters and ensure the receiver is set to the same channel.
8. Технічні характеристики
| Особливість | Деталь |
|---|---|
| Режим модуляції | Цифровий модулятор частоти |
| Діапазон частот | UHF 519-551MHz |
| Preset Frequency | 16 (автоматичне сполучення) |
| АЧХ | 75 Гц-18 кГц ± 3 дБ |
| Макс. Діапазон відхилень | 50kHz (with level limiting) |
| THD | <1% |
| Співвідношення S/N | >98 дБ |
| Робочий діапазон | До 50 м (164 футів) |
| Стабільність носія радіочастот | 0.005% (-10℃-50℃) |
| Розміри ресивера | 110 x 65 x 25 мм |
| Блок живлення приймача | 3 В (2 батарейки типу АА) |
| Споживання енергії приймача | 100 мА |
| Термін служби батареї приймача | прибл. 6 години |
| Transmitter Carrier Frequency Power | 30 мВт |
| Transmitter Working Time | прибл. 10 години |
| Розміри передавача | 110 x 65 x 25 мм |
| Вага передавача | 50г |
| антена | гнучкий |
| Гніздо аудіовходу | 3.5 мм міні-джек |
| Розміри продукту (габаритні) | 25 х 22 х 8 см |
| Вага товару (загальна) | 0.55 кілограма |
9. Гарантія та підтримка
For warranty information and technical support, please refer to the documentation provided with your purchase or contact XTUGA customer service directly. Keep your purchase receipt as proof of purchase for any warranty claims.