1. Вступ
This manual provides detailed instructions for the installation, operation, and maintenance of your ASRock B365 PRO4 ATX Motherboard. Please read this manual thoroughly before proceeding with installation to ensure correct setup and to prevent damage to the components.
The ASRock B365 PRO4 motherboard supports 9th and 8th Generation Intel Core Processors, offering a robust platform for personal computing. It features a Digi Power Design with an 8 Power Phase Design, ensuring stable power delivery to the CPU.
2. Інформація про безпеку
- Завжди відключайте живлення перед встановленням або видаленням будь-яких компонентів.
- Одягайте антистатичний браслет, щоб запобігти пошкодженню чутливих компонентів електростатичним розрядом (ESD).
- Тримайте материнську плату за краї, щоб не торкатися чутливих компонентів.
- Забезпечте належну вентиляцію всередині корпусу ПК, щоб запобігти перегріву.
- Тримайте материнську плату подалі від вологи та екстремальних температур.
3. Налаштування та встановлення
3.1 Вміст упаковки
Перевірте наявність усіх елементів в упаковці:
- ASRock B365 PRO4 Motherboard
- Посібник із швидкого встановлення
- Підтримка CD
- I / O Shield
- 2 кабелі для передачі даних SATA
- 3 гвинти для роз'ємів M.2
- 1 x стійка для роз'єму M.2

Image: ASRock B365 PRO4 Motherboard and its included accessories, including the quick installation guide, support CD, I/O shield, SATA cables, and M.2 screws/standoff.
3.2 Розташування материнської плати
Ознайомтеся з ключовими компонентами та роз'ємами на материнській платі.

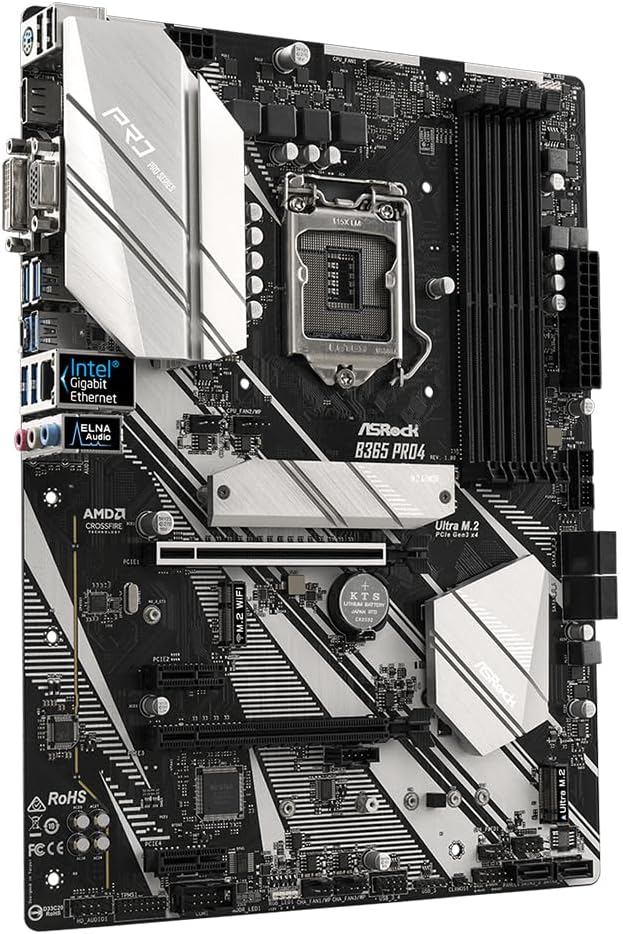
Зображення: Зверху вниз view of the ASRock B365 PRO4 Motherboard, highlighting the CPU socket, RAM slots, PCIe slots, and M.2 slots.

Зображення: Кутове view of the ASRock B365 PRO4 Motherboard, showing the heatsinks and various connectors.
3.3 CPU Installation (LGA1151)
- Відкрийте важіль роз'єму процесора та підніміть навантажувальну пластину.
- Обережно вирівняйте процесор із сокетом, переконавшись, що золотий трикутник на процесорі збігається із трикутником на сокеті.
- Обережно, не докладаючи зусиль, вставте процесор у роз'єм.
- Закрийте вантажну платформу та зафіксуйте її важелем.
3.4 Встановлення пам'яті (ОЗП)
The motherboard features 4 DDR4 DIMM slots, supporting dual-channel memory up to 64GB.
- Відкрийте затискачі з обох кінців гнізда DIMM.
- Зіставте виїмку на модулі оперативної пам’яті з ключем у гнізді DIMM.
- Insert the RAM module firmly until the clips snap into place.
3.5 Встановлення запам'ятовуючого пристрою
The motherboard supports 6 SATA3 ports and 2 Ultra M.2 ports.
- Накопичувачі SATA: Connect SATA data cables to the SATA ports on the motherboard and to your storage devices (HDDs/SSDs). Connect power cables from your power supply to the devices.
- Твердотільні накопичувачі M.2: Locate the M.2 slots. Insert the M.2 SSD into the slot at an angle, then gently push it down and secure it with the provided screw and standoff.
3.6 Встановлення плати розширення (PCIe)
The motherboard has 2 PCI-Express 3.0 x16 slots and 2 PCI-Express 3.0 x1 slots.
- Select an appropriate PCIe slot for your expansion card (e.g., graphics card).
- Зніміть відповідний металевий кронштейн з корпусу ПК.
- Align the card with the slot and press firmly until it is seated correctly.
- Закріпіть карту гвинтом до корпусу ПК.
3.7 Connecting Peripherals to the I/O Panel
Задня панель вводу/виводу містить різні порти для підключення зовнішніх пристроїв.
Зображення: Крупний план view of the ASRock B365 PRO4 Motherboard's rear I/O panel, showing ports for PS/2, USB 2.0, USB 3.1 Gen 1, VGA, DVI-D, HDMI, LAN, and audio jacks.
- Порти USB: Connect USB devices (keyboard, mouse, external drives) to the available USB 2.0 (5 ports) and USB 3.1 Gen 1 (8 ports, including 1 Type-C rear) ports.
- Відеовиходи: Connect your monitor to the VGA, DVI-D, or HDMI port.
- Порт LAN: Підключіть кабель Ethernet для доступу до мережі.
- Аудіороз'єми: Connect speakers, headphones, or microphones to the audio jacks.
- Порт PS/2: Connect a PS/2 keyboard or mouse.
4. Інструкція з експлуатації
4.1 Перше завантаження та налаштування BIOS
- After assembling all components, connect the power supply and monitor.
- Power on your system. Press Del or F2 під час запуску, щоб увійти до утиліти налаштування BIOS/UEFI.
- Configure boot order, system time, and other necessary settings. Save changes and exit.
- Install your operating system from a bootable USB drive or optical media.
4.2 Встановлення драйвера
After installing the operating system, install the necessary drivers from the provided Support CD or download the latest versions from the ASRock webсайт. Ключові рушійні сили включають:
- Драйвери чіпсетів
- Аудіодрайвери (Realtek ALC892)
- LAN Drivers (Intel I219V Gigabit Ethernet)
- Драйвери графіки (для інтегрованої графіки або дискретного графічного процесора)
5. Технічне обслуговування
- Видалення пилу: Regularly clean dust from the motherboard and case fans using compressed air. Ensure the system is powered off and unplugged before cleaning.
- Оновлення BIOS: Перевірте ASRock website periodically for BIOS updates. Updates can improve system stability and compatibility. Follow the instructions carefully when updating the BIOS.
- Управління кабелем: Переконайтеся, що кабелі акуратно прокладені, щоб покращити потік повітря та запобігти перешкодам.
6. Вирішення проблем
- Немає живлення:
- Check all power connections, including the 24-pin ATX and 8-pin 12V CPU power connectors.
- Переконайтеся, що вимикач живлення знаходиться в положенні УВІМК.
- Немає дисплея:
- Verify that the monitor is connected to the correct video output (either integrated graphics or discrete GPU).
- Перевстановіть відеокарту та модулі оперативної пам'яті.
- Нестабільність/збої системи:
- Перевірте правильність встановлення модулів оперативної пам'яті.
- Ensure CPU cooler is properly installed and making good contact.
- Оновіть драйвери та BIOS до останніх версій.
- Твердотільний накопичувач M.2 не виявлено:
- Ensure the M.2 SSD is correctly seated and secured.
- Check BIOS settings to ensure M.2 slots are enabled and configured correctly (SATA vs. PCIe mode).
7. Технічні характеристики
| Особливість | Деталь |
|---|---|
| Гніздо ЦП | LGA 1151 |
| Сумісні процесори | 9th/8th Generation Intel Core Processors (up to 95W) |
| Чіпсет | Intel B365 |
| Пам'ять | 4 x DDR4 DIMM slots, Dual Channel, Non-ECC, Buffered, Max 64GB (2666/2400/2133 MHz) |
| Слоти розширення | 2 x PCIe 3.0 x16, 2 x PCIe 3.0 x1 |
| Підтримка кількох графічних елементів | AMD Quad CrossFireX and CrossFire Technology |
| Зберігання | 6 x SATA3 ports (RAID 0, 1, 5, 10), 2 x Ultra M.2 ports (PCIe Gen3 x4 & SATA3) |
| Аудіо | Realtek ALC892 7.1-канальний HD Audio |
| LAN | Intel I219V Gigabit Ethernet |
| USB порти | 8 x USB 3.1 Gen1 (1 Type-C rear, 5 rear, 2 via header), 5 x USB 2.0 (2 rear, 3 via header) |
| Відеовиходи | 1 x VGA, 1 x DVI-D, 1 x HDMI |
| Форм-фактор | ATX (12.0 x 9.0 inch / 30.5 x 22.9 cm) |
8. Гарантія та підтримка
8.1 Інформація про гарантію
The ASRock B365 PRO4 Motherboard comes with a 1 рік обмеженої гарантії. This warranty covers defects in materials and workmanship under normal use. For specific terms and conditions, please refer to the warranty card included with your product or visit the official ASRock webсайт.
Note: Damage caused by improper installation, misuse, unauthorized modifications, or natural disasters is not covered under warranty.
8.2 Технічна підтримка
For technical assistance, driver downloads, BIOS updates, or further troubleshooting, please visit the official ASRock support webсайт:
You may also contact ASRock customer service directly through their webсайт для персоналізованої підтримки.