
1. Вступ
The Centralite Pearl Thermostat is designed to provide precise temperature control with an intuitive touch interface. It integrates seamlessly with various smart home platforms using ZigBee connectivity, offering efficient management of residential HVAC systems. This manual provides essential information for installation, operation, and maintenance of your Pearl Thermostat.
2. Ключові характеристики
- Compatible with SmartThings, Spectrum, Cox, Time Warner Cable, Vera, and ZigBee platforms.
- Supports up to 2-stagе тепло і 2-сtage cool HVAC systems.
- Designed for quick installation, typically within 15 minutes.
- Features a built-in power amplifier for extended wireless range.
- Equipped with responsive touch controls for user interaction.
3. Вміст упаковки
Перевірте наявність усіх предметів у вашій упаковці:
- Pearl Thermostat
- Монтажні гвинти (4)
- Акумулятори типу АА (4)
- Короткий посібник
- Етикетки проводки
4. Монтаж
Перед початком встановлення переконайтеся, що живлення вашої системи опалення, вентиляції та кондиціонування повітря вимкнено автоматичним вимикачем, щоб запобігти ураженню електричним струмом.
4.1 Mounting the Backplate
- Carefully remove your old thermostat from the wall. Note the wiring connections before disconnecting.
- Mount the Pearl Thermostat backplate to the wall using the provided mounting screws. Ensure it is level.
4.2 Електропроводка
The Pearl Thermostat features quick-connect terminals for tool-free wiring. Match the wires from your HVAC system to the corresponding terminals on the thermostat backplate. Use the included wiring labels for identification.

Малюнок 1: Задня частина view of the Pearl Thermostat backplate, illustrating battery compartments and quick-connect wiring terminals for HVAC system connection.
Common wiring configurations include:
- R/Rc/Rh: 24V AC power (usually red wire)
- C: Common wire (for continuous 24V power, often blue or black)
- В/В1: Heat (usually white wire)
- Р/Р1: Cool (usually yellow wire)
- G: Fan (usually green wire)
- O / B: Reversing valve for heat pumps
Insert each stripped wire end into its corresponding terminal until it is securely held.
4.3 Встановлення батареї
Insert the four AA batteries into the designated compartments on the back of the thermostat unit. Ensure correct polarity.
4.4 Attaching the Thermostat
Align the thermostat unit with the mounted backplate and gently push until it clicks into place. Restore power to your HVAC system at the circuit breaker.
5. Інструкція з експлуатації
The Pearl Thermostat features a clear LCD display and intuitive touch controls for easy operation.

Малюнок 2: Спереду view of the Pearl Thermostat, highlighting the digital display and touch-sensitive buttons for Mode, Hold, and Fan functions.
5.1 Регулювання температури
Використовуйте + і - touch areas on the right side of the thermostat to increase or decrease the desired temperature set point.
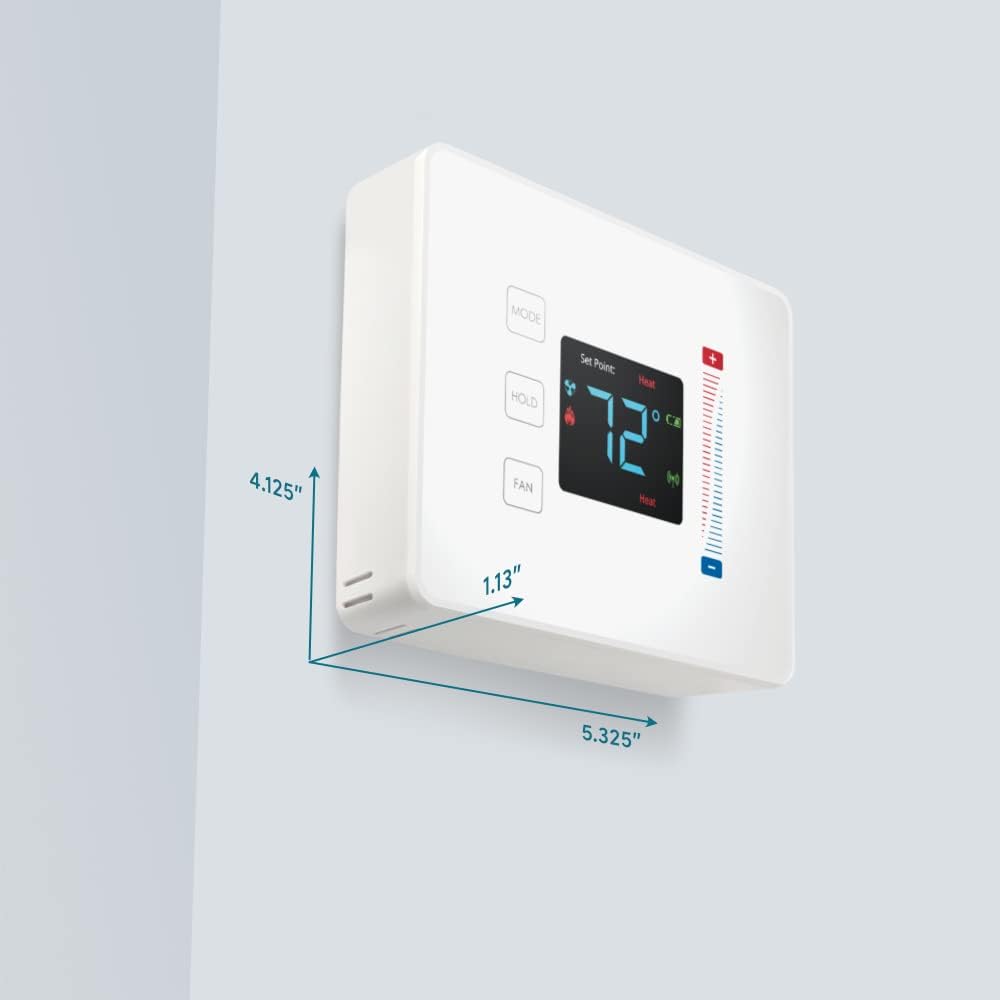
Figure 3: User interaction with the Pearl Thermostat's touch screen to modify temperature settings.
5.2 Вибір режиму
Натисніть РЕЖИМ button to cycle through available operating modes: Heat, Cool, Auto, Off.
5.3 Функція утримання
Натисніть ТРИМАТИ button to maintain the current temperature setting indefinitely, overriding any programmed schedules. Press again to release the hold and resume the schedule.
5.4 Керування вентилятором
Натисніть FAN button to cycle through fan settings: Auto (fan runs only when heating or cooling) or On (fan runs continuously).
6. Технічне обслуговування
6.1 Заміна батареї
The Pearl Thermostat is powered by four AA batteries. When the battery level is low, a low battery indicator will appear on the display. To replace batteries:
- Gently pull the thermostat unit off its backplate.
- Remove the old AA batteries and dispose of them properly.
- Вставте чотири нові лужні батарейки типу АА, дотримуючись правильної полярності.
- Reattach the thermostat unit to the backplate.
Regular battery replacement ensures uninterrupted operation and maintains ZigBee connectivity.
6.2 Очищення
Протріть поверхню термостата м’якою тканиноюamp тканиною. Уникайте використання абразивних засобів для чищення або розчинників, оскільки вони можуть пошкодити дисплей та покриття.
7. Вирішення проблем
If you encounter issues with your Pearl Thermostat, refer to the following common troubleshooting steps:
- Без дисплея/живлення: Check if the AA batteries are correctly installed and fully charged. Ensure power to the HVAC system is on at the circuit breaker.
- Система опалення, вентиляції та кондиціонування повітря не відповідає: Verify that the wiring connections to the backplate are secure. Confirm the thermostat is in the correct operating mode (Heat/Cool/Auto).
- Connectivity Issues (ZigBee): Ensure your smart home hub is powered on and within range. Refer to your smart home hub's instructions for device pairing. You may need to initiate a re-pairing process.
- Неправильні показники температури: Переконайтеся, що термостат не піддається впливу прямих сонячних променів, протягів або джерел тепла, які можуть вплинути на його внутрішній датчик.
- Thermostat Not Responding to Touch: Gently clean the screen surface. If the issue persists, try removing the thermostat from its backplate, waiting 30 seconds, and reattaching it to perform a soft reset.
8. Технічні характеристики

Figure 4: Dimensions of the Centralite Pearl Thermostat.
| Специфікація | Деталь |
|---|---|
| Бренд | централіт |
| Назва моделі | Centralite Pearl Thermostat |
| Номер моделі | 3000-wC |
| Тип контролера | РозумніРечі, Віра |
| Колір | Білий |
| Тип контролю температури | Програмований, цифровий |
| Технологія підключення | ZigBee |
| Джерело живлення | Живлення від батарейок (4 батарейки типу АА, в комплекті) |
| Вага товару | 0.97 фунта (приблизно 15.5 унції) |
| томtage | 230 Volts (HVAC system) |
| матеріал | Перлина |
| Тип дисплея | ЖК |
| Тип обробки | Сатин |
| Тип управління | Управління тачпадом |
| Спосіб контролю | додаток |
| Тип монтажу | Настінне кріплення |
| Підсвічування | так |
| Розміри продукту (Д x Ш x В) | 5.33 x 1.13 x 4.13 дюймів |
| UPC | 812489022264 |
9. Гарантія та підтримка
For warranty information and technical support, please refer to the documentation included with your product or visit the official Centralite webсайт. Зберігайте чек про покупку як підтвердження покупки.