
вступ
This manual provides essential information for the safe and effective installation, operation, and maintenance of your NVX XKIT46 True 4 Gauge AWG 100% OFC Complete Amplifier Wiring Kit. Please read all instructions carefully before beginning installation to ensure proper setup and optimal performance of your car audio system. This kit is designed to provide reliable power and signal transfer for car audio systems up to 1500 watts RMS.
Особливості продукту
- Premium Power Transfer: The kit features 100% Oxygen-Free Copper (OFC) wiring for superior conductivity and efficient power delivery to your ampліфірник.
- Надійний захист: Includes a solid brass and satin-chromed ANL/Mini-ANL fuse holder, designed to protect your high-powered audio system from electrical surges and fluctuations.
- Стійкість до корозії: Power wires feature tinned conductors and a pre-installed black nylon mesh covering, enhancing longevity and durability in automotive environments.
- Спрощена установка: Equipped with pre-terminated seamless power and ground ring terminals for easy and secure connections.
- Comprehensive Setup: This kit provides all necessary components for a professional amplifier installation, including power and ground wires, RCA interconnect cables, speaker wire, and various terminals.
Вміст набору

Image: Diagram illustrating the complete contents of the NVX XKIT46 kit.
The NVX XKIT46 kit includes the following components:
- 17 ft. Frosted Blue 4 gauge power wire with seamless crimp ring terminal
- 3 ft. Frosted Black 4 gauge ground wire with seamless crimp ring terminal
- 17 ft. Clear 18 gauge remote lead wire
- 60 ft. Frosted Black/Blue 16 gauge speaker wire
- One 16.4 ft. 4-channel dual twisted construction RCA interconnect cable (NVX XIV45)
- One 16.4 ft. 2-channel dual twisted construction RCA interconnect cable (NVX XIV25)
- One NVX XMANL04 ANL/Mini-ANL Fuse Holder with 100 amp Mini-ANL fuse
- One Black rubber firewall grommet
- Two 4 Gauge Nickel Plated spade terminals
- Four 18 Gauge Spade terminal
- Two 18 Gauge Red butt connectors
- Four 16 Gauge quick disconnect
- Five 16 Gauge Nickel Plated spade terminals
- Two Heat Shrink tubes with the NVX logo
- Ten 6" Black zip ties
Інструкції з налаштування та встановлення
Proper installation of an amplifier wiring kit is crucial for safety and optimal audio performance. If you are unsure about any steps, it is recommended to seek professional installation.
Заходи безпеки:
- Завжди від'єднуйте негативну клему акумулятора автомобіля перед початком будь-яких електромонтажних робіт.
- Використовуйте відповідні засоби безпеки, включаючи захист для очей.
- Переконайтеся, що всі з'єднання надійно закріплені та належним чином ізольовані, щоб запобігти коротким замиканням.
- Route power cables away from signal cables to minimize noise interference.
- Use grommets when passing wires through metal panels to prevent chafing and shorting.
Кроки встановлення:
- Power Wire Installation: Connect the 4 gauge power wire to the positive terminal of your vehicle's battery. Route the power wire through the firewall into the vehicle's cabin, ensuring it is protected by the included grommet. Connect the other end to the ANL/Mini-ANL fuse holder, then to your amplifier's power input.
- Ground Wire Installation: Connect the 4 gauge ground wire from your amplifier to a clean, unpainted metal surface on the vehicle's chassis. Ensure the connection point is free of paint, rust, or debris for optimal conductivity.
- Дріт дистанційного ввімкнення: Connect the 18 gauge remote lead wire from your head unit's remote output to your amplifier's remote input. This wire signals the ampвмикати та вимикати лайфер за допомогою головного пристрою.
- RCA Interconnect Cables: Connect the RCA cables from your head unit's RCA outputs to your amplifier's RCA inputs. Ensure correct channel matching (e.g., front left to front left).
- Провід динаміка: Route the 16 gauge speaker wire from your amplifier's speaker outputs to your speakers. Maintain correct polarity (+ to + and - to -) for each speaker.
- Установка запобіжника: Встановіть 100 amp Mini-ANL fuse into the fuse holder.
- Кінцеві з'єднання: Double-check all connections for tightness and proper insulation. Reconnect the vehicle's negative battery terminal.

Image: Close-up of the NVX 4 AWG power wire, highlighting its nylon braided tubing, silver-tinned true-spec 100% oxygen-free copper, and pre-terminated seamless ring terminals. It features 1862 strands.

Зображення: Детальне view of the NVX fuse holder, showing its high-temperature polycarbonate base and cover, solid brass and satin-chrome plated contacts, and compatibility with ANL or Mini-ANL fuses for 1/0 or 4 gauge wire.
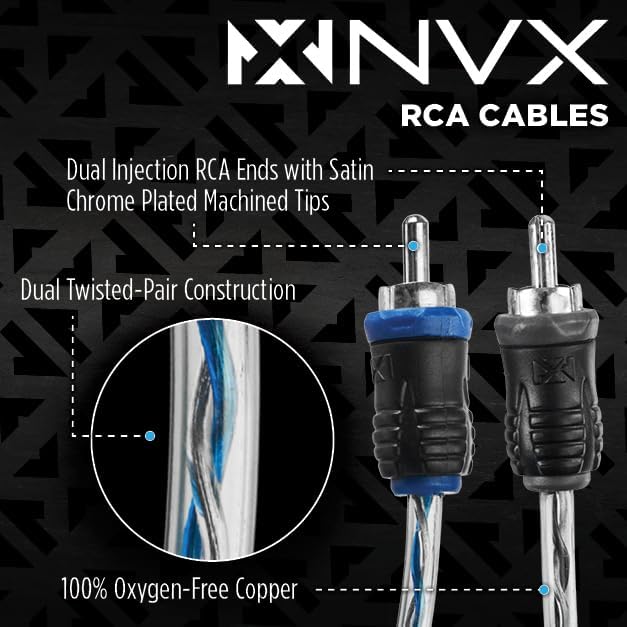
Image: Close-up of NVX RCA cables, featuring dual injection RCA ends with satin chrome plated machined tips, dual twisted-pair construction, and 100% Oxygen-Free Copper conductors.
Інструкція з експлуатації
Once the NVX XKIT46 amplifier wiring kit is correctly installed, the operation of your car audio system will largely depend on your head unit and ampрятувальник. Переконайтеся, що ваш amplifier settings (gain, crossover, bass boost) are adjusted according to your amplifier's manual and your specific audio preferences. Always start with low gain settings and gradually increase to avoid distortion or damage to your speakers and ampліфірник.
Технічне обслуговування
The NVX XKIT46 wiring kit is designed for durability and minimal maintenance. Periodically inspect all connections for tightness and corrosion. Ensure the fuse holder is clean and the fuse is intact. If any wiring appears damaged, replace it immediately to prevent electrical issues or system failure. Keep the wiring free from excessive heat and sharp objects.
Усунення несправностей
If you experience issues with your car audio system after installing the NVX XKIT46 kit, consider the following common troubleshooting steps:
- Немає живлення Ampліфтер: Check the fuse in the ANL/Mini-ANL fuse holder. Ensure the power and ground connections are secure and free of corrosion. Verify the remote turn-on wire is receiving a signal from the head unit.
- Немає звуку: Confirm all RCA cables are securely connected at both the head unit and amplifier. Check speaker wire connections for correct polarity and secure contact. Ensure amplifier gain and crossover settings are correctly configured.
- Спотворений звук: Зменшити amplifier's gain setting. Check for proper grounding. Ensure speaker wires are not shorting to each other or to the vehicle chassis.
- Шум/виль двигуна: Reroute power cables away from signal cables. Ensure the amplifier's ground connection is solid and short. Consider adding a ground loop isolator if the issue persists.
If these steps do not resolve the issue, consult a professional car audio technician.
Технічні характеристики
| Бренд | NVX |
| Модель | XKIT46 |
| матеріал | 100% Oxygen-Free Copper (OFC) |
| Калібр проводів живлення | 4 AWG |
| RCA Channels | 6-Channel (4-channel and 2-channel interconnects included) |
| Fuse Holder Type | ANL/Mini-ANL |
| Max RMS Power Rating | До 1500 Вт |
| UPC | 818060016448 |

Image: Visual comparison of NVX power wire gauges, showing AWG 1/0 (4704 strands), AWG 4 (1862 strands), and AWG 8 (735 strands).
Гарантія та підтримка
For warranty information or technical support regarding your NVX XKIT46 amplifier wiring kit, please refer to the official NVX website or contact NVX customer service directly. Keep your purchase receipt as proof of purchase for any warranty claims.