
Важлива інформація з безпеки
УВАГА: To avoid electric shock, always disconnect power at the main circuit breaker or fuse box before beginning installation or performing any maintenance. This product must be installed in accordance with the applicable installation code by a person familiar with the construction and operation of the product and the hazards involved. If you are unsure about any part of the installation process, consult a qualified electrician.
Пропозиція 65 Попередження: Цей продукт може містити хімічні речовини, які, як відомо штату Каліфорнія, викликають рак, вроджені вади розвитку або інші репродуктивні порушення. Будь ласка, ознайомтеся з місцевим законодавством перед покупкою.asinцей продукт.
Always use a stable ladder and ensure all connections are secure. Do not exceed the maximum wattagе зазначено для лампочок.
Вміст упаковки
Перед початком встановлення перевірте наявність усіх компонентів. Комплектація повинна містити:
- Chandelier fixture body with adjustable arms
- Mounting bracket and hardware (screws, nuts, washers)
- Навіс
- Chain (if applicable for hanging height adjustment)
- Інструкція з експлуатації
- Інформація про гарантію
Note: Light bulbs are typically sold separately. This fixture requires eight medium G40 up to 100W bulbs.
Інструкції з монтажу
Необхідні інструменти (не включені):
- Хрестова викрутка
- Плоска викрутка
- Знімачі дроту
- Плоскогубці
- Ізоляційна стрічка
- томtagтестер
- Драбинка
Крок 1: Підготовка до встановлення
- Відключити живлення: Locate the main circuit breaker or fuse box for your home and turn off the power to the circuit where you will be installing the chandelier.
- Verify Power is Off: Використовуйте томtage tester to confirm that the power is completely off at the junction box where the fixture will be installed.
- Видалити старе приладдя: Carefully remove any existing light fixture from the ceiling, disconnecting its wiring.
- Розпакуйте та перевірте: Unpack the new Kichler Armstrong Chandelier and all its components. Inspect for any damage or missing parts.
Крок 2: Встановіть монтажний кронштейн
- Прикріпіть монтажний кронштейн до стельової розподільної коробки за допомогою наданих гвинтів. Переконайтеся, що він надійно закріплений.
- Thread the fixture's wires through the mounting box and prepare them for connection.
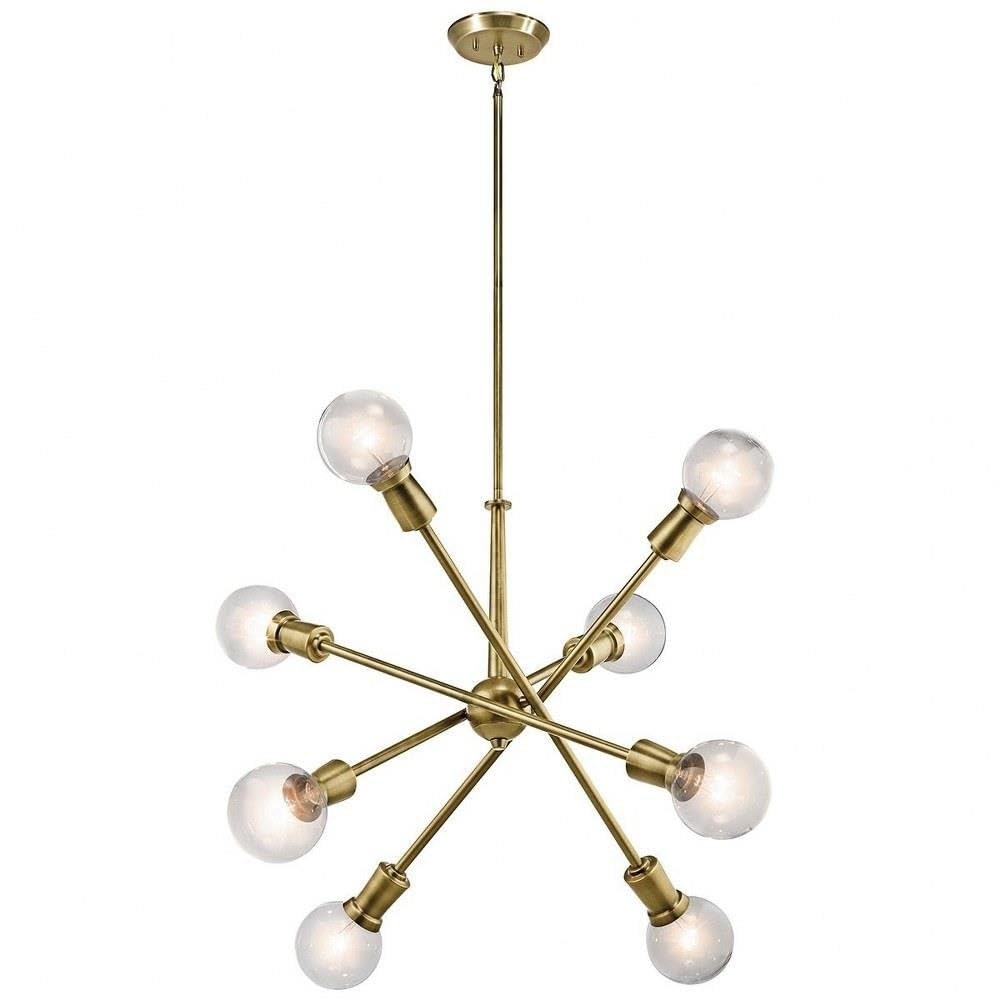
Image: The Kichler Armstrong 8-Light Chandelier in Natural Brass finish, showcasing its adjustable arms and exposed bulbs.
Крок 3: Підключення проводів
- Дріт заземлення: Connect the bare copper ground wire from the fixture to the ground wire from the junction box (usually bare copper or green) using a wire nut. If your junction box has a ground screw, wrap the ground wire around it before connecting.
- Нейтральний провід: Підключіть білий дріт від світильника до білого (нульового) дроту від розподільної коробки за допомогою дротяної муфти.
- Hot Wire: Підключіть чорний дріт від світильника до чорного (під напругою) дроту від розподільної коробки за допомогою дротяної гайки.
- Безпечні з'єднання: Ensure all wire nuts are tightly secured. Wrap electrical tape around each wire nut and connection for added safety.
- Дроти Tuck: Carefully tuck all connected wires into the junction box, ensuring no wires are pinched.
Крок 4: Встановлення приладу
- Raise the canopy of the chandelier to the ceiling, aligning it with the mounting bracket.
- Secure the canopy to the mounting bracket using the provided hardware (e.g., decorative nuts or screws).
- Adjust the arms of the chandelier to your desired horizontal or vertical configuration.

Image: The Kichler Armstrong Chandelier configured with its arms spread horizontally, ideal for wider spaces.

Image: The Kichler Armstrong Chandelier configured with its arms clustered vertically, suitable for narrower or taller spaces.
Step 5: Install Light Bulbs
- Carefully screw the eight medium G40 bulbs (up to 100W each) into the sockets. Do not overtighten.
Відеоінструкція з встановлення:
Video: A step-by-step guide on how to install Kichler Chandeliers and Pendants. This video demonstrates general installation procedures for Kichler lighting fixtures.
Інструкція з експлуатації
Once installation is complete and verified, restore power at the main circuit breaker. Operate the chandelier using your wall switch. The adjustable arms allow for customization of light direction and aesthetic. Gently reposition the arms as desired, ensuring not to apply excessive force.
Технічне обслуговування
- Прибирання: To clean the fixture, ensure power is off. Wipe with a soft, dry cloth. Do not use abrasive cleaners or solvents as they may damage the finish.
- Заміна лампи: Always turn off power before replacing bulbs. Allow bulbs to cool before handling. Replace with eight medium G40 bulbs, not exceeding 100W per bulb.
- Огляд: Періодично перевіряйте міцність затягування всіх з'єднань та монтажних елементів.
Усунення несправностей
| проблема | Можлива причина | Рішення |
|---|---|---|
| Світло не вмикається |
|
|
| Мерехтливі вогні |
|
|
Технічні характеристики
| Номер моделі | 43118NBR |
| Бренд | Кіхлер |
| Колір | Натуральна латунь |
| матеріал | Легована сталь, скло |
| Стиль | Modern, Contemporary/Mid-Century Modern |
| Форма світильника | Люстра |
| Тип кімнати | Living Room, Dining Room, Kitchen, Foyer |
| Використання в приміщенні/зовні | закритий |
| Джерело живлення | Провідний електричний |
| Джерело світла | Лампа розжарювання |
| Кількість джерел світла | 8 |
| томtage | 120 вольт |
| Wattage | 100 вати (на лампочку) |
| Основа лампи | E26 |
| Розміри предмета Д х Ш х В | 30 см (Д) x 30 см (Ш) x 26 см (В) |
| Вага товару | 8 фунта |
| Необхідна збірка | так |
Гарантія та підтримка
Гарантія виробника: This Kichler product comes with a limited warranty of one (1) year from the date of purchase.
For additional support, troubleshooting, or to explore coordinating products, please visit the official Kichler Store: Магазин Kichler на Amazon.