1. Більшеview
The Waveshare High-Precision AD/DA Expansion Board is designed to add advanced analog-to-digital (AD) and digital-to-analog (DA) conversion capabilities to your Raspberry Pi. This board integrates the ADS1256, an 8-channel 24-bit high-precision ADC, and the DAC8552, a 2-channel 16-bit high-precision DAC. It is compatible with Raspberry Pi and provides a robust solution for applications requiring precise analog signal processing.
Малюнок 1: Закінченоview of the Waveshare High-Precision AD/DA Board connected to a Raspberry Pi.
2. особливості
- Standard Raspberry Pi 40PIN GPIO extension header for direct connection.
- Onboard ADS1256, an 8-channel 24-bit high-precision ADC (4-channel differential input) with a 30ksps sampлінг -курс.
- Onboard DAC8552, a 2-channel 16-bit high-precision DAC.
- Input interface via pinheaders for connecting analog signals.
- Compatible with Waveshare sensor interface standard for easy connection to various analog sensor modules.
- Onboard input/output interface via screw terminals for connecting analog/digital signals.
- Features an AD/DA detect circuit for signal demonstration.
3. Board Layout and Interface Definition
This section details the physical layout and pin definitions of the AD/DA Expansion Board.

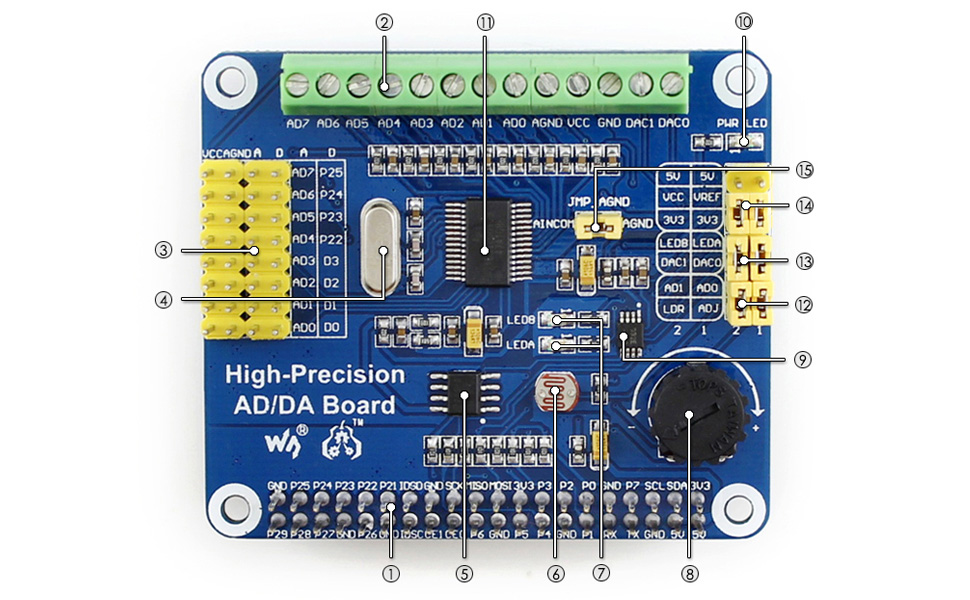
Figure 2: Labeled components of the Waveshare High-Precision AD/DA Board.
- Raspberry Pi GPIO interface: For connecting with the Pi.
- AD/DA input/output: Screw terminals for signal connections.
- AD input: Pinheaders, compatible with Waveshare sensor interface standard.
- 7.68M crystal: Provides timing for the board.
- LM285-2.5: Provides reference voltage for the ADC chip.
- Photo resistor: An example sensor for demonstration.
- LED output indicator: Visual feedback for output.
- 10K potentiometer: An example input for demonstration.
- DAC8552: 16-bit high-precision DAC, 2 channels.
- Power indicator: LED to show power status.
- ADS1256: 24-bit high-precision ADC, 8 channels (4 differential input).
- ADC testing jumper: For configuring ADC test modes.
- DAC testing jumper: For configuring DAC test modes.
- Power selection jumper: To select power source.
- ADC reference ground configuration: When AD single inputted, the AINCOM is reference terminal, can be connected to GND or external reference voltage.
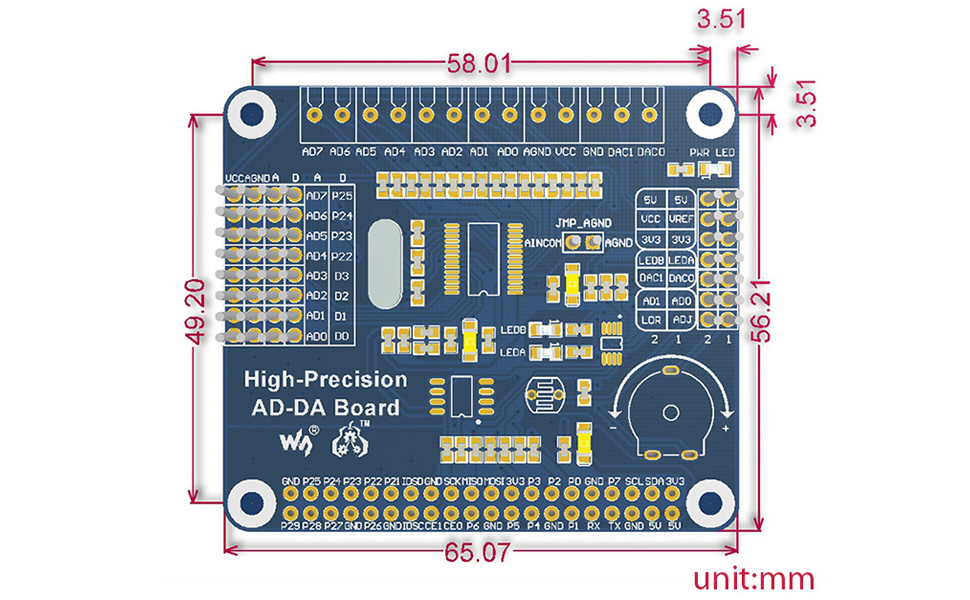
Figure 3: Pin definitions for the Waveshare High-Precision AD/DA Board.
| PIN-код | СИМВОЛ | ОПИС |
|---|---|---|
| 1, 17 | 3.3 В | Блок живлення (3.3В) |
| 2, 4 | 5V | Блок живлення (5В) |
| 3, 5, 7, 8, 10, 18, 22, 24, 26, 27, 28, 29, 32, 36, 38, 40 | NC | Не підключено |
| 6, 9, 14, 20, 25, 30, 34, 39 | GND | Земля |
| 11 | DRDY | ADS1256 data ready output, low active |
| 12 | СКИДАННЯ | ADS1256 reset input |
| 13 | PDWN | ADS1256 sync/power off input, low active |
| 15 | CS0 | ADS1256 chip select, low active |
| 16 | CS1 | DAC8552 chip select, low active |
| 19 | DIN | Введення даних SPI |
| 21 | DOUT | Виведення даних SPI |
| 23 | SCK | SPI годинник |
| 31, 33, 35, 37 | GPIO | Extend to sensor interface |
4. Інструкції з налаштування
Follow these steps to set up your Waveshare High-Precision AD/DA Expansion Board with a Raspberry Pi:
- Фізичне з'єднання: Carefully align the 40-pin GPIO header of the AD/DA board with the corresponding pins on your Raspberry Pi. Press down gently to ensure a secure connection.
- Джерело живлення: Ensure your Raspberry Pi is powered off before connecting the AD/DA board. Once connected, power on the Raspberry Pi. The power indicator LED on the AD/DA board should illuminate.
- Встановлення програмного забезпечення:
- Access the official Waveshare Wiki for the "High-Precision AD/DA Board" to find the latest drivers and exampкод
- Download and install the necessary libraries and example programs for the ADS1256 ADC and DAC8552 DAC. This typically involves cloning a Git repository and compiling C or Python code.
- Ensure the Broadcom GPIO library is correctly installed and configured for your Raspberry Pi operating system (e.g., Raspbian).
- Початкове тестування: Запустіть наданий прикладample code to verify basic functionality of both the ADC and DAC. This will help confirm correct hardware connection and software setup.
Примітка: Refer to the Waveshare Wiki for detailed, up-to-date software installation guides and specific commands for your Raspberry Pi model and operating system.
5. Інструкція з експлуатації
Operating the High-Precision AD/DA Board involves configuring the ADC and DAC chips via SPI communication from the Raspberry Pi.
5.1 Analog-to-Digital Conversion (ADC) with ADS1256
- Вхідне підключення: Connect analog signals to the AD input pinheaders or screw terminals (AD0-AD7). The ADS1256 supports 8 single-ended channels or 4 differential channels.
- Конфігурація: Use the provided software libraries to configure the ADS1256. Key parameters include:
- Вибір каналу: Select the desired input channel(s).
- Налаштування посилення: Adjust the programmable gain amplifier (PGA) for optimal signal range.
- Швидкість передачі даних: Встановіть sampling rate (up to 30ksps). Note that higher sample rates may introduce more noise.
- Довідка Voltage: Configure the internal or external reference voltage.
- Збір даних: Initiate conversions and read the 24-bit digital data from the ADS1256 via SPI. The DRDY pin indicates when new data is available.
5.2 Digital-to-Analog Conversion (DAC) with DAC8552
- Вихідне підключення: Connect your output devices to the DAC0 and DAC1 pins on the screw terminals.
- Вихід даних: Send 16-bit digital values to the DAC8552 via SPI. The DAC will convert these values into corresponding analog voltagес.
- Генерація хвильової форми: By continuously updating the DAC with a sequence of digital values, you can generate various analog waveforms.
Зверніться до прample code and the ADS1256/DAC8552 datasheets for detailed programming information and advanced configurations.
6. Технічне обслуговування
Proper maintenance ensures the longevity and reliable operation of your AD/DA Expansion Board:
- Обробка: Always handle the board by its edges to avoid touching components, especially the sensitive ICs. Static electricity can damage electronic components.
- Прибирання: За потреби обережно очистіть дошку м’якою сухою щіткою або стисненим повітрям, щоб видалити пил. Уникайте використання рідин або абразивних матеріалів.
- Зберігання: Зберігайте дошку в антистатичному пакеті в сухому, прохолодному місці, коли вона не використовується.
- Підключення: Periodically check all connections (GPIO, screw terminals) to ensure they are secure and free from corrosion.
- Оновлення мікропрограми/програмного забезпечення: Regularly check the Waveshare Wiki for any updated drivers, libraries, or firmware that may improve performance or fix issues.
7. Вирішення проблем
If you encounter issues with your AD/DA Expansion Board, consider the following troubleshooting steps:
- Плату не виявлено:
- Ensure the board is correctly seated on the Raspberry Pi's GPIO header.
- Verify that the Raspberry Pi is powered on and the AD/DA board's power LED is lit.
- Check SPI interface enablement on your Raspberry Pi (e.g., via
raspi-config).
- Incorrect Readings/Outputs:
- Double-check your wiring for analog inputs/outputs.
- Review your software configuration for the ADS1256 (gain, data rate, channel selection) and DAC8552.
- Ensure the reference voltagналаштування правильні.
- Test with known voltage sources for ADC and measure DAC output with a multimeter.
- Noise at higher sample rates for ADC is expected; consider lower rates for higher precision.
- Проблеми з програмним забезпеченням/драйвером:
- Confirm that you are using the correct and latest software libraries from the Waveshare Wiki.
- Verify that all dependencies (e.g., Broadcom GPIO library) are installed and correctly configured.
- Check for compilation errors if building from source.
- Consult community forums or the Waveshare support page for known issues and solutions.
- Board Not Functioning:
- Disconnect and reconnect the board.
- Try a different Raspberry Pi if available to rule out Pi-specific issues.
- Inspect the board for any visible damage or bent pins.
8. Технічні характеристики
| Особливість | Деталь |
|---|---|
| Назва продукту | High-Precision AD/DA Board |
| Бренд | Waveshare |
| ADC Chip | ADS1256 (24-bit, 8-channel, 4-differential input) |
| ADC Sampлінг -курс | Up to 30ksps |
| Чіп ЦАП | DAC8552 (16-bit, 2-channel) |
| Інтерфейс | SPI (послідовний периферійний інтерфейс) |
| Сумісність | Raspberry Pi (40PIN GPIO) |
| Операційна система | Linux |
| Технологія підключення | GPIO |
| Розміри продукту | 7.09 x 3.94 x 3.54 дюйма (приблизно 180 x 100 x 90 мм) |
| Вага товару | 0.353 унції (приблизно 10 грамів) |
| Включені компоненти | High-Precision AD/DA Board, RPi screws pack (2pcs) |

Figure 4: Physical dimensions of the Waveshare High-Precision AD/DA Board in millimeters.
9. Гарантія та підтримка
Щоб отримати інформацію про гарантію, технічну підтримку та додаткові ресурси, відвідайте офіційний веб-сайт Waveshare. website or their product Wiki page. The Wiki often contains detailed documentation, schematics, and example code that can be invaluable for advanced users and troubleshooting.
Офіційний користувач Waveshare Webсайт: www.waveshare.com
Product Wiki: шукати "High-Precision AD/DA Board" on the Waveshare Wiki for specific documentation.