
1. Вступ і даліview
The OSD Audio ATM-7 is a sophisticated 7-zone automatic speaker selector designed to distribute amplified audio signals to various zones within a home or commercial space. It allows users to select between two distinct music sources for each designated zone, providing flexible audio management. This passive device is engineered for seamless integration into existing audio systems, offering remote control capabilities for enhanced convenience.
For optimal performance and to prevent potential damage to your amplifier, it is highly recommended to use impedance matching in-wall volume controls in conjunction with the ATM-7, as this unit does not include built-in impedance protection.

Figure 1.1: OSD Audio ATM-7 Speaker Selector and its accompanying remote control, showcasing the front panel and rear connections.
2. Ключові характеристики
- 7-Zone Audio Distribution: Розповсюджує amplified audio signals to up to seven independent zones.
- Dual Source Selection: Allows selection between two distinct music sources (A or B) in each zone when operating in 2-input mode.
- Пульт дистанційного керування: Includes an IR remote control for convenient operation from a distance of up to 10 meters.
- Front Panel Controls & LEDs: Features status LEDs for Power, Multi-zone, Master/Slave, Zone In/Out Select, In/Out Mode, and Zone Out/In Selector.
- Master-Slave Functionality: A Master-Slave switch on the rear panel enables parallel connection of two ATM-7 units for expanded zone control.
- Функція пам'яті: The remote control includes a backup memory function to retain settings.
- Passive Design: A passive device, requiring external impedance matching for amplifier захист.
3. Вміст упаковки
Please verify that all items are present and in good condition upon unpacking.
- OSD Audio ATM-7 Speaker Selector Unit
- ІЧ-пульт дистанційного керування
- Адаптер живлення (DC 12V 1.5A)
- External IR Receiver (for remote placement)
- Посібник користувача (цей документ)
4. Інформація про безпеку
Для забезпечення безпечної роботи та запобігання пошкодженням, будь ласка, дотримуйтесь наступних запобіжних заходів:
- Джерело живлення: Використовуйте лише наданий адаптер живлення. Переконайтеся, що гучністьtage відповідає вашому місцевому джерелу живлення.
- Вентиляція: Не блокуйте вентиляційні отвори. Забезпечте достатній потік повітря навколо пристрою, щоб запобігти перегріву.
- вологість: Do not expose the unit to water, moisture, or excessive humidity. Avoid placing liquids near the device.
- Розміщення: Розмістіть пристрій на стійкій, рівній поверхні. Уникайте розміщення його поблизу джерел тепла або прямих сонячних променів.
- Обслуговування: Не намагайтеся обслуговувати пристрій самостійно. Довірте всі послуги кваліфікованому персоналу.
- Відповідність імпедансу: As a passive device, the ATM-7 does not provide impedance protection. Always use impedance matching volume controls or ensure your amplifier can handle the combined speaker load to prevent damage to your ampліфірник.
5. Налаштування та встановлення
Follow these steps to connect your OSD Audio ATM-7 speaker selector:
- Вимкніть усе обладнання: Перш ніж виконувати будь-які підключення, переконайтеся, що amplifier and all audio sources are powered off and unplugged from the wall outlet.
- Підключитися Amplifier Вихід: Connect the speaker output terminals from your amplifier to the "ZONE IN/OUT" terminals on the rear of the ATM-7. The ATM-7 supports two input modes: 2-input (for dual source selection) or 7-input (for individual zone control). Refer to the rear panel diagram for correct wiring.
- Підключення динаміків: Connect your speakers to the corresponding "ZONE OUT" terminals on the rear of the ATM-7. Ensure correct polarity (+ to + and - to -) for all connections.
- Install Impedance Matching Volume Controls (Recommended): For optimal performance and amplifier protection, install impedance matching in-wall volume controls between the ATM-7 and your speakers. This is crucial to maintain a safe impedance load for your amplifier, especially when multiple zones are active.
- Connect IR Receiver: If the ATM-7 unit will be placed out of direct line of sight for the remote control, connect the external IR receiver to the "EXT IR Receiver" port on the rear panel. Position the IR receiver in a location where it can receive signals from the remote.
- Підключіть живлення: Plug the provided DC 12V 1.5A power adapter into the "DC 12V 1.5A" input on the rear of the ATM-7, then plug the adapter into a wall outlet.

Figure 5.1: Rear panel connections of the ATM-7, including speaker terminals, IR receiver port, and power input.

Малюнок 5.2: Детально view of the speaker wire terminals on the rear of the ATM-7, showing positive and negative connections for a zone.
6. Інструкція з експлуатації
The ATM-7 can be operated using the front panel controls or the included IR remote control.
6.1 Елементи керування передньої панелі

Figure 6.1: Front panel of the ATM-7, displaying power button, status LEDs, and zone selectors.
- Кнопка живлення: Press to turn the unit On or Off. The "ON" LED indicates power status.
- Multi Zone Enable: Activates or deactivates multi-zone operation.
- Кнопка MUTE: Mutes all active audio outputs.
- Master/Slave Control Select (M/S): Toggles between Master and Slave mode when chaining two ATM-7 units.
- Zone In/Out Select: Toggles individual zones between input and output modes.
- IN/OUT Mode (2 IN / 7 IN): Selects between 2-input mode (allowing selection of Source A or B for each zone) or 7-input mode (where each zone acts as an independent input/output).
- ZONE OUT/IN SELECTOR (ZONE1-ZONE7): Buttons to individually activate or deactivate each of the seven zones. Corresponding LEDs indicate active zones.
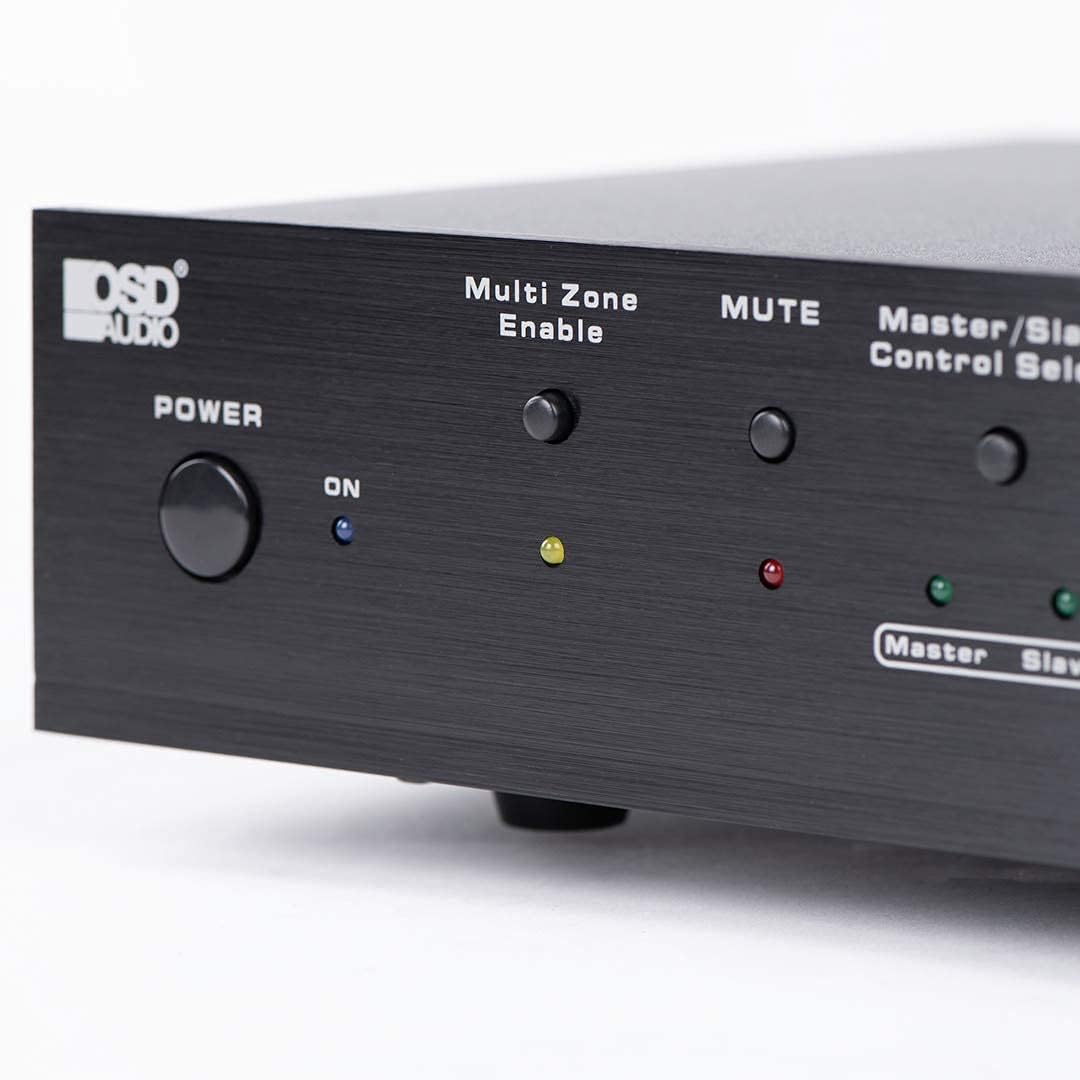
Figure 6.2: Detail of the Power and Multi Zone Enable buttons on the ATM-7 front panel.

Figure 6.3: Detail of the IN/OUT Mode (2 IN / 7 IN) and individual Zone Selector buttons on the ATM-7 front panel.
6.2 ІЧ-пульт дистанційного керування
The included IR remote control provides full functionality for the ATM-7. Point the remote towards the unit's IR sensor or the external IR receiver.
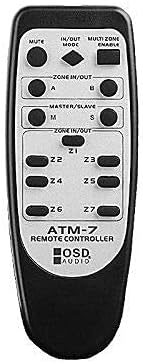
Figure 6.4: The ATM-7 remote control, featuring buttons for mute, input/output mode, master/slave, and individual zone selection.
- МУК: Вимикає весь аудіовихід.
- IN/OUT MODE: Toggles between 2-input and 7-input modes.
- MULTI ZONE ENABLE: Activates or deactivates multi-zone operation.
- ZONE IN/OUT (A/B): In 2-input mode, selects between Source A and Source B for the active zones.
- MASTER/SLAVE (M/S): Selects Master or Slave mode for multi-unit configurations.
- Z1-Z7 Buttons: Individually activate or deactivate each of the seven zones.
The remote control has a backup memory function, retaining the last settings even after power cycling the unit. This allows for integration with smart plugs or switched outlets.
7. Технічне обслуговування
The OSD Audio ATM-7 requires minimal maintenance. Follow these guidelines to ensure longevity:
- Прибирання: Використовуйте м’яку суху тканину для очищення зовнішньої частини пристрою. Не використовуйте рідкі засоби для чищення або абразивні хімікати.
- Вентиляція: Періодично перевіряйте, чи вентиляційні отвори чисті від пилу та сміття.
- Підключення: Ensure all speaker wire connections remain secure and free from corrosion.
8. Вирішення проблем
| проблема | Можлива причина | Рішення |
|---|---|---|
| No audio output from speakers. |
|
|
| Не працює пульт дистанційного керування. |
|
|
| Спотворення звуку або низька гучність. |
|
|
9. Технічні характеристики
| Особливість | Специфікація |
|---|---|
| Номер моделі | ATM-7 |
| Розміри продукту | 21.5 x 12 x 5.5 дюймів |
| Вага товару | 7 фунта |
| Колір | чорний |
| Тип роз'єму | Speaker Wire (Banana Plugs compatible) |
| Тип кабелю | Провід динаміка |
| Виробник | Звук екранного меню |
| Вхідна потужність | Постійний струм 12 В 1.5 А |
| Remote Operating Distance | До 10 метрів |
10. Інформація про гарантію
Warranty information for the OSD Audio ATM-7 Speaker Selector is typically provided with the product at the time of purchase or can be found on the official OSD Audio website. Please retain your proof of purchase for warranty claims. For detailed terms and conditions, please visit the OSD Audio official webсайту або зв’яжіться зі службою підтримки клієнтів.
11. Підтримка клієнтів
For technical assistance, troubleshooting, or general inquiries regarding your OSD Audio ATM-7, please contact OSD Audio customer support. You can find contact information, FAQs, and additional resources on the official OSD Audio webсайт: