
вступ
This manual provides detailed instructions for the safe and effective use of your AmScope SW-3T24Z Trinocular Stereo Microscope. Please read this manual thoroughly before operation and retain it for future reference. This microscope is designed for inspecting biological specimens, rocks, stamps, jewelry, and other large specimens that require handling or manipulation.
Інформація про безпеку
- Handle the microscope with care to prevent damage to optical and mechanical components.
- Avoid exposing the microscope to direct sunlight, high temperatures, or high humidity.
- Keep the microscope away from dust and corrosive chemicals.
- Переконайтеся, що мікроскоп встановлено на стійкій рівній поверхні, щоб запобігти його перекиданню.
- Do not attempt to disassemble or repair the microscope yourself. Contact qualified service personnel for assistance.
Вміст упаковки
Перевірте наявність усіх компонентів в упаковці:
- Trinocular stereo zoom head with 2x/4x objective
- WH10x eyepieces (one pair)
- 2.0x лінзи Барлоу
- Single-arm boom stand with focus rack
- Eye guards (one pair)
Інструкції з налаштування
Follow these steps to assemble your AmScope SW-3T24Z microscope:
- Розпакуйте компоненти: Carefully remove all parts from the packaging and place them on a clean, stable surface.
- Зберіть підставку для стріли: Attach the vertical pillar to the heavy base using the provided screws. Ensure it is securely fastened.
- Attach Horizontal Arm: Slide the horizontal boom arm into the clamp on the vertical pillar. Adjust its position and tighten the knob to secure it.
- Mount Microscope Head: Insert the microscope head into the mounting ring at the end of the horizontal arm. Secure it by tightening the set screw.

Figure 1: Assembled AmScope SW-3T24Z Trinocular Stereo Microscope.
- Вставити окуляри: Gently insert the WH10x eyepieces into the two viewing tubes of the trinocular head.

Figure 2: Eyepieces installed in the microscope head.
- Install Barlow Lens (Optional): If increased magnification is desired, screw the 2.0x Barlow lens onto the objective housing at the bottom of the microscope head.
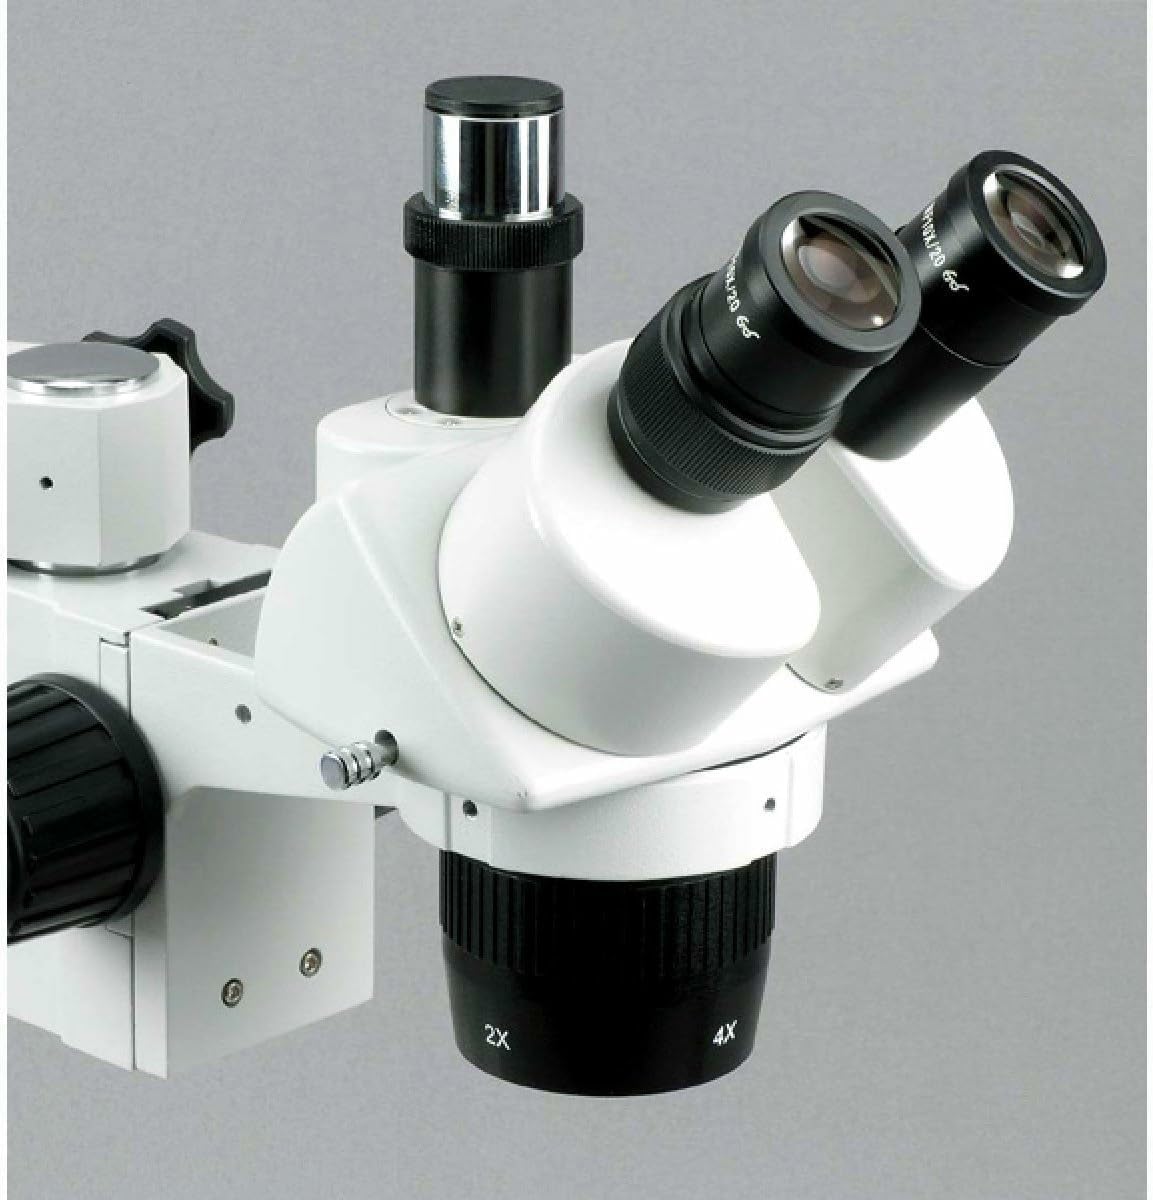
Figure 3: Microscope head with objective. The Barlow lens attaches here.
- Attach Eye Guards: Place the rubber eye guards onto the eyepieces for comfortable viewing and to block ambient light.
Інструкція з експлуатації
1. Adjusting Magnification
- The microscope features a 2x/4x objective. Rotate the objective housing to switch between 2x and 4x magnification.
- With the WH10x eyepieces, the base magnification is 20x (2x objective) and 40x (4x objective).
- When the 2.0x Barlow lens is installed, the total magnification becomes 40x (2x objective * 2.0x Barlow * 10x eyepieces) and 80x (4x objective * 2.0x Barlow * 10x eyepieces).
2. Фокусування
- Place your specimen on a flat surface beneath the objective.
- Use the bilateral focus knobs on the boom stand to raise or lower the microscope head until the specimen comes into sharp focus.
3. Регулювання міжзіничної відстані
- While looking through the eyepieces, adjust the distance between the two eyepiece tubes until you see a single, circular field of view. This range is typically 47 to 75mm.
4. Dioptric Adjustment
- Close your left eye and focus the right eyepiece using the main focus knob until the image is sharp.
- Close your right eye and use the diopter adjustment ring on the left eyepiece to focus the image for your left eye. Do not use the main focus knob for this step.
5. Using the Trinocular Port
- The vertical trinocular port allows for the attachment of a camera (sold separately). It is compatible with C-Mount or 23mm photo ports.
- To use the trinocular port, pull out the light path selector rod (if present) to divert the image to the camera port.
6. Робоча відстань
- The microscope offers a long working distance, up to 4 inches, which is beneficial for manipulating specimens under observation.
- The 17-inch pillar provides an 8-inch vertical working distance, and the 16-inch single-arm boom has a 24-inch overall length, allowing for flexible positioning over large objects.

Малюнок 4: Впрample of a circuit board viewed through the microscope.

Малюнок 5: Впрample of insect eggs viewed through the microscope.
Технічне обслуговування
1. Очищення лінз
- Use only specialized lens cleaning paper and lens cleaning solution.
- Gently wipe the lens surfaces in a circular motion. Avoid touching the lenses with bare hands.
- Never use abrasive cloths or harsh chemicals, as these can scratch or damage the optical coatings.
2. Очищення організму
- Протріть корпус мікроскопа м’якою серветкоюamp тканина.
- For stubborn dirt, a mild detergent solution can be used, but ensure no liquid enters the internal components.
3. Зберігання
- When not in use, cover the microscope with the provided dust cover to protect it from dust and debris.
- Store the microscope in a cool, dry place, away from direct sunlight and extreme temperatures.
4. Змащення
- The moving parts of the microscope are pre-lubricated. Avoid excessive lubrication.
- If any movement becomes stiff, apply a minimal amount of light machine oil to the vertical and horizontal bars, wiping off any excess immediately.
Усунення несправностей
Проблема: Зображення розмите або не у фокусі.
- Рішення 1: Adjust the main focus knobs to bring the specimen into sharp focus.
- Рішення 2: Ensure the eyepieces are fully inserted and the interpupillary distance is correctly set for your eyes.
- Рішення 3: Perform dioptric adjustment for each eyepiece individually.
- Рішення 4: Check if the objective is clean and free from smudges or dust.
Problem: No image visible.
- Рішення 1: Verify that the specimen is correctly positioned under the objective.
- Рішення 2: Ensure the objective is rotated to a click-stop position (2x or 4x).
- Рішення 3: Check if the light path selector for the trinocular port is correctly set for visual observation (not diverted to a camera).
Проблема: Зображення виглядає тьмяним.
- Рішення 1: Ensure adequate ambient lighting is available, as this microscope uses ambient light for illumination.
- Рішення 2: Очистіть лінзи об'єктива та окуляра.
Технічні характеристики
| Особливість | Специфікація |
|---|---|
| Голова | Тринокулярний |
| Збільшення | 20x, 40x, 80x (with 2.0x Barlow) |
| Objective Power | 2x / 4x |
| Окуляри | WH10x20mm |
| Тринокулярний порт | C-Mount or 23mm |
| Optical Working Distance | До 4 дюйма |
| Поле в View | 0.787 inches at 10x |
| Підставка під мікроскоп | Single-arm boom stand |
| Рух головою | X- and Y-axes |
| Тип освітлення | Ембіент |
| матеріал | Оптичне скло |
| Вага товару | 3.3 фунта |
| Номер моделі | SW-3T24Z |
Інформація про гарантію
The AmScope SW-3T24Z Trinocular Stereo Microscope is covered by a 5-Year Manufacturer Warranty. This warranty covers defects in materials and workmanship under normal use. For specific terms and conditions, or to make a warranty claim, please contact AmScope customer support.
Підтримка
For technical assistance, troubleshooting, or inquiries regarding your AmScope SW-3T24Z Trinocular Stereo Microscope, please contact AmScope customer support. You can find contact information and additional resources on the official AmScope website. The manufacturer is United Scope LLC.