
1. Вступ
This manual provides instructions for the installation, operation, and maintenance of your Orbit 27954 Pocket Star 4-Station Plus Indoor Sprinkler Controller. This controller is designed to manage residential 24-volt sprinkler systems, offering dual programming capabilities and a rain delay feature.
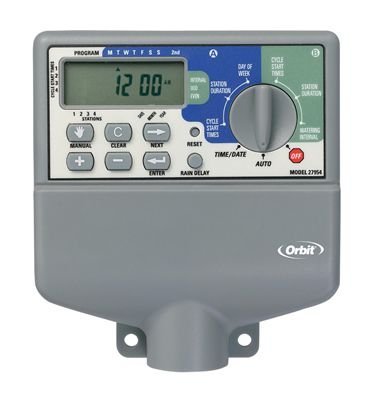
Image 1.1: The Orbit 27954 Pocket Star 4-Station Plus Indoor Sprinkler Controller. This image displays the front panel of the controller, featuring its digital display and control buttons.
2. Інформація про безпеку
Please read all instructions carefully before installation and operation. Failure to follow these instructions may result in property damage or personal injury.
- This controller is designed for indoor use only. Do not install outdoors or in areas exposed to water.
- Перед виконанням будь-яких проводних робіт або технічного обслуговування переконайтеся, що джерело живлення відключено.
- All electrical wiring should comply with local codes and regulations. If you are unsure, consult a qualified electrician.
- Не намагайтеся ремонтувати пристрій самостійно. Звертайтеся до кваліфікованого персоналу для проведення всіх робіт з обслуговування.
3. Налаштування
3.1 Розпакування
Carefully remove the controller from its packaging. Verify that all components are present. Retain packaging for future use or disposal.
3.2 Встановлення контролера
- Choose a suitable indoor location near a standard 120V AC outlet and away from direct sunlight or extreme temperatures.
- Use the provided mounting template (if applicable) or mark the desired screw locations on the wall.
- Install mounting screws into the wall, leaving the screw heads slightly extended.
- Hang the controller onto the screws using the keyhole slots on the back of the unit.
- Secure the controller by tightening the screws.
3.3 Електропроводка
Важливо: Перед підключенням відключіть живлення.
- Підключення живлення: Plug the controller's power cord into a standard 120V AC outlet.
- Valve Wiring: Connect one wire from each sprinkler valve to a numbered terminal (1, 2, 3, 4) on the controller. Connect the common wire from all valves to the terminal labeled 'C' (Common).
- Sensor Wiring (Optional): If using a rain sensor, connect its wires to the designated sensor terminals. Refer to your sensor's manual for specific wiring instructions.
3.4 Початкове ввімкнення
Once all wiring is complete and secure, connect the power cord to the electrical outlet. The controller display should illuminate, indicating it is powered on.
4. Інструкція з експлуатації
4.1 Розуміння дисплея та кнопок
The controller features a digital display and several buttons for navigation and programming. Familiarize yourself with the 'Program', 'Set', 'Arrow' (up/down), and 'Rain Delay' buttons.
4.2 Setting Current Time and Date
- Press the 'Set' button repeatedly until 'Set Time' appears on the display.
- Use the 'Arrow' buttons to adjust the hour, then press 'Set' to move to minutes.
- Repeat for minutes, AM/PM, year, month, and day.
4.3 Програмування графіків поливу
The controller supports dual programs (A and B) for flexible scheduling.
- Виберіть програму: Press the 'Program' button to select Program A or B.
- Встановити час початку: Press 'Set' until 'Start Time' appears. Use 'Arrow' buttons to set the desired start time for the first cycle. The controller supports multiple start times per program.
- Встановлення часу виконання: Press 'Set' until 'Run Time' appears. Use 'Arrow' buttons to set the duration (in minutes) for each station (1-4).
- Set Watering Days: Press 'Set' until 'Watering Days' appears. Use 'Arrow' buttons to select specific days of the week, odd/even days, or interval watering.
4.4 Ручне керування
To manually water a station or all stations:
- Press the 'Manual' button (if available, or follow specific manual run instructions in the display menu).
- Select the desired station or 'All Stations'.
- Set the run time using the 'Arrow' buttons.
- The selected station(s) will begin watering immediately.
4.5 Функція затримки дощу
The rain delay feature allows you to pause watering for a set period without losing your programmed schedule.
- Press the 'Rain Delay' button.
- Use the 'Arrow' buttons to select the delay duration (e.g., 24, 48, or 72 hours).
- The controller will pause watering for the selected period and resume the schedule automatically afterward.
5. Технічне обслуговування
5.1 Очищення
Протріть зовнішню частину контролера м’якою тканиноюamp тканиною. Не використовуйте абразивні засоби для чищення або розчинники, оскільки вони можуть пошкодити дисплей абоasing.
5.2 Seasonal Considerations
As an indoor controller, the unit is not directly exposed to outdoor elements. However, ensure the indoor environment remains within recommended operating temperatures to prolong its lifespan.
6. Вирішення проблем
| проблема | Можлива причина | Рішення |
|---|---|---|
| Дисплей контролера порожній. | Немає живлення. | Check power outlet, ensure power cord is securely plugged in. Verify circuit breaker. |
| Sprinklers do not turn on. | Incorrect programming, wiring issue, or rain sensor activated. | Verify watering schedule. Check valve wiring connections. Ensure rain sensor is not active or bypassed. |
| Only some sprinklers turn on. | Faulty valve, wiring issue to specific station. | Check wiring for the non-working station. Test the valve manually. |
| Watering occurs at incorrect times. | Incorrect time/date setting or program schedule. | Verify current time and date. Review and adjust program start times and watering days. |
7. Технічні характеристики
- модель: Orbit 27954 Pocket Star 4-Station Plus Indoor Controller
- Бренд: Орбіта
- Номер деталі: 27954
- Кількість станцій: 4
- томtage: 24 вольт (перемінний струм)
- Введення людського інтерфейсу: кнопки
- Потрібні батареї: немає
- Установка: закритий
- особливості: Dual program, Rain delay
- Розміри упаковки: 21.84 х 13.46 х 6.6 см
- вага: 226.8 г
8. Гарантія та підтримка
For warranty information or technical support, please refer to the official Orbit webсайт або зверніться до їхнього відділу обслуговування клієнтів. Зберігайте чек про покупку як підтвердження покупки.