
1. Вступ
This manual provides essential information for the proper setup, operation, and maintenance of your Coby DVD-527 5.1 Channel Progressive Scan DVD Player. Please read this manual thoroughly before using the device to ensure optimal performance and safety. The Coby DVD-527 features a super-slim design, 5.1 channel audio output, and progressive scan video output for enhanced picture quality on compatible televisions.
2. Інформація про безпеку
- Джерело живлення: Переконайтеся, що джерело живлення відповідає об’ємуtagвимоги, зазначені на пристрої.
- Вентиляція: Не блокуйте вентиляційні отвори. Забезпечте достатній простір навколо пристрою для належної циркуляції повітря, щоб запобігти перегріву.
- вологість: Не піддавайте пристрій впливу дощу, вологи або надмірної вологості.
- Прибирання: Unplug the unit from the power outlet before cleaning. Use a soft, dry cloth.
- Обслуговування: Не намагайтеся самостійно обслуговувати цей виріб. Зверніть усі послуги до кваліфікованого обслуговуючого персоналу.
3. Вміст упаковки
Перевірте наявність усіх елементів в упаковці:
- Coby DVD-527 DVD Player
- Повнофункціональний пульт дистанційного керування
- AV-кабель
- Посібник користувача (цей документ)
- Інформація про гарантію
4. Продукт закінчивсяview
The Coby DVD-527 DVD Player and its accompanying remote control are designed for ease of use and integration into your home entertainment system.
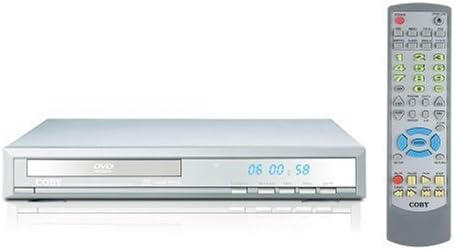
малюнок 1: Coby DVD-527 DVD Player (left) and its full-function remote control (right). The DVD player features a slim profile with a disc tray, display screen, and control buttons on the front panel. The remote control includes various buttons for playback, navigation, and special features.
Елементи керування передньої панелі
The front panel typically includes the disc tray, power button, play/pause, stop, and eject buttons, along with a digital display showing playback time or status.
Підключення задньої панелі
The rear panel houses various audio and video output ports for connecting to your television and audio system.
Пульт дистанційного керування
The included remote control provides full functionality for operating the DVD player from a distance, including power, playback controls, menu navigation, volume, and special features.
5. Налаштування
5.1 Підключення до телевізора
Choose one of the following video connection methods:
- Component Video Output (Progressive Scan): For the highest quality picture on HD-capable televisions, connect the Y, Pb, and Pr component video outputs from the DVD player to the corresponding inputs on your TV using component video cables.
- RCA Video Output: Connect the yellow RCA video output from the DVD player to the video input on your TV using an RCA video cable.
- Вихід S-Video: Connect the S-Video output from the DVD player to the S-Video input on your TV using an S-Video cable.
5.2 Підключення до аудіосистеми
Виберіть один із наведених нижче способів підключення аудіо:
- 5.1 Dolby Digital Output: For surround sound, connect the 5.1 channel audio outputs (Front Left, Front Right, Center, Surround Left, Surround Right, Subwoofer) from the DVD player to the corresponding inputs on your 5.1 channel receiver or ampліфірник.
- Коаксіальний цифровий аудіовихід: Connect the coaxial digital audio output from the DVD player to the coaxial digital audio input on your receiver or amplifier using a coaxial digital audio cable.
- Оптичний цифровий аудіовихід: Connect the optical digital audio output from the DVD player to the optical digital audio input on your receiver or amplifier using an optical digital audio cable.
- Аналоговий аудіовихід: Connect the red and white RCA analog audio outputs from the DVD player to the corresponding audio inputs on your TV or stereo system using an RCA audio cable.
5.3 Підключення живлення
After all audio and video connections are made, plug the DVD player's power cord into a standard AC power outlet.
6. Інструкція з експлуатації
6.1 Основи відтворення дисків
- Turn on your television and select the correct input source for the DVD player.
- Press the Power button on the DVD player or remote control to turn on the unit.
- Press the Eject button (▲) on the front panel or remote to open the disc tray.
- Place a compatible disc (DVD, CD, CD-R/RW, MP3) gently into the disc tray with the label side facing up.
- Press the Eject button (▲) again to close the disc tray. The player will begin reading the disc.
- Playback should start automatically. If a disc menu appears, use the navigation buttons on the remote to select your desired option and press Enter.
- Use the Play (▶), Pause (▐▐), Stop (■), Fast Forward (►►), and Rewind (◄◄) buttons on the remote for playback control.
6.2 Особливості
- Екранний дисплей: Press the OSD button on the remote to view playback information on your screen.
- Операція масштабування: Use the Zoom button to magnify a portion of the picture.
- множинний Viewкути нахилу: For discs that support it, press the Angle button to switch between different camera angles.
- Субтитри: Press the Subtitle button to select available subtitle languages.
- Parental Lock Control: Access the setup menu to configure parental control settings, restricting playback of certain content based on rating.
6.3 Налаштування системи
Press the Setup button on the remote to access the system menu. Here you can adjust video settings (e.g., aspect ratio, progressive scan mode), audio settings, language preferences, and parental control options. Refer to the on-screen menu for detailed navigation.
7. Технічне обслуговування
7.1 Очищення пристрою
Wipe the exterior of the DVD player with a soft, dry cloth. Do not use liquid cleaners or aerosol sprays, as they may damage the finish or internal components.
7.2 Догляд за диском
Тримайте диски за краї. Тримайте диски чистими та без подряпин. Зберігайте диски в футлярах, коли вони не використовуються, щоб запобігти пошкодженню від пилу та пошкодження.
8. Вирішення проблем
If you encounter problems with your DVD player, refer to the following common issues and solutions:
- Немає живлення:
• Ensure the power cord is securely plugged into both the DVD player and a working electrical outlet.
• Check if the power outlet is functional by plugging in another device. - Немає зображення:
• Verify that the video cables are correctly connected between the DVD player and the TV.
• Ensure your TV is set to the correct input source (e.g., AV1, Component, HDMI).
• Check the TV's picture settings. - Немає звуку:
• Confirm that audio cables are properly connected to your TV or audio system.
• Check the volume level on both the DVD player and your TV/audio system.
• Ensure your TV/audio system is set to the correct audio input.
• If using digital audio, verify the audio settings in the DVD player's setup menu. - Disc Not Playing / Disc Error:
• Ensure the disc is clean and free of scratches or smudges.
• Make sure the disc is inserted correctly with the label side facing up.
• Verify that the disc format is compatible with the player (DVD, CD, CD-R/RW, MP3). - Пульт дистанційного керування не працює:
• Check and replace the batteries in the remote control.
• Ensure there are no obstructions between the remote and the DVD player's sensor.
• Point the remote directly at the DVD player.
9. Технічні характеристики
| Модель | DVD-527 |
| Бренд | Кобі |
| Розміри (Ш x Г x В) | 11 x 10 x 2 дюйма (приблизно) |
| вага | 7 фунта (приблизно) |
| Media Type Compatibility | DVD, CD, CD-R/RW, MP3 |
| Відеовихід | Component Video (Y, Pb, Pr), RCA Video, S-Video |
| Аудіовихід | 5.1 Channel Dolby Digital, Coaxial Digital, Optical Digital, Analog RCA (L/R) |
| Особливості | Progressive Scan, Multiple Subtitles, Multiple Viewing Angles, On-Screen Display, Zoom Operation, Parental Lock Control |
| Сумісність відео | Система NTSC/PAL |
10. Гарантія та підтримка
This product is covered by a limited manufacturer's warranty. Please refer to the warranty information card included in your package for specific terms and conditions, including the warranty period and coverage details. Keep your purchase receipt as proof of purchase.
For technical assistance or customer support, please refer to the contact information provided in your warranty documentation or visit the official Coby website for the most current support resources.